
How to Future-Proof an Older Auckland Home Against Weather
Quick answer: Most Auckland homes — especially those built before the 1990s — have gutters, drainage systems, and building envelopes designed for normal NZ rainfall, not the extreme weather events the city has experienced since 2023. Addressing these gaps during your renovation is the most cost-effective protection you can give your home long-term.
27 January 2023. For a lot of Aucklanders, that date is now fixed in memory. In roughly 24 hours, Auckland received close to 300mm of rain — an entire summer’s worth, fallen in a single day, making it the wettest day on record across multiple Auckland weather stations. Then, barely a fortnight later, Cyclone Gabrielle swept through. By the time both events were done, New Zealand was counting NZ$14.5 billion in damage — the costliest tropical cyclone in the Southern Hemisphere’s recorded history. Over 48,000 insurance claims were lodged. Thirty-six thousand of those were for homes and contents, valued at around $565 million.
Most of that damage wasn’t inevitable.
What we’ve heard repeatedly from clients who came to us in the aftermath — and from those who called to ask “what should we be doing?” before the next one — is that a lot of Auckland homes simply weren’t equipped for that scale of rainfall. Not because they were badly built, necessarily, but because they were built for a different era. Pre-1990s homes across Henderson, Grey Lynn, Papakura, and West Auckland were designed using rainfall standards that assumed 10-year recurrence events. The reality since 2023 is that Auckland is experiencing those theoretical 50-year events back-to-back.
The clients asking us about weatherproofing aren’t panicking. They’re thinking ahead. And that’s exactly the right instinct. This guide covers the practical changes Auckland homeowners should make — or consider — when renovating. Gutter sizing and downpipe placement. Internal gutters. Foundation and perimeter drainage. Sealing eaves and gaps. Double glazing and heat pumps. Outdoor structures in wind-exposed areas. Some of these are simple. Others require more planning and budget. All of them make a measurable difference to how your home performs when the weather turns.
Sound familiar? You’ve been meaning to do something about the gutters that overflow every winter, or the damp corner near the front door, or the way the single-glazed windows run with condensation every time it rains. This is where all of it comes together.

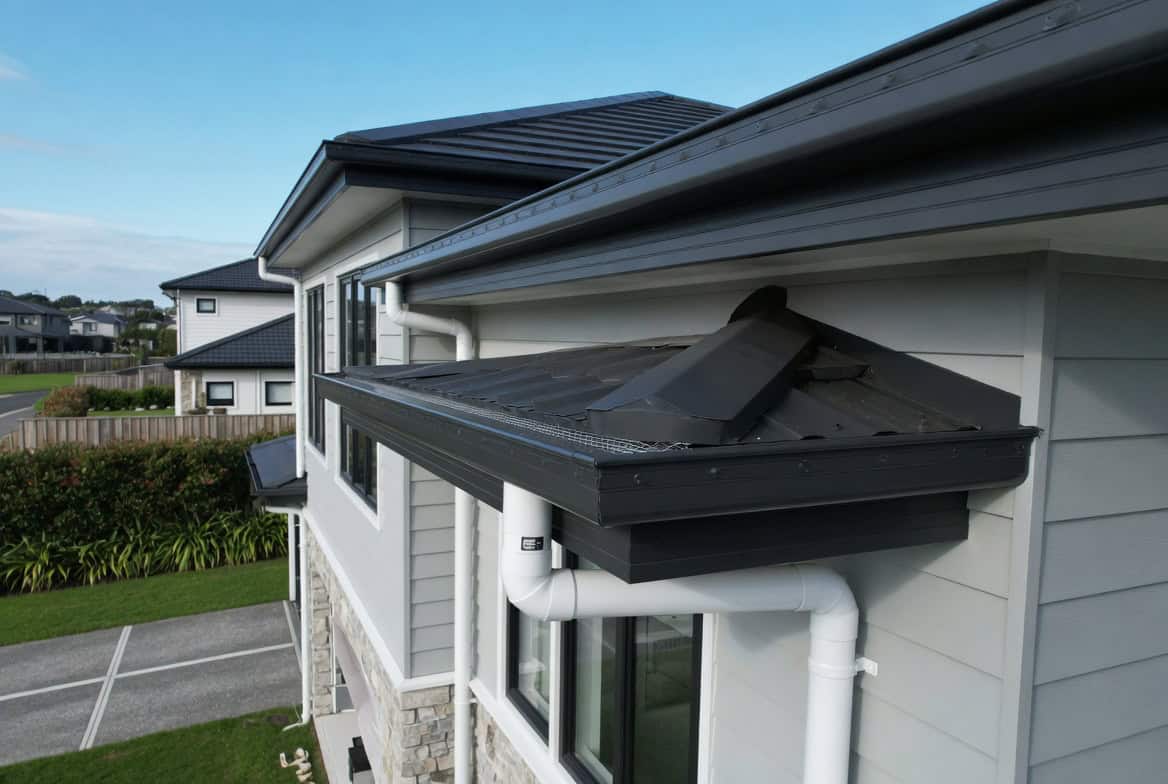
Your Gutters and Downpipes Are Probably Undersized for Modern Auckland Weather
Most Auckland homeowners don’t think about their gutters until they’re watching water cascade down the side of the house in a heavy downpour. By that point, the damage is already in progress — water pooling at the foundation, seeping into subfloor spaces, eroding the soil against the perimeter walls.
The core problem: gutter and downpipe systems on most older Auckland homes were sized using 10-year rainfall intensity figures. New Zealand Building Code clause E1 — the one governing roof drainage — uses those figures in its Acceptable Solution. But research by NZ Metal Roofing Manufacturers reveals a critical gap: rainfall measured over a one-minute period can be up to 4.4 times more intense than the same rainfall averaged over 10 minutes. The Building Code actually requires buildings to have no more than a 2% probability of flooding, which demands 50-year recurrence interval rainfall data — yet the E1 Acceptable Solution charts use 10-year data. That discrepancy is responsible for roughly 34% variation in how much rain a compliant gutter system is actually sized to handle.
If your home was built before the 2000s, there’s a real possibility your spouting system wasn’t designed for what Auckland now regularly delivers.
Too Few Downpipes in the Wrong Locations
One of the most common things we find during full home renovations is inadequate downpipe coverage. A typical 1970s brick-and-tile in Manurewa or Papakura might have one downpipe serving a long roof run — functional for a light shower, completely overwhelmed in heavy rain. The fix is often more straightforward than people expect.
Additional downpipes, positioned to break up long roof runs and placed at the lowest points where water accumulates, can dramatically improve how your spouting system performs. The NZ Metal Roofing Manufacturers’ Code of Practice recommends a minimum 1:200 fall (5mm per metre) for external gutters — meaning gutters should slope gently toward the downpipe so water flows rather than pools. Many older homes have inadequate fall, or gutters that have settled flat over time. Standing water in a gutter leads to overflow, premature rusting, and leaking at the joints.
When you’re replacing guttering as part of a renovation — or even if it’s a standalone job — a licensed roofer can assess the fall and downpipe positions at the same time as they’re cleaning or replacing the system. It costs very little extra to add a downpipe while the scaffold is up.
Gutter Guards — Worth It, But Choose Carefully
Gutter guards and hedgehog-style filters (sometimes called gutter whiskers) are worth considering for any home near mature trees. They reduce blockage frequency by stopping leaves and debris from entering the gutter. But there’s a catch. If silt builds up around the filter insert, it can actually impair water flow — making overflow more likely, not less. Regular inspection is still required even with a guard in place, particularly after storms.
The best-performing option for high-debris environments is a solid-top guard with a drip edge that allows leaves to blow off while water passes through. For homes near pohutukawa or pines — which drop needles as well as leaves — this matters more than it does for clear sections. Get advice from a licensed roofer before committing to a product. The right choice varies by roof pitch, nearby tree species, and gutter profile.
💡 Quick tip: If your gutters overflow in heavy rain, the most likely causes are a blockage, inadequate fall toward the downpipe, or too few downpipes — not that the gutters themselves are too small. Have a roofer assess before replacing everything. A diagnosis first saves money.
Internal Gutters — An Older Home’s Hidden Vulnerability
This one surprises a lot of Auckland homeowners. Many homes from the 1980s and early 1990s were built with internal gutters — drainage channels set within the roof structure, rather than hanging off the eaves. They look tidy from the street and were popular with the architects of the era. They are also, to use the industry’s own language, a known problem.
A survey of designers by NZ Metal Roofing Manufacturers found 58% had experienced problems with flooding internal gutters. Internal gutters designed to the E1 Acceptable Solution fail for the same reason external gutters do — they’re sized to 10-year rainfall data, not 50-year. When an internal gutter overflows, the water doesn’t cascade off the eaves. It goes inside the building — into the ceiling cavity, down the wall frames, and onto your floor.
Converting internal gutters to an external system used to cost $40,000 or more. NZ-manufactured systems have brought that cost down significantly, but it’s still a project requiring a Licensed Building Practitioner (LBP) and, for any structural modification, a building consent from Auckland Council. If your home has internal gutters and you’re planning a renovation, now is the time to have them assessed. The cost of fixing a failed internal gutter after water damage has occurred is always higher than the cost of converting it beforehand.
“When we’re working on a full home reno and the roof drainage hasn’t been touched in 30 years, I always flag it. Not because gutters are anyone’s idea of an exciting renovation — they’re not — but because we’ve seen what happens when they’re ignored. Water finds a way in, and once it does, you’re spending a lot more than you would have on a gutter upgrade.”
— Dorothy Li, Design Manager, Superior Renovations
What High Winds Do to Tile Roofs — and How to Check Yours Before the Next Cyclone
Auckland doesn’t get the sustained winds Wellington is famous for, but the gusts that came with Cyclone Gabrielle — up to 127 km/h in affected areas — were enough to lift, shift, and dislodge concrete and terracotta tiles across hundreds of properties. A heavy concrete tile does a great job of keeping water out when it’s sitting flat and correctly mortared. When it shifts, it creates a direct opening into your roof cavity.
If your home has a tile roof and you can’t remember the last time someone went up there to look at it properly, this section is worth reading carefully.
Ridge and Hip Mortar — The Most Exposed Point on Your Roof
The pointed mortar along the ridge (the peak of the roof) and the hips (the diagonal edges where two roof planes meet) takes the most exposure of any part of the roof. UV, thermal cycling, and the small movements a house makes over time cause it to crack and crumble over the years. Once the pointing is compromised, wind can get under the ridge capping and lift entire sections in a storm.
If your home is more than 15 years old and you can’t remember the last time the ridge and hip pointing was inspected, assume it needs attention. Caught early, re-pointing ridges and hips is a relatively affordable job — a tiler can often work through a standard single-level home in a day. Left for another five years, you’re looking at tiles off the roof in the next significant wind event, and the repair becomes a much larger conversation.
Valleys and Flashings — Where Water Gets In During Sustained Rain
Water follows the path of least resistance. On a tile roof, the most vulnerable points are always the valleys (where two roof planes meet and channel water to the eaves) and the flashings (metal strips at chimneys, skylights, parapets, and wall junctions). These are the points most likely to fail under sustained heavy rainfall or during high winds — and they’re often invisible from the ground until water appears on the ceiling below.
During any roof inspection — and ideally before committing to a renovation budget — ask a licensed roofer to check that valley trays are clear of debris and not corroded, that flashings are sealed and not lifting at their edges, that ridge and hip capping is firmly mortared with no visible gaps, and that no individual tiles are cracked, shifted, or sitting proud of the surrounding surface.
A professional roof inspection in Auckland typically costs $200–$500. For context, a single failed valley tray that allows water ingress over an Auckland winter can cause ceiling, insulation, framing, and GIB board damage that easily runs $5,000–$15,000 to repair properly. The inspection is cheap insurance.
💡 Quick tip: Do your roof inspection before your renovation starts — not after. Problems found early can often be incorporated into the build, saving on mobilisation costs. A roofer visiting for an inspection costs far less than a roofer returning for a separate visit later.
Metal Roofs and Wind Uplift
If your home has a Colorsteel or other metal roof — common on newer Hobsonville, Flat Bush, and Millwater builds, and on renovated homes where tile has been replaced — wind uplift at the fixings is the main thing to check. Sheet metal roofing held by screws into purlins can be lifted if the screws are through-fastened into degraded timber, or if the screw pattern doesn’t meet current wind loading requirements for your site.
Coastal properties in West Harbour, Muriwai, and around the North Shore require particular attention here, as salt exposure degrades metal fixings faster than inland sites. If you’re in a coastal location and the roof was installed more than 10 years ago, a fixings check by a licensed roofer is worth adding to your renovation preparation list.
“The 2023 floods and cyclone were a real wake-up call for a lot of Auckland clients. The homes that had the most damage weren’t necessarily old or poorly built — they were homes where the small maintenance jobs had been put off year after year. A cracked valley tray, a lifting flashing, a few shifted tiles. None of those things are dramatic on a dry Tuesday. In a cyclone, they’re catastrophic.”
— Eunice Qin, Designer, Superior Renovations
Water at the Foundation — the Drainage Problem Most Auckland Homeowners Don’t See Coming
Here’s something that doesn’t get enough attention: Auckland’s soils are predominantly clay-based. Clay holds water. When 300mm falls in a day, clay-heavy ground around a house can become fully saturated within hours — and saturated clay pushes water sideways. Straight against your foundations.
Homes built before 1980 in Auckland — particularly those on uneven contoured sites across the isthmus, South Auckland, and West Auckland — were often built without subsoil drainage at all. It simply wasn’t standard practice. Groundwater that would be intercepted and redirected on a modern build just sits against the foundation, seeps through concrete block or stone, and slowly makes its way into subfloor spaces and lower rooms.
We had a client in Henderson with consistent flooding in their ground floor garage every winter — water seeping through the concrete block wall after heavy rain. The existing drainage system was original to the house. Thirty years old. We installed a perimeter subsoil drain around the garage, added a waterproofing membrane to the exterior wall, and the problem was gone. Straightforward in execution. Worth doing much, much earlier.
French Drains and Perimeter Drainage — What They Actually Do
A French drain — also called a subsoil drain or perimeter drain — is a trench dug around your home’s foundation, filled with gravel and a perforated pipe wrapped in geotextile fabric. Water from saturated soil flows into the pipe before it can reach the foundation, and gravity carries it to a discharge point — typically the street stormwater drain or an approved outfall.
Nobody puts subsoil drainage on Instagram. It’s invisible once installed. But for Auckland homes on clay-heavy sites — which includes most of Grey Lynn, Epsom, Mt Eden, Remuera, and large portions of West Auckland — a perimeter drain is one of the highest-value things you can add during a renovation. It’s most cost-effective when installed during works that already involve excavation, since trenching is the main cost driver. Adding it to a landscaping scope or a house extension project costs far less than doing it as a standalone job later.
Auckland’s clay soils also mean that any site with ground sloping toward the house — common on older hillside sections in Titirangi, Hillsborough, and the western isthmus — is at higher risk of water running toward the foundation after heavy rain. If this describes your site, a drainage assessment before your renovation starts is time well spent.
Grading the Ground Away from the House
This is basic and consistently overlooked. The ground immediately around your home should slope away from the foundation at a minimum 1:20 fall — 50mm of drop for every metre out from the building — for at least 1.5 metres. On many older Auckland sections, gardens have been built up against the house over decades, concrete paths have settled flat, and soil has accumulated at the base of the wall. Water now pools at the foundation rather than running away from it.
When you’re landscaping during a renovation, correcting the ground grade costs very little. When a building has been sitting in a wet zone for years, you’re looking at foundation repairs, framing replacement, and sometimes re-piling. The comparison isn’t subtle.
Subfloor Moisture and Ground Moisture Barriers
Many older Auckland homes — the timber-framed villas and bungalows in Grey Lynn, Ponsonby, and Kingsland, and plenty of 1950s and 1960s homes further south — sit on piles with an open or semi-enclosed subfloor. If there’s no ground moisture barrier (a polythene sheet on the subfloor ground), rising damp is a persistent and often invisible problem.
New Zealand’s Healthy Homes Standards require ground moisture barriers in rental properties with enclosed subfloor spaces — but owner-occupiers in the same situation get no such mandate. A 0.25mm polythene sheet across the subfloor area dramatically reduces moisture rising from the soil into the floor structure. Combined with adequate subfloor ventilation, this addresses most damp subfloor problems. It’s not glamorous work, but it costs a fraction of replacing rotted floor framing later.
💡 Quick tip: A musty smell at floor level in a timber-framed Auckland home, or mould on skirting boards and lower walls in winter, almost always points to groundwater or rising damp — not a ventilation issue. A subfloor inspection is the first step, and it usually costs nothing to check.
Eaves, Cladding, and Gaps — Where Wind-Driven Rain Gets Into Your Home
During the 2023 Auckland floods, a significant portion of the interior damage to homes wasn’t from rising water. It was from wind-driven rain forcing its way through the building envelope — around windows, through gaps in weatherboards, via deteriorated eaves soffits, and through cladding flashings that hadn’t been touched since the house was built.
Old NZ homes were not built airtight. Pre-war villas and bungalows used single-skin construction with limited air sealing. Homes from the 1980s and early 1990s frequently have rubber window seals that have hardened and cracked with age. When you add winds driving rain horizontally against a wall, water finds every gap — and in older homes, there are more gaps than most owners realise.
Eaves and Soffits — the Part Nobody Looks At
The soffit boards (the horizontal boards under the eaves overhang) are a key line of defence against horizontal rain. On many older Auckland homes, these boards have gaps at the wall junction, open joints between boards, or unsealed penetrations where plumbing or cables pass through. During a sustained wind-rain event, these gaps allow water to enter the wall cavity from above — where it’s hardest to detect and hardest to repair.
Check your soffits from both inside and outside. Look for daylight showing through at wall junctions. Look for water staining on ceiling boards near the eaves. Any gap should be sealed with a flexible, paintable sealant. If the soffit boards themselves are deteriorated — soft, delaminating, or heavily stained — replace them. James Hardie VL Board (fibre cement) is a low-maintenance, dimensionally stable material that handles NZ weather far better than the compressed sheet products common in 1970s and 1980s homes.
Window and Door Seals — First to Degrade, Last to Be Replaced
Rubber window seals have a finite lifespan. Most aluminium joinery from the 1990s and early 2000s has original seals that are now 20–30 years old. That rubber has hardened, cracked, and often shrunk away from the frame. In horizontal rain, a compromised window seal lets in far more water than most homeowners realise — often into the wall cavity in places that aren’t obvious until there’s visible damage inside.
During a renovation, replacing window seals is a low-cost job with outsized value. Ask your builder to check the condition of all seals and flashings around windows and doors at the assessment stage. If any window is being touched during the renovation — because a new internal lining is going in, or new cladding is being installed around it — replace the seal and re-flash it at the same time. Mobilisation cost for a second visit to do it later is always higher than doing it while the builder is already there.
Cladding Flashings and the Leaky Building Era
Where cladding meets windows, doors, ground level, decks, and any penetration (pipes, cables, vents), a flashing is required to shed water away from the building. Old or poorly detailed flashings — particularly on homes built during the leaky building era (mid-1990s to mid-2000s) — are among the most common causes of ongoing water ingress in Auckland.
If your home is from this period and hasn’t had a weathertightness assessment, doing so before or during your renovation is worth the investment. A LIM report from Auckland Council will flag any weather-tightness history on record, and a licensed building inspector can identify problem areas before they become structural failures. If recladding is on your radar, our home renovation services page covers what’s involved and what to expect from the process.
💡 Quick tip: If you notice paint bubbling, soft GIB board near a window frame, or a damp smell adjacent to an exterior wall — don’t paint over it. Get a moisture reading taken first. These are signs of water in the wall cavity, and covering them delays the diagnosis while the damage continues.
Double Glazing and Heat Pumps — Staying Dry, Warm, and Cool Through Auckland’s Variable Weather
Most people think of double glazing as a comfort upgrade. It is. But it’s also a weatherproofing decision — and that distinction changes how you think about the priority and timing.
Single-glazed windows are cold. Cold glass surfaces attract moisture from warm interior air, which condenses on the pane and runs down into the timber sill below. Over years, that condensation causes timber rot, promotes mould growth on adjacent walls, and creates a cycle of damp that’s genuinely hard to break without addressing the root cause. According to EECA, up to 40% of a home’s heat loss occurs through single-glazed windows. That heat loss is also moisture vulnerability — because a home that can’t hold warmth has larger temperature swings, and larger temperature swings create more condensation.
When you upgrade to double glazing, the inner pane stays closer to room temperature. Condensation reduces substantially. Mould risk drops. And the home holds temperature far better, which matters specifically for Auckland — where weather can shift from a humid 26°C afternoon to a wet 10°C evening between lunch and dinner.
What Double Glazing Costs and What to Expect
Full window replacement to double glazing — new frames, new insulated glass units — is a significant investment. Installation costs for the glazing work itself typically range from $2,400 to $6,000 depending on window count, size, and complexity, with glass unit and frame costs additional. A typical three-bedroom Auckland home with 10–15 windows and 2 doors can expect the total project cost to be substantial — use our double glazing cost calculator to get an indicative figure for your specific home before you start getting quotes.
Retrofit double glazing — replacing the glass only within existing aluminium frames — is a more cost-effective entry point for older homes where the joinery itself is in good condition. Low-E glass with argon fill delivers better performance than standard clear glass: EECA data shows well-insulated homes including quality double glazing can save up to $340 per year on power bills. For an Auckland home, payback through energy savings alone is typically 8–12 years, with additional long-term value from reduced maintenance costs associated with moisture damage.
If you’re renovating a kitchen or bathroom, ask whether any adjacent windows should be addressed at the same time. Getting glazing work done while builders are already on site removes one mobilisation cost and simplifies the sequencing.
Pairing Double Glazing with a Heat Pump
A heat pump and double glazing work together. On their own, each delivers real improvement. Together, they change how a home actually feels — and how it performs through a full Auckland winter.
A heat pump in the main living area maintains consistent temperature, which reduces the humidity swings that drive condensation and mould. Combined with double glazing that retains warmth in winter and blocks solar heat gain in summer, you end up with a home that stays genuinely comfortable year-round — not just comfortable when the weather cooperates.
EECA’s Warmer Kiwi Homes programme offers eligible homeowners up to 90% off the cost of a heat pump installation, with the grant capped at $3,450. If you own a pre-2008 home and hold a Community Services Card or SuperGold Combo Card, or live in a qualifying low-to-middle-income area, eligible homeowners typically pay just $400–$700 out of pocket after the grant is applied. Check your eligibility at eeca.govt.nz before budgeting for this component of your renovation.
Important note: From 9 January 2026, EECA’s Warmer Kiwi Homes programme no longer accepts new applications for wood or pellet burner grants. Heat pumps are now the primary funded heating option under the scheme. If you were planning on a wood burner as part of your renovation heating strategy, check the EECA website for current grant status.
“On a lot of the kitchen renovations I work on, the windows haven’t been touched in 20 or 30 years. Single glazing, degraded rubber seals, timber sills that are soft from years of condensation. We do the kitchen properly, but the window is still losing heat and creating damp. Addressing the glazing at the same time as the renovation just makes sense — you’re already in the walls, the builder’s already there.”
— Alison Yu, Designer, Superior Renovations
💡 Quick tip: When pairing a heat pump with a double glazing upgrade, size the heat pump for the room after the glazing is installed — a well-insulated room requires a smaller unit, which runs more efficiently and costs less over time. A heat pump sized for a draughty single-glazed room will be oversized and inefficient once the glazing is in.

Outdoor Structures, Flood-Proof Entries, and Getting Stormwater Away from Your Home
The outdoor environment around your home is the first place water encounters your property. What happens to rainfall when it hits your paths, your driveway, your lawn, and the areas around your doorways directly determines whether your interior stays dry. And if you have a pergola, deck, or carport — what happens to those structures when 127 km/h gusts arrive matters too.
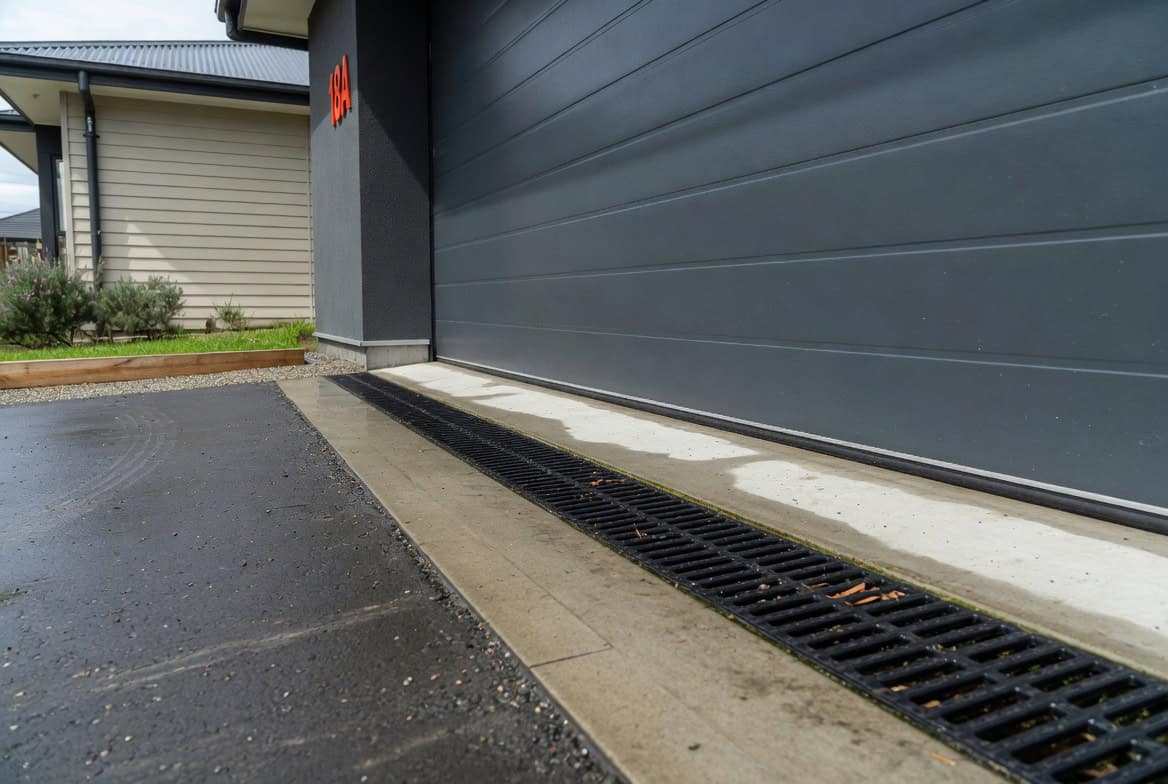
Diverting Water Away from Entrances and Doorways
In the 2023 Auckland floods, a significant number of homes had water entering through front doors and covered entryways. Not because the doors weren’t watertight, but because surface water accumulated on paths, decks, and driveways and had nowhere to go except under the threshold. The solution is twofold: slope and a drainage channel.
Any hardscaped surface adjacent to a door should slope away from the threshold, with a channel drain (slot drain) installed at the entry if the slope can’t be improved enough to divert water clear of the doorway. Slot drains are straightforward to install during landscaping works and highly effective at intercepting surface runoff before it reaches a door. For steeply sloping driveways, a full-width channel drain at the base — directing water to the street stormwater system — is often the right call.
Permeable paving is worth considering if you’re resurfacing a driveway or path as part of your renovation. Rather than sending all runoff to the street drain at once, permeable paving allows water to soak through the surface into a prepared subbase — reducing the peak volume of surface runoff during heavy rainfall. On a heavily paved section, this can make a meaningful difference to how quickly your site drains after a downpour.
Pergola and Outdoor Structure Strength in High-Wind Exposed Locations
If you’re planning a pergola or deck as part of your renovation, Cyclone Gabrielle made one thing very clear: structural adequacy in high-wind conditions is not optional, and it’s not something to sort out after the structure is built.
Under Schedule 1 of the Building Act 2004, many residential pergolas under 20m² are consent-exempt. But consent-exempt does not mean engineering-free — the NZ Building Code still requires any structure to be fit for purpose, and that requirement applies regardless of whether consent was needed. For pergolas in wind-exposed locations — coastal properties in West Harbour, Muriwai, Takapuna, Hobsonville Point, or elevated sections anywhere in Auckland — discuss wind loading requirements with your builder or a structural engineer before settling on a design.
A poorly anchored freestanding pergola in a cyclone doesn’t just get damaged. It becomes a hazard to adjacent property and people. This is not a hypothetical. The 2023 events produced footage of outdoor structures across Auckland doing exactly that.
For attached pergolas and covered outdoor areas, the connection to the house structure is the most critical point. An attached pergola that pulls away from the wall under wind uplift — because the fixings weren’t adequate — damages both the pergola and the cladding behind it. Make sure your builder specifies fixings appropriate for your site’s wind zone. Most of Auckland is classified as a medium wind zone, but exposed coastal and elevated sites may require engineering to a higher wind classification. Our landscaping and outdoor renovations page has more on what’s involved.
Landscaping for Stormwater Management
Smart landscaping isn’t just about how your section looks. During heavy rain, it determines how much water accumulates around your home versus how much flows away. Deep-rooted plants, swales (shallow grassed channels that direct surface runoff), rain gardens, and retention areas can all reduce the volume and speed of stormwater running toward your house during a storm.
For sections where Auckland Council’s stormwater system is the downstream discharge point, check that you’re not directing water in ways that overload your connection point. Auckland Council provides guidance on stormwater management for residential properties at aucklandcouncil.govt.nz.
💡 Quick tip: For any freestanding pergola on an exposed site, ask your builder for the specific post anchor and footing specification before you sign off on the design. The footing depth, anchor type, and bracket specification vary with wind zone — and getting it right upfront costs nothing extra compared to retrofitting a compliant anchor system after the structure is built.
Putting It All Together — What to Prioritise When Renovating
The homes that came through the 2023 Auckland floods and Cyclone Gabrielle in the best condition weren’t necessarily the newest. They were the ones where someone had thought carefully about water — where it comes from, where it goes, and what happens when more of it arrives than the original design anticipated.
That’s what weatherproofing really is. Not a single product or a single trade. It’s a series of considered decisions made at the right point in a renovation project. And the right point is always earlier than most homeowners expect.
If you’re planning a full home renovation in Auckland, these are the conversations to have at the design stage — with your renovation company and, where structural drainage or subsoil works are involved, your engineer. The work is almost always cheaper when it’s planned in from the start than when it’s retrofitted later as a separate project.
If you’re only doing a kitchen or bathroom this year, it’s still worth asking: are there any of these issues that could be cost-effectively addressed while the trades are already on site? The answer is usually yes.
➡ Book your free in-home consultation with Superior Renovations
➡ Learn more about full home renovation services in Auckland
➡ Request a free feasibility report for your renovation project
What are the most important weatherproofing upgrades for an older Auckland home?
For most pre-1990s Auckland homes, the priority upgrades are: (1) assessing and resizing gutter and downpipe systems for 50-year rainfall events rather than the 10-year standard used in older construction; (2) installing perimeter subsoil drainage if none exists, particularly on clay-heavy sites; (3) checking and repointing ridge and hip mortar on tile roofs; (4) sealing eaves gaps and replacing degraded window seals; and (5) upgrading to double glazing to reduce condensation and moisture risk. These often cost far less when done during a broader renovation than as standalone projects.
How do I know if my gutters and downpipes are undersized?
The most obvious sign is water overflowing from the gutters during heavy rain — but overflowing can also be caused by blockages or insufficient fall, not just undersizing. Have a licensed roofer assess gutter fall, downpipe positions, and the number of downpipes serving each roof section. NZ Metal Roofing Manufacturers recommend using 50-year rainfall recurrence data for sizing — the older E1/AS1 Acceptable Solution used 10-year figures, which can result in systems undersized for today's Auckland weather events.
What are internal gutters and why are they a problem in NZ homes?
Internal gutters are drainage channels built within the roof structure — set inside the building envelope rather than hanging off the eaves. They were common in NZ homes built in the 1980s and early 1990s. The problem is that they're sized to older, less conservative rainfall standards and, when they overflow, water goes into the ceiling and walls rather than off the eaves. A survey by NZ Metal Roofing Manufacturers found 58% of designers had experienced flooding internal gutters. Conversion to external gutters is the recommended fix — previously $40,000+, but now more affordable with NZ-manufactured conversion systems.
Do I need building consent for weatherproofing work in Auckland?
It depends on the scope. Maintenance work — replacing gutter systems, repointing ridge mortar, installing ground moisture barriers — is generally consent-exempt under Schedule 1 of the Building Act 2004. But any structural modifications, including converting internal gutters where roof structure is altered, installing major drainage systems connecting to public stormwater, or foundation waterproofing that involves excavation below the building, may require consent from Auckland Council. Work must always be done by a Licensed Building Practitioner (LBP) where LBP work is involved. When in doubt, check with Auckland Council's building consent team or your renovation company.
How much does it cost to add a French drain or perimeter drain in Auckland?
The cost of a French drain or perimeter subsoil drain in Auckland varies significantly based on the length of the perimeter, site access, soil conditions, and the discharge point available. A simple perimeter drain on one side of a house might start from $2,000–$5,000 installed. A full perimeter drain around a larger home with difficult access or significant excavation depth can cost considerably more. The most cost-effective time to install one is during a renovation that already involves landscaping or excavation works — where the trenching equipment is already on site.
How do double glazing and heat pumps help with weatherproofing?
Double glazing reduces condensation by keeping the inner pane close to room temperature — warm indoor air no longer contacts a cold glass surface, so moisture doesn't condense and run into window sills and frames. This directly reduces timber rot and mould risk. A heat pump maintains consistent interior temperature, which further reduces humidity swings that drive condensation. Together, they create a home that stays drier internally, which complements the external weatherproofing work done on gutters, drainage, and sealing. EECA notes up to 40% of heat loss in single-glazed homes occurs through windows.
What should I check on a tile roof before Auckland's winter?
Before winter, a licensed roofer should check: ridge and hip mortar for cracking or missing sections; valley trays for debris blockage and corrosion; flashings around chimneys, skylights, and wall junctions for lifting or failing seals; individual tiles for cracking, shifting, or loose positioning; and gutters for adequate fall and blockage. A professional roof inspection in Auckland typically costs $200–$500. Finding and fixing a failed valley tray or loose ridge cap before winter costs far less than repairing ceiling and wall damage caused by water ingress during a storm.
How can I prevent water entering through my front door or garage in heavy rain?
The most effective approaches are: (1) ensuring the hardscaped surface in front of the door slopes away from the threshold; (2) installing a slot drain or channel drain at the door entry to intercept surface runoff before it reaches the threshold; (3) checking that the door seal is in good condition and replacing it if degraded; and (4) for driveways that slope toward a garage, installing a full-width channel drain at the base of the driveway to redirect water to the stormwater system before it reaches the garage door. These are relatively affordable fixes during a landscaping or renovation project.
What is the Warmer Kiwi Homes grant and how does it apply to weatherproofing?
The Warmer Kiwi Homes programme, administered by EECA, offers eligible homeowners up to 90% of the cost of ceiling and underfloor insulation, and up to 90% of the cost of a heat pump (capped at $3,450). Eligible homeowners typically pay $400–$700 out of pocket for a heat pump after the grant. To qualify, you must own and live in a pre-2008 home and meet income or Community Services Card criteria. The grant does not currently cover double glazing, but banks including ANZ, BNZ, and ASB offer green home loans for glazing and insulation upgrades. Check eligibility at eeca.govt.nz.
Are pergolas and outdoor structures safe in high-wind conditions?
A properly designed and anchored pergola — built to NZ Building Code requirements for the site's wind zone — is designed to be safe. The issues arise with structures that are consent-exempt (under 20m²) but are not engineered for wind loading, or where post anchors and footings are insufficient for the site's exposure. Auckland is generally a medium wind zone, but coastal and elevated sites may require engineering to a higher wind classification. Always ask your builder for the footing and anchor specification before the structure is built — particularly for freestanding pergolas on exposed sections near the coast or on elevated sites.
How do I protect my Auckland home's foundation from water damage?
The key steps are: (1) ensure the ground around the house slopes away from the foundation at a minimum 1:20 fall for at least 1.5 metres; (2) install perimeter subsoil drainage (French drain) if none exists, particularly on clay-heavy sites common across Auckland; (3) apply a waterproofing membrane to exterior foundation walls where ground level is close to or above internal floor level; and (4) install a ground moisture barrier (polythene sheeting) in enclosed subfloor spaces to prevent rising damp. These are best addressed during a renovation when excavation or landscaping works are already underway.
Further Resources for your home weatherproofing and renovation
- Featured projects and client stories to see specifications on some of our renovation projects
- Real client stories from Auckland homeowners who’ve been through full home renovations
- Use our double glazing cost calculator to estimate glazing upgrade costs for your home
- Visit EECA’s Warmer Kiwi Homes page to check eligibility for insulation and heat pump grants
- Auckland Council building consent guidance at aucklandcouncil.govt.nz
需要更多信息?
利用我们的免费《房屋翻新完整指南》(48 页),无论您是已经开始翻新还是正在决定翻新,这都不是一个简单的过程,本指南包括一份免费的 100 多点检查清单--将帮助您避免代价高昂的错误。
还有问题没有解答?
Book a no-obligation consultation with the team at Superior Renovations,
we’d love to meet you to discuss your renovation ideas!
Or call us on 0800 199 888

您是否一直在拖延装修?
我们与 Q Mastercard ® 合作,为您提供 18 个月免息付款选择,让您现在就可以享受新家,减轻压力。
了解更多 免息付款选择*
*Lending criteria, fees, terms and conditions apply. Mastercard is a registered trademark and the circles design is a trademark of Mastercard International Incorporated.


0 条评论
写评论