
How to Choose the Right Bathroom Tiles for Your Auckland Renovation
The tiles you pick will set the mood, the maintenance schedule, and the budget for your entire bathroom renovation. For an average Auckland bathroom (around 5–8 m²), you’re looking at anywhere from $2,500 to $8,000+ on tiles and installation — so getting the material, size, colour, and layout right the first time matters more than most homeowners realise. Here’s what we’ve learnt after completing hundreds of bathroom renovations across Auckland.
Tile Materials — What Actually Works in a NZ Bathroom
Not all tiles handle moisture the same way. In a humid Auckland bathroom, the single most important property of any tile is its water absorption rate — and porcelain wins that fight.
Here’s how the main options stack up for the NZ market:
Porcelain tiles ($60–$150 per m²) are the workhorse of Auckland bathrooms. They’re fired at higher temperatures than ceramic, which makes them denser and far less porous — typically under 0.5% water absorption. That matters in a city where humidity sits high for most of the year. Porcelain works on both floors and walls, handles underfloor heating well, and comes in everything from stone-look finishes to polished concrete effects. Most of the bathrooms we complete across the North Shore and central Auckland use porcelain as the base.
Ceramic tiles ($35–$80 per m²) are the budget-friendly option. They’re lighter, easier to cut, and perfectly fine for walls. But ceramic absorbs more water than porcelain, so we generally don’t recommend ceramic for bathroom floors in wet zones — particularly in shower areas. If you’re watching costs, a common approach is ceramic on the walls with porcelain on the floor.
Natural stone tiles ($120–$250+ per m²) — marble, travertine, limestone — bring a premium feel that’s hard to replicate with porcelain look-alikes. The trade-off? Stone is porous and needs regular sealing, typically every 12–18 months. A marble shower wall in a Remuera ensuite looks stunning, but it demands more upkeep than most families want to deal with in a main bathroom.
Mosaic tiles ($40–$150 per m²) are small-format tiles (usually 20–50 mm) that come pre-mounted on mesh sheets. They’re ideal for shower niches, feature strips, and curved surfaces. The catch is labour cost — mosaics take significantly longer to install, and the grout lines add up fast. Budget an extra 20–40% on installation for any mosaic work.
Size and Layout — How Tile Format Changes Your Bathroom
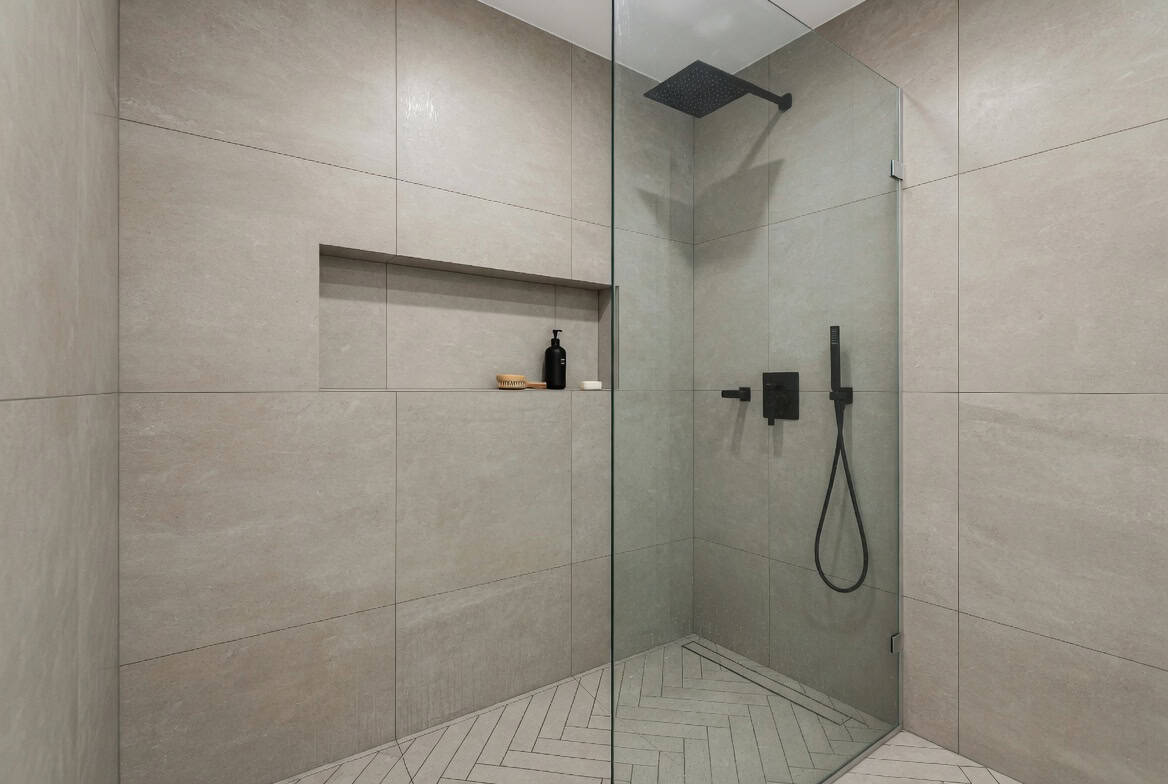
Tile size does more heavy lifting than most people expect. Large-format tiles (600×600 mm or bigger) are dominating Auckland bathroom renovations right now — and for good reason. Fewer grout lines mean less visual clutter, easier cleaning, and a sense of space that smaller tiles can’t match in a compact room.
That said, large tiles aren’t always straightforward. They need a perfectly level substrate, which can mean additional floor preparation — especially in older Auckland homes where timber subfloors have settled over decades. A 1960s bungalow in Mt Eden with an uneven bathroom floor will need screeding before any 600×1200 tile goes down. That’s an extra cost, but skipping it leads to lippage (uneven tile edges) that looks amateur and creates trip hazards.
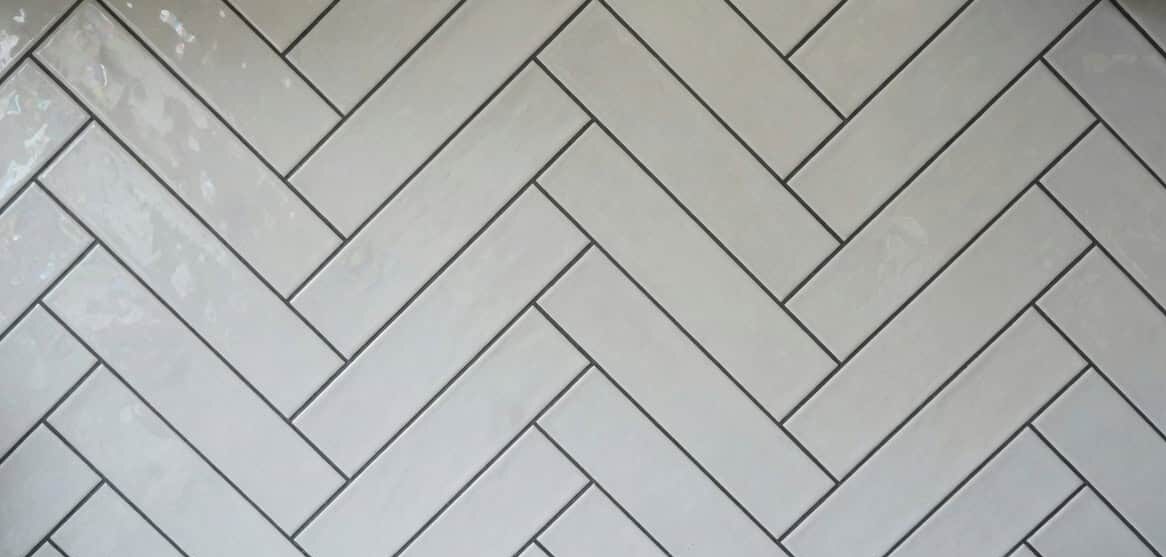
Smaller tiles (300×300 or smaller) still make sense in certain situations. They’re easier to grade toward a floor waste in a walk-in shower, they handle curved walls better, and they give you more design flexibility. A herringbone pattern in a small-format subway tile can add real character to a compact powder room without making the space feel smaller.
Common layout patterns we see across our Auckland projects:
Stacked (grid): Clean, modern, minimal grout visibility. Works well with large format.
Brick bond (offset): The classic subway tile layout. Softens the grid and hides slight size variations between tiles.
Herringbone: High visual impact, premium feel — but expect 20–30% more labour time and 10–15% more tile waste from all the angled cuts.
Vertical stack: Increasingly popular in 2026. Stacking rectangular tiles vertically draws the eye up and makes low ceilings feel taller.
Colour and Tone — What’s Working in NZ Bathrooms Right Now
Warm neutrals have taken over from the cool grey palette that dominated Auckland bathrooms for the past five years. We’re seeing soft whites, sand tones, warm beige, and greige (grey-beige) across the majority of our 2025 and 2026 projects. These tones work well with the timber vanities, brushed brass tapware, and natural light that Kiwi homeowners are gravitating toward.
Dark tiles aren’t dead — a charcoal or deep green feature wall still makes a strong statement in a well-lit space. But going full dark in a small bathroom without good natural light is a risky move. It can make the room feel smaller and every water spot, soap residue mark, and dust particle becomes visible. If you want drama without the maintenance headache, keep dark tiles to a single feature wall or the shower niche and let lighter tones carry the rest of the room.
One trend that’s sticking around: tonal variation within a single colour family. Rather than uniform flat colour, tiles with subtle veining, texture shifts, or matte-to-satin variation add depth without competing with your fixtures. It’s the difference between a bathroom that photographs well and one that actually feels good to stand in.
Waterproofing Comes Before Tiles — And It’s Non-Negotiable
This is the section most tiling guides skip. Under NZ Building Code Clause E3, every bathroom wet area must be waterproofed with an approved membrane system before any tile goes on. That’s not optional — it’s a legal requirement, and getting it wrong is one of the most expensive mistakes you can make in a renovation.
The waterproofing membrane goes over the substrate (the surface behind your tiles — typically gib or cement board) and must extend:
— At least 1,800 mm above the finished floor level in shower areas (or to the ceiling if the shower rose is mounted high)
— A minimum of 150 mm above the finished floor level around the rest of the bathroom
— Across the entire floor area with sealed junctions at every wall-floor corner
The membrane must meet AS/NZS 4858 (Wet Area Membranes) standards, and the WMAI Code of Practice for Internal Wet-Area Membrane Systems sets out exactly how it should be applied. Corners need reinforcement tape. Pipe penetrations need specific detailing. None of this is DIY territory.
Why does this matter for your tile choice? Because the tile and adhesive system has to be compatible with the membrane underneath. Some natural stone tiles require specific adhesives that may not bond well with certain membrane products. Your renovation company or tiler should be specifying the full system — membrane, adhesive, tile, and grout — as a compatible package, not mixing and matching from different suppliers.
Floor Tiles vs Wall Tiles — They’re Not Interchangeable
You can use floor tiles on walls, but you should never use wall-only tiles on a bathroom floor. The difference comes down to three things: slip resistance, thickness, and load tolerance.
Floor tiles need a slip-resistant surface. In NZ, this is measured by the P-rating (pendulum test) system. For a residential bathroom floor, you want a minimum P3 rating — ideally P4 if anyone in the household has mobility concerns. Matte and textured finishes naturally offer better grip than polished or gloss tiles. That’s one reason textured stone-look porcelain is so popular right now — it looks premium and performs well underfoot when wet.
Falls in the bathroom are a serious issue in New Zealand. ACC data shows 236,923 new claims for fall-related injuries from people aged 60 and over in 2023 alone, and bathrooms are one of the highest-risk areas in the home. Tile choice plays a direct role in reducing that risk.
Wall tiles can be thinner, lighter, and glossier because they don’t bear weight or get walked on wet. This is actually an advantage — lighter tiles are easier to adhere to vertical surfaces and less likely to slump during installation. If you find a gorgeous polished marble-look tile, it’s probably better suited to your walls than your floor.
What Bathroom Tiling Actually Costs in Auckland
For a standard Auckland bathroom (around 5–8 m² of floor and 15–25 m² of wall tiling), total tiling costs typically land between $4,000 and $12,000+ including tiles, waterproofing, adhesive, grout, and labour. That’s a wide range, so here’s what drives it up or down:
Tile cost: The biggest variable. Budget ceramic at $35/m² vs premium natural stone at $250+/m² creates a massive gap before labour even enters the picture.
Layout complexity: A straight stacked grid is the fastest to install. Herringbone, diagonal, or mixed-format layouts add 20–40% to labour time.
Substrate condition: Older Auckland homes — your character villas, 1970s brick and tile places, anything from the leaky building era — often need significant floor levelling or wall preparation before tiling can start. Budget $500–$1,500 for prep work in an older home.
Waterproofing: A certified membrane system typically adds $1,000–$2,500 depending on bathroom size and the number of wet zones. This isn’t optional — it’s a Building Code requirement.
Walk-in showers: Tiled walk-in showers (replacing a shower box or over-bath setup) are one of the most popular upgrades we do. They also require the most waterproofing, precise floor grading to the drain, and careful tile selection for slip resistance. Expect the shower area alone to account for 30–40% of your total tiling budget.
All figures above are GST-inclusive estimates based on Auckland market rates. Your actual costs will depend on the specific tiles you choose and the condition of your existing bathroom.
Want a clearer picture of what your specific bathroom would cost? Book a free in-home consultation and we’ll walk through the numbers with you — including tile, waterproofing, and installation for your exact space.
Grout — The Detail Most People Forget Until It’s Too Late
Grout colour can make or break your tile design, and it’s one of the last decisions homeowners make — usually in a rush. That’s a mistake.
A contrasting grout (white tiles with dark grout, or vice versa) emphasises the tile pattern and each individual tile shape. It’s bold, it makes a statement, and it’s trending in 2026 — but it also shows every imperfection in tile alignment. Your tiler needs to be precise.
A matching grout (same tone as the tile) creates a seamless, monolithic look. It’s more forgiving of minor installation variances and makes the room feel larger. For most Auckland bathroom renovations, we recommend a tone-matched grout as the safer long-term choice — especially in family bathrooms that take daily punishment.
Whatever colour you choose, make sure you’re using an epoxy-based grout in wet areas. Standard cement grout is porous, absorbs moisture, and will stain or grow mould over time — no matter how well you seal it. Epoxy grout costs more upfront but saves years of scrubbing and regrouting. In a shower recess, it’s the only sensible option.
2026 Tile Trends We’re Actually Seeing in Auckland
Trends come and go, but some of what we’re seeing in our current Auckland projects has real staying power:
Stone-look porcelain: Travertine and limestone effects remain the most requested tile finish across our bathroom projects. The technology has improved dramatically — you’d struggle to tell the difference from real stone at arm’s length, and maintenance is a fraction of the effort.
Textured matte finishes: Gloss tiles are fading. Matte and textured surfaces feel more natural, hide water spots better, and offer improved slip resistance. They also photograph better — which matters if you’re ever selling.
Warm whites over cool whites: The blue-toned bright white bathroom is giving way to warmer off-whites, creams, and bone tones. These warmer palettes work particularly well in Auckland homes with timber floors and natural light — they feel connected to the rest of the house rather than clinical.
Feature walls with texture, not colour: Instead of a loud coloured accent wall, the move is toward textured tile in the same colour family as the rest of the bathroom. Think a fluted or ribbed tile behind the vanity in the same warm white as the surrounding walls. Subtle, but it gives the room depth.
Larger formats, fewer grout lines: 600×1200 mm wall tiles and 600×600 mm floor tiles are now standard in mid-range Auckland renovations. The visual impact of fewer grout joints is significant, especially in smaller bathrooms.
How to Get Your Tile Selection Right — The Short Version
After working across hundreds of Auckland bathrooms — from compact Ponsonby villas to large Howick family homes — here’s the process that consistently produces results homeowners are happy with years later:
Start with the floor. Your floor tile choice drives everything else. Pick a floor tile with the right slip rating, the right format for your room size, and a colour you can live with long term. Then select wall tiles that complement it.
Choose materials before colours. Decide porcelain vs ceramic vs stone first. Each material has its own maintenance profile, price band, and installation requirements. Colour comes second.
Get physical samples. Online images lie. Screens distort colour. Always view tile samples in your actual bathroom under the actual lighting conditions — natural daylight and whatever artificial lighting you use at night. A tile that looks warm beige under showroom LEDs might read pink under your bathroom’s fluorescent light.
Think about resale. If you’re planning to sell within five years, stick to neutral tones and timeless formats. Bold trends date quickly. A well-executed neutral bathroom adds value; a dated trend statement subtracts it.
Brief your renovation company on the full picture. Your tile selection isn’t isolated — it connects to waterproofing, adhesive systems, grout, underfloor heating, and fixture placement. A good renovation team manages all of this as one system. That’s the approach we take at Superior Renovations — our design team works with you on tile selection as part of the full bathroom design, not as an afterthought.
Ready to Start Your Bathroom Renovation?
Choosing tiles is one piece of the puzzle. The right renovation partner handles the waterproofing, substrate preparation, design coordination, and installation quality that turns a tile selection into a bathroom you’ll enjoy for the next 15–20 years.
Book a free in-home consultation with Superior Renovations. We’ll walk through your bathroom, discuss what you’re after, and give you a clear picture of costs and timeline — no obligation.
Book Your Free Consultation | Call 0800 199 888


