
28 Stunning Small Kitchen Design Ideas for Your NZ Renovation
28 Small Kitchen Design Ideas for Auckland Renovations
Quick answer: To get small kitchen design ideas that actually work in Auckland, focus on a light tonal palette, full-extension drawers, ceiling-height cabinetry, and layered lighting — most small kitchen renovations sit between $26,000 and $80,000 depending on whether the layout stays put or walls move.
In an Auckland villa kitchen at the back of the house, or a brand-new townhouse in Hobsonville with a kitchen tucked along one wall, the question is the same: how do you make a small kitchen design work without a full architectural rebuild? The 28 ideas below come from completed Superior Renovations projects across Auckland — Parnell, Greenlane, Mangere Bridge, Mt Eden, Avondale, Bucklands Beach. They cover colour, storage, layout, appliances, and the small visual tricks that make a tight kitchen feel less tight. Read them as a working list, not a prescription. The point is to find the three or four that suit your home and your budget.
One upfront note: we’re a full-renovation company based at 16B Link Drive, Wairau Valley. Small kitchens are usually one room of a larger renovation we’re doing — full house renovation, addition, character home work — where the trades (builder, electrician, plumber, tiler, painter) need to be coordinated under one project manager. If you only need new cabinetry in the same footprint, see the honest answer in the renovate-vs-cabinetry section below.

How to make a small Auckland kitchen feel bigger
The fastest gains in a small kitchen are visual, not structural. These five ideas don’t move a single wall. They change the way the room reads.
1. Choose a light, neutral colour palette
Light surfaces bounce daylight; dark surfaces absorb it. In a 6–10 m² Auckland kitchen with one or two windows, that difference is the gap between a room that feels like a cave and a room that feels open. Warm off-whites and soft greys are the workhorse palette — think the Dulux or Resene neutral families, used on walls, cabinetry and ceiling together so the eye doesn’t hit a colour change every metre. Save the contrast for the splashback or a single accent. A kitchen painted entirely in one tonal family will read as 20–30% larger than the same kitchen with three competing colours.
💡 Quick tip: take a colour sample home and stick it to the wall for 48 hours. Auckland’s afternoon light shifts dramatically — a white that reads warm at 11am can read grey by 4pm.
2. Match cabinets to walls to remove the visual break
Most small kitchens lose the spatial fight at the colour join between cabinetry and wall. The eye registers the break, and the room divides into “kitchen zone” and “everything else.” Specify cabinetry in the same colour family as the walls — or the same colour, if you’re feeling brave — and the kitchen reads as part of the room rather than a stand-alone object inside it. This works best in open-plan layouts where the kitchen sits inside a living space. If the kitchen is enclosed, the trick is weaker but still useful for the upper cabinetry, which is what sits at eye level.
3. Maximise natural light with bigger windows or a skylight
A skylight above a galley kitchen does more for the perceived size of the room than any cabinetry decision. In an Auckland villa with original sash windows, the kitchen is often the darkest room in the house because it’s at the back, north-facing windows have been blocked by extensions, and the ceiling is low. A 600 × 600 skylight over the bench costs $2,500–$5,500 installed (including framing, flashing and the consent that comes with cutting a roof). It’s the single highest-impact item on this list if your current kitchen is dark. If a skylight isn’t possible, enlarging a window over the sink is the next move — even an extra 300 mm of glass height changes the room.
💡 Quick tip: if your kitchen sits in the south-facing back-of-villa configuration that’s common in Mt Eden and Grey Lynn, a skylight is almost always worth the consent cost. The room never gets direct sun from a wall window.
4. Layer your artificial lighting
Small kitchens get this wrong almost universally. One bright ceiling pendant, glaring straight down, casting shadows under the upper cabinets onto the bench where you’re chopping. The fix is three layers: recessed downlights for the room, under-cabinet LED strips for the bench (this is the layer most kitchens lack), and a pendant or two over the island or breakfast bar for warmth. Under-cabinet LED is cheap — $200–$500 in materials — and changes the usability of a small kitchen at night. Specify dimmable on at least the pendants and the downlights so you can drop the room down for dinner.
5. Use larger floor tiles to reduce grout lines
This one feels counter-intuitive: bigger tiles in a smaller room. The reason is grout. Every grout line is a visual break, and a small kitchen tiled in 300 × 300 squares has twice as many breaks as the same kitchen in 600 × 600. The eye stops counting tiles and starts reading the floor as a continuous surface, which makes the room read as larger. 900 × 600 rectangular porcelain in a stack-bond pattern is the current go-to for Auckland kitchens — looks contemporary, sits well under both modern and character home cabinetry, and large-format porcelain has come down in price enough that it’s no longer a luxury spec.
“Matching cabinetry to wall colour is the cheapest spatial trick we have. In a Mt Eden galley we did last year, the same cabinetry in a warm grey reads about 30% wider than it would have in white. The eye stops registering the join.”
— Dorothy Li, Design Manager, Superior Renovations
Storage solutions that turn cramped into clever
The single biggest reason a small kitchen feels small is that it stores its things badly. These six small kitchen design ideas are about getting the same gear to fit better.
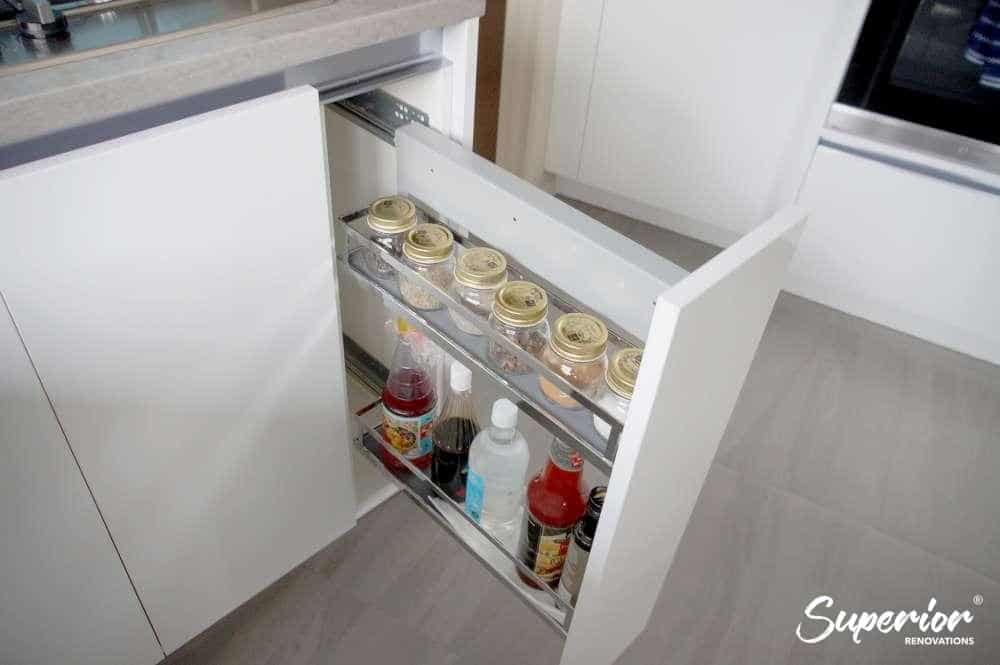
6. Replace cupboards with full-extension drawers
Standard cupboards are a waste of space in a small kitchen. Whatever sits at the back of the cupboard becomes a lost cause — you’d rather buy a new one than dig past three roasting pans to find it. Full-extension drawers fix this completely. You pull the drawer out, you see everything, you grab what you need. Soft-close runners are standard from any decent cabinetmaker now and add maybe 10–15% to the cost of the cabinetry. For a small kitchen, that’s the best money you’ll spend.
💡 Quick tip: deep base drawers (300–400 mm) work better for pots than two shallow drawers stacked. The deep drawer lets you stand a 28cm pot upright without stacking pans on top of it.
7. Build cabinetry to the ceiling
The gap between the top of a standard wall cabinet and the ceiling is usually 200–400 mm. In a normal-sized kitchen that gap is wasted but tolerable. In a small kitchen it’s lost storage you can’t afford. Take the upper cabinetry all the way up. The top row stores things you use twice a year — Christmas platters, the slow cooker, the bread maker — and you climb on a step stool to get them. The visible surface in the kitchen drops by 15–20% because the cabinetry no longer collects dust on top and looks unfinished.
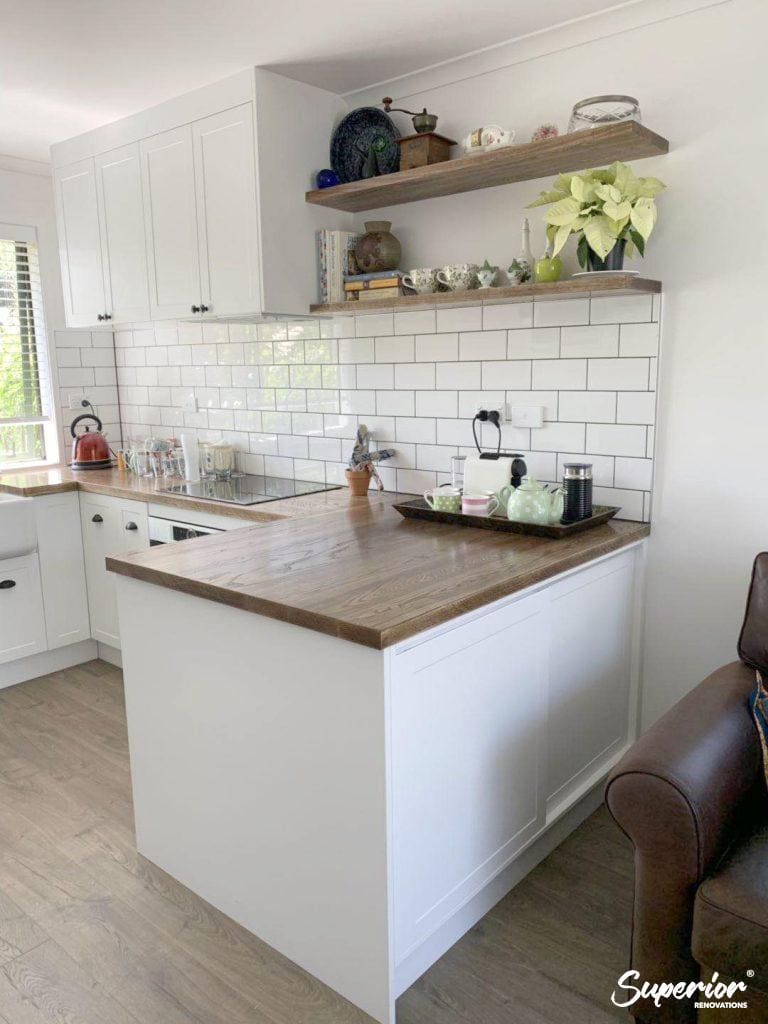
8. Add floating shelves at the right scale
Floating shelves are everywhere in design magazines, and most of them don’t work in real kitchens. The shelves are too shallow, too short, too high, or styled with objects that never come down. Done right, floating shelves replace one bank of wall cabinets and give the room visual relief — the walls stop looking like a solid line of cabinet doors. The rule is: every item on the shelf must be something you actually use weekly — mugs, plates, glasses, the salt and pepper. If it’s decorative, it’s wrong.
9. Use magic corners and pull-out trolleys for awkward cabinets
Every L-shape kitchen has a dead corner where two runs of cabinetry meet. Standard cabinetry treats this corner as a black hole. Magic corners (sometimes called magic corner pull-outs or LeMans units) are sprung trolley systems that pull the back of the corner out into the open when you swing the door. You go from 30% usable corner storage to 95% usable. They’re not cheap — $400–$900 per unit installed depending on the brand — but in a small kitchen the corner is too valuable to leave broken.
💡 Quick tip: magic corners pay for themselves in an L-shape under 8 m². In a larger kitchen, a standard corner carousel or lazy susan does most of the same job for half the cost.
10. Install sliding pantry doors
A hinged pantry door swings into the kitchen and steals 600 mm of clearance every time it opens. In a galley layout, that clearance is the only walking space you have, which means the pantry door is closed every time you’re cooking. Sliding pantry doors solve this in tight kitchens — they run on a top track, take up zero floor swing, and let you keep the pantry open while you’re working. Specify them in the same finish as the rest of the cabinetry so they disappear into the run.
11. Use magnetic strips and tool walls instead of drawers
Knives, scissors, peelers, kitchen shears, metal spice tins — these all live in drawers in most kitchens, where they collect together at the bottom and slide around when you open them. Mount a magnetic strip on the splashback above the bench and they live within reach, off the bench surface, out of drawers entirely. The bench gets clearer, the drawer gets smaller, the kitchen functions faster. The same idea works for a pegboard tool wall if you’d rather hang utensils than stick them to a magnet.
Layout choices that make a small kitchen work harder
Storage and colour are surface fixes. Layout is the structural one. These four ideas are about the geometry of the room — which is also where Superior Renovations earns its keep, because changing a layout usually means moving a wall, relocating plumbing, and coordinating four or five trades through a consent process.
12. Galley layout — for long, narrow spaces
The classic Auckland villa kitchen is a long narrow rectangle at the back of the house. The galley layout — two parallel runs of cabinetry with a corridor between them — was made for this shape. Sink and prep on one side, cooktop and pantry on the other. The work triangle stays tight, the cook can pivot between sides without walking. The clearance between the two runs needs to be at least 1,000 mm — any less and two people can’t pass; any more and you’re walking too far between sides. Galley works because it doesn’t fight the room’s geometry.
💡 Quick tip: the 1,000 mm minimum is for single-cook kitchens. If two people cook together regularly, bump the galley clearance to 1,200 mm so the dishwasher and oven doors don’t collide when both are open.
13. Single-wall layout — for very small footprints
In an apartment kitchen or a tiny back-of-villa space under 5 m², a single-wall layout is often the only one that works. Everything on one wall, the rest of the room left as open floor or living space. The trade-off is bench space, which becomes precious. Pair a single-wall kitchen with a mobile island or a fold-out prep surface (Idea 25) to compensate. Single-wall kitchens also pair well with European laundries hidden inside a cabinet at the end of the run.
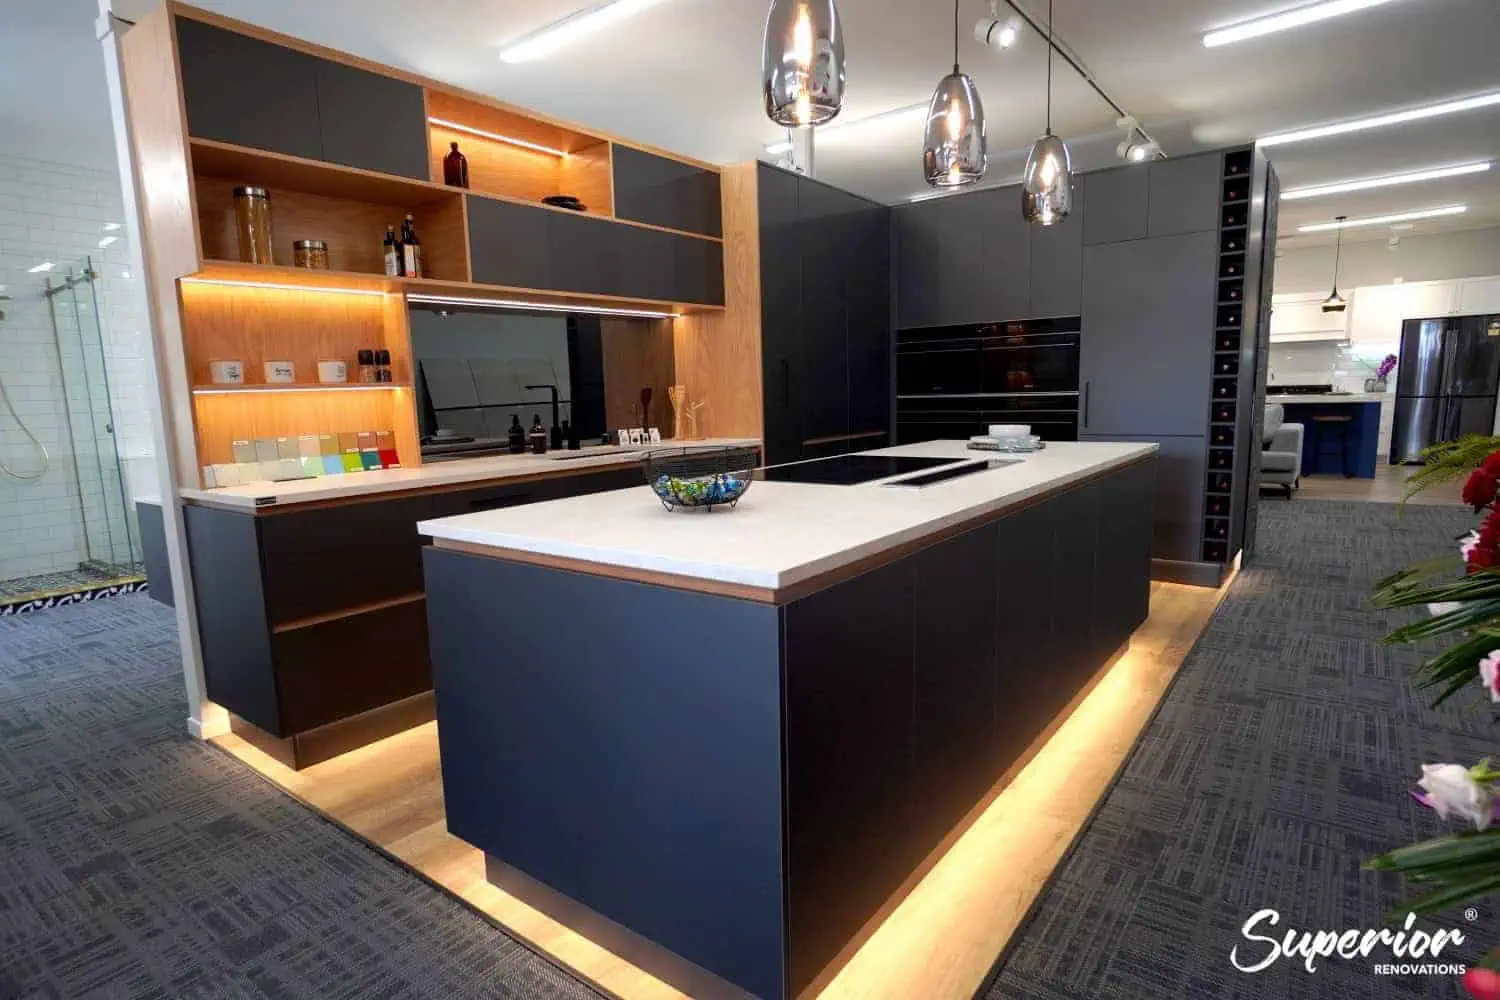
14. Add an island that doubles as storage and dining
An island isn’t always possible in a small kitchen, but where there’s a metre of clearance to spare, an island earns its space three ways: extra bench for prep, extra storage underneath, and seating for two or three so the dining table can shrink or disappear. The island doesn’t need to be big — 1,200 × 700 is plenty. Storage on both sides of the island is the trick: shallower cabinets facing the seating side for cookbooks and serving ware, deeper cabinets facing the cook side for pots and the dishwasher. Our Wairau Valley showroom kitchen at 16B Link Drive has exactly this setup — worth a visit if you’re trying to picture it.
15. Break the wall to open the kitchen to your living space
This is the single biggest move on the list, and the one that requires the most planning. Most small Auckland kitchens feel small because they’re cut off from the dining and living rooms by a wall that was there when the house was built in 1925, 1965 or 1985. Removing that wall — even partially — changes everything. The kitchen borrows light, sightlines and air from the next room, and the cook joins the household instead of working in solitary confinement.
Important note: if the wall is load-bearing, you’ll need a structural engineer, a building consent, an LBP-supervised build, and a beam to carry the load above. That’s where a full-renovation company matters — the trades, the engineering, the consent and the build all need to run as one project, not five.
Smart appliances and fixtures for small kitchens
Appliances are the next round of decisions. The brand matters less than people think; the size and the integration matter more.
16. Compact two-burner induction cooktops
A standard 600 mm four-burner cooktop is overkill for a household of two or even three. A 300 mm or 400 mm two-burner induction cooktop frees up 200–300 mm of bench either side, which in a small kitchen is the difference between having room to chop and not. Induction also runs cooler than gas or ceramic, so you can stand closer to the cooktop without the bench heating up. If you cook for larger groups occasionally, pair the smaller cooktop with a portable single burner that goes back in the drawer.
17. Slim profile or integrated appliances
The dishwasher and the fridge are the two biggest space-eaters in a small kitchen. A standard 600 mm dishwasher and a 700 mm side-by-side fridge consume 1,300 mm of run on their own. A slimline 450 mm dishwasher does the same daily wash for a 2–3 person household, and a column fridge (taller and narrower) gives the same volume in less floor footprint. Integrated appliances — clad in the same finish as the cabinetry — also visually shrink the kitchen because the eye reads one continuous run instead of three appliances and a cabinet.
💡 Quick tip: integrated panels add roughly $300–$600 per appliance over a freestanding equivalent. Worth it on the dishwasher and fridge; rarely worth it on the oven, which is already a feature of the kitchen.
18. Install a large single bowl sink
The double bowl sink had its moment. In a small kitchen, it’s the wrong choice. Each bowl is too small to wash a baking tray or a roasting pan, and the divider in the middle is wasted space. A single bowl sink — at least 500 mm wide and 200 mm deep — handles everything from a single mug to a full oven tray, and stays out of sight under the bench profile. Specify it under-mounted so the bench wipes straight into the sink and the silicon line that catches grime in a top-mount sink doesn’t exist.
19. No-handle cabinetry for visual cleanness
Handles are a visual interruption. In a kitchen with eight or ten cabinets, that’s eight or ten interruptions. No-handle cabinetry — either push-to-open or with a routed J-pull on the top edge of the door — reads as a single clean surface, and in a small kitchen that calm makes the room feel less busy. The trade-off is that push-to-open mechanisms can be temperamental over time if the cabinetry isn’t perfectly hung. Routed J-pulls are the more reliable option for households with kids.
Visual tricks that make small kitchens feel open
These four ideas are pure visual cheating. They don’t add storage or change layout. They change the way the room reads.
20. Glass-fronted cabinets for depth
A wall of solid cabinet doors feels heavier than a wall with one or two glass-fronted cabinets in the run. The glass admits a fragment of background — a coloured plate, a stack of glasses — and the eye reads depth where it would otherwise read a flat plane. Specify glass on the upper cabinetry only, and only on cabinets storing things you’d be happy to have on display. The clutter cabinet (the one with the lunchboxes and the cereal) stays solid.
21. Mirror or glass splashback
The splashback is the only surface in the kitchen that sits at eye level on a wall. Make it work: a mirror splashback doubles the perceived width of a galley kitchen, and a back-painted glass splashback in a light colour bounces daylight back into the room. Mirror splashbacks need to be toughened glass with a heat rating if they’re behind a cooktop. Some homeowners find them too literal — they don’t like seeing themselves while cooking — but in a tight kitchen the spatial gain is significant.
💡 Quick tip: back-painted glass in a warm white is the safer choice than a mirror — same daylight bounce, no reflection of yourself mid-cook. Costs about the same per square metre installed.
22. Bi-fold windows above the sink
A bi-fold window opens the kitchen onto a deck, a courtyard or a garden, and on a summer evening turns the window itself into a serving hatch. The kitchen suddenly has twice the footprint because the outside has joined in. Bi-fold windows above a sink need careful detailing for waterproofing — the sill takes water during rain and the seal at the open edge has to drain outward — but the spatial result is dramatic for the cost.
23. Textured feature wall
A single feature wall in a small kitchen — textured tile, V-groove panelling, exposed brick, a strong wallpaper — gives the eye somewhere to land and stops the room reading as a uniform box. The other walls stay calm. Don’t try to make every surface a feature; the wall that gets the texture is usually the one without cabinetry, often behind a dining nook or breakfast bar. The texture adds depth without stealing floor space.
Design touches that add personality without clutter
The last five ideas are details. Small enough to retrofit into an existing kitchen, small enough to fold into a bigger renovation as a finishing layer.
24. Recessed niche shelves
A 200 mm deep niche carved into the splashback wall, lit with a strip of warm LED at the top edge, holds the spice jars, the olive oil, the everyday salt. It clears 200 mm of bench depth — a meaningful gain in a small kitchen — and gives the splashback a focal point. Best done as part of a renovation where the wall is open anyway; harder to retrofit without making a mess.
25. Fold-down or pull-out prep stations
The bench that disappears when you’re not using it. A wall-mounted fold-down table, or a pull-out chopping board hidden under the bench, gives you working surface on demand without consuming permanent floor space. Best paired with a single-wall kitchen layout where the bench is genuinely short. A fold-down 800 × 400 surface seats two for breakfast, then folds away by 8.30 am.
26. A rolling kitchen cart for flex space
The cheapest, most reversible idea on this list. A timber-and-steel rolling cart on lockable castors gives you extra bench while you’re cooking, parks against a wall when you’re not, and can move into the dining room as a drinks station when you’re entertaining. $300–$800 from a furniture store, and it goes with you when you move. Worth doing before you commit to a renovation — sometimes it’s the only fix you need.
27. Bring nature in
A small herb wall above the bench — three or four pots of basil, mint, parsley — softens what is otherwise a hard room. So does a single timber accent in an otherwise painted kitchen: a strip of rimu or oak as a shelf, a butcher’s block end on the island, a timber-fronted drawer in a run of laminate. Don’t overdo it; small kitchens punish busy. One timber moment, one plant moment, and the room warms up.
28. Contrasting countertop and flooring
The last visual trick. A light bench against a darker floor, or a darker bench against a paler floor, gives the room horizontal stripes that make it read as wider than it is. The contrast doesn’t have to be dramatic — a warm white engineered stone bench against a mid-tone oak-look floor does the job. The error is matching them too closely: the room collapses into one tone and feels smaller, not larger.
Real small kitchen renovations we’ve delivered in Auckland
Three completed Superior Renovations projects — different suburbs, different home types, different briefs. Each one shows what a few of the ideas above look like in practice.
Parnell townhouse — relocating the kitchen for a small-footprint win
This central Parnell townhouse came to us with a kitchen squeezed into the wrong end of an open-plan living space. The original layout cut the cook off from the dining table and left almost no bench. We moved the kitchen from the left wall to the right, extended the cabinetry down the dining wall as integrated storage, and added a deep single-bowl sink under a new window. The kitchen footprint stayed the same — the layout did the work. Budget range: $55,000–$70,000. See the full Parnell project →

Greenlane — opening up a closed 1960s kitchen
Joanna and Steve’s Greenlane home had a closed-off kitchen typical of its era — a small room with one door in and one door out, separated from the living space by a non-load-bearing wall. We took the wall out, built a breakfast bar across the new opening, and used the bar as both extra prep space and the dividing line between kitchen and dining. The room reads now as roughly twice the size it used to, because the eye stops at the back of the dining room instead of at the kitchen wall. Budget range: $48,000–$62,000. See the full Greenlane project →
Mangere Bridge — a full-renovation kitchen with floating shelf storage
This Mangere Bridge kitchen was a single-wall layout that needed more storage without a footprint change. We added floor-to-ceiling cabinetry, floating shelves on the wall opposite the run, and an under-mounted single-bowl sink. The shelves became the focal point of the room — coloured mugs, pottery, cookbooks — and the upper cabinets stored everything that didn’t earn display space. Budget range: $32,000–$45,000.
“The Parnell townhouse came to us as a corridor kitchen — the bench was on the wrong wall. Moving it across, putting the sink under a new window, did more than swapping cabinetry ever could. Layout is where small kitchens win or lose.”
— Alison Yu, Designer, Superior Renovations
How much does a small kitchen renovation cost in Auckland?
Honest answer with ranges. Auckland small kitchen renovations sit in three bands depending on what you’re actually changing.
Band 1: $26,000–$45,000 — like-for-like with new cabinetry and finishes. The kitchen stays in the same footprint. New cabinetry, new benchtop, new appliances, new splashback and floor. No walls move, no plumbing relocates. This is where most small kitchen projects through a full-renovation company sit, with the lower end matching the Auckland average for a mid-range kitchen renovation.
Band 2: $45,000–$70,000 — modest layout changes. The sink moves, a window enlarges, the cooktop swaps walls, perhaps a small section of non-structural wall comes out. Plumbing and electrical relocations bring extra trades into the project, and a building consent is sometimes required depending on what’s moving (see the next section).
Band 3: $70,000–$110,000+ — structural change. A load-bearing wall comes out, a beam goes in, the kitchen extends into a former dining room or new addition. This is where the consent process, the engineer, the LBP supervision and the trade coordination all earn their fees. A small kitchen on paper, but a full-renovation project in reality.
💡 Quick tip: small kitchens save money on cabinetry and material volume — a 6 m² kitchen needs roughly half the cabinetry of a 12 m² one. They don’t save on labour. Trades still need to come, still need a project manager, still need the same coordination time. That’s why a small kitchen rarely costs less than the band 1 floor through a full-renovation company.
Where the wider construction market sits matters too. [VERIFY: Cordell’s Construction Cost Index — June 2025 quarter 0.6% rise, annual rate 2.7%; QV CostBuilder Nov 2025 — 0.5% three-month, 1.1% annual; 2020–2024 cumulative rise of ~38%.] Construction cost inflation in NZ has cooled significantly in 2025, which means budgeting a renovation in 2026 is more predictable than it has been since 2019.
To work out where your project lands, run the numbers through our kitchen renovation cost calculator — it sets out the cost bands by scope so you can see what a $35K kitchen looks like versus a $75K one before you commit to anything.
“Most homeowners underspend on the layout change and overspend on the appliance brand. Layout drives resale value. The sticker on the oven doesn’t.”
— Eunice Qin, Designer, Superior Renovations
When does a small kitchen renovation need building consent?
The short answer: it depends what you’re moving, not how big the kitchen is. A small kitchen renovation in the same footprint usually doesn’t need a building consent. A small kitchen renovation that moves the plumbing across the room, removes a wall, or adds new sanitary fixtures usually does.
Schedule 1 of the Building Act 2004 exempts certain low-risk work from needing a building consent. The relevant exemptions for kitchens are minor non-structural alterations (replacing cabinetry, painting, retiling), like-for-like fixture replacement (swapping a tap or sink in the same place), and cosmetic work that doesn’t affect the structure, fire safety, or weathertightness of the home. The trades doing the plumbing and electrical still need to be licensed under the Plumbing, Gasfitting and Drainlaying Act and the Electricity (Safety) Regulations — that requirement doesn’t go away just because a building consent isn’t required.
Consent is required when:
- A load-bearing wall is being removed (always)
- Plumbing is being relocated to a new wall, or new fixtures are being added
- The kitchen ventilation is being routed through a new wall penetration or roof
- A new window or skylight is being installed
- The work crosses the threshold into Restricted Building Work, which requires LBP design and supervision
Important note: Auckland Council fees for residential building consents are set on a project-value basis. For a project valued between $20,000 and $99,999 — which covers most small kitchen renovations requiring a consent — the base fee plus processing deposit sits at around $2,870 in the current 2025/26 schedule, with additional inspection fees layered on depending on the number of inspections needed. [VERIFY against current Auckland Council fee schedule before publish.]
For a deeper walkthrough of what triggers consent, when it doesn’t, and how Auckland Council’s process works, see our companion guide: what renovations need building consent in Auckland. The Auckland Council fee schedule is published in full at aucklandcouncil.govt.nz, and the MBIE Schedule 1 exemption list sits at building.govt.nz.
What we do as a full-renovation company is run the consent process for you. You don’t lodge the application; we do, with our LBP designer producing the consent drawings and the Records of Work submitted at sign-off. That’s the difference between hiring a cabinetmaker and hiring a renovation company — the cabinetmaker isn’t taking on the consent risk.
Should you renovate, or just replace the cabinetry?
An honest section that doesn’t fit the rest of this article. If your kitchen layout works, the plumbing is fine, the floor is sound, and what you actually want is new cabinetry and a new benchtop in the same footprint — you don’t need a full renovation. You need a cabinetmaker.
The full-renovation model pays for itself when there are multiple trades to coordinate, walls to move, consents to manage, or an entire room being reworked. If none of that applies, the renovation overhead — project management, the engineer, the consent fees, the trades you don’t need — adds cost you won’t recover at resale. For cabinetry-only work, our sister brand Little Giant Interiors’ small kitchen design guide is the better starting point — they design, manufacture and install custom cabinetry in their own Auckland factory, and you’d manage the other trades yourself (or none, if the cabinetry is genuinely all that’s changing).
Where Superior Renovations comes in is the second case: when the wall needs to come out, when the layout has to change, when the kitchen is part of a wider renovation, when you’d rather not coordinate a builder, a plumber, an electrician, a tiler and a painter yourself. Same group, different jobs. The choice between them is really a choice about scope.
Ready to talk about your small kitchen renovation?
If your project is more than cabinetry — if the layout has to change, if the wall has to move, if you’d rather have one project manager coordinating every trade instead of chasing five contractors yourself — we’d love to talk. Book a free, no-obligation in-home consultation and we’ll come out, look at the space, talk through what’s possible, and give you an honest read on scope and budget before you commit to anything.
➡ Book your free in-home consultation with Superior Renovations
➡ Use our kitchen renovation cost calculator to see where your project lands
➡ Request a free feasibility report for your project
Small kitchen design ideas FAQ
How much does a small kitchen renovation cost in Auckland?
Small kitchen renovations in Auckland typically range from $26,000 to $45,000 for like-for-like work (new cabinetry, benchtop, splashback and appliances in the same footprint), $45,000 to $70,000 for modest layout changes such as moving the sink or enlarging a window, and $70,000 to $110,000-plus when load-bearing walls come out or the kitchen extends into another room. Final pricing depends on cabinetry spec, appliance choice and whether a building consent is required.
Do I need a building consent for a small kitchen renovation?
Most small kitchen renovations don't need a building consent if the work is like-for-like in the same footprint — cabinetry, benchtop, splashback, painting and swapping fixtures in their existing positions are exempt under Schedule 1 of the Building Act 2004. Consent is required when a load-bearing wall is removed, plumbing is relocated to a new wall, ventilation cuts a new roof penetration, or a new window or skylight is added. Auckland Council fees for residential consents in the $20,000 to $99,999 project-value band sit around $2,870 base.
How long does a small kitchen renovation take?
A like-for-like small kitchen renovation in Auckland typically takes four to six weeks on site once demolition begins, with another four to eight weeks of design and cabinetry lead time beforehand. Projects involving layout changes or wall removal run six to ten weeks on site. Consent processing through Auckland Council adds another six to eight weeks before work can start. Realistic end-to-end timeframe from first consultation to handover is three to six months.
What's the best layout for a small kitchen?
In an Auckland villa or apartment kitchen under 10 square metres, a galley layout (two parallel runs of cabinetry with at least 1,000mm clearance between) gives the most efficient work triangle. For very small footprints under 5 square metres, a single-wall layout paired with a mobile island or fold-out prep surface works best. L-shape layouts work when the kitchen sits in a corner of an open-plan living space — magic-corner pull-outs make the dead corner usable.
Can I knock down a wall to open up my small kitchen?
Yes, but the process depends on whether the wall is load-bearing. Non-load-bearing walls can be removed without a building consent in most cases, though consent is still required if removal affects fire safety or weathertightness. Load-bearing walls always require a structural engineer, a building consent, an LBP-supervised build, and a beam or lintel to carry the load. Expect to add $8,000 to $25,000 for the structural work on top of the kitchen renovation itself.
How do I make a small kitchen feel bigger without renovating?
Three changes that don't require consent or trades: paint the cabinetry and walls in the same light tonal family (warm off-whites and soft greys work best in Auckland's variable light), add under-cabinet LED strip lighting to remove shadow lines on the bench, and replace upper cabinet doors with glass-fronted ones to add visual depth. A rolling island cart adds flexible bench space without permanent install.
Should I use light or dark colours in a small kitchen?
Light tonal colours read as larger in small kitchens — warm off-whites, soft greys and pale neutrals bounce daylight and reduce visual breaks. Dark colours work as a single accent (an island, a splashback, a feature wall) but shouldn't dominate the cabinetry in a kitchen under 10 square metres. The bigger win is keeping cabinetry and walls in the same colour family so the eye doesn't register a join between cabinet and wall.
What size dishwasher fits a small kitchen?
A slimline 450mm dishwasher fits most small Auckland kitchens and handles the daily wash for a two-to-three-person household. Standard 600mm dishwashers consume 150mm of additional cabinetry run that small kitchens usually can't afford. For one or two-person households, an integrated 450mm drawer dishwasher under the bench frees up the equivalent of a small cupboard. Choose integrated panels matching the cabinetry for visual continuity.
Is it worth adding an island to a small kitchen?
An island earns its space in a small kitchen when there's at least 1,000mm of clearance around all sides — anything less and the kitchen becomes harder to use, not easier. A compact 1,200 x 700mm island adds prep bench, two-sided storage, and seating for two or three, which can let the dining table shrink or disappear. In kitchens under 10 square metres, a mobile island cart on castors is usually the smarter call.
Should I hire a renovation company or just a cabinetmaker?
Hire a cabinetmaker when the layout works, the plumbing stays put, and what you actually want is new cabinetry and a benchtop in the same footprint — adding renovation-company overhead to a cabinetry-only job adds cost you won't recover. Hire a renovation company when walls have to move, layout changes, consents are required, or the kitchen is one room of a larger renovation. The split between Superior Renovations and our sister brand Little Giant Interiors reflects exactly that scope difference.
Further Resources for your small kitchen renovation
- Featured projects and Client stories to see specifications on some of the projects.
- Real client stories from Auckland
Need more information?
Take advantage of our FREE Complete Home Renovation Guide (48 pages), whether you’re already renovating or in the process of deciding to renovate, it’s not an easy process, this guide which includes a free 100+ point check list – will help you avoid costly mistakes.
Download Free Renovation Guide (PDF)
Still have questions unanswered?
Book a no-obligation consultation with the team at Superior Renovations, we’d love to meet you to discuss your renovation ideas!
Or call us on 0800 199 888

Have you been putting off getting renovations done?
We have partnered with Q Mastercard ® to provide you an 18 Month Interest-Free Payment Option, you can enjoy your new home now and stress less.
Learn More about Interest-Free Payment Options*
*Lending criteria, fees, terms and conditions apply. Mastercard is a registered trademark and the circles design is a trademark of Mastercard International Incorporated.


