Bathroom Renovation Cost NZ: Updated 2026 Guide to Average Prices & Tips
This article has been updated with added content to reflect costs in the year 2026. The cost for 2026 has gone up by 5-8% from our 2025 guide due to material inflation, as well as the general inflation that NZ has been experiencing since the last year.
Hey Aucklanders, if you’re eyeing up a bathroom reno in 2026—whether it’s a tired spot in your Grey Lynn villa or a family hub in Albany—and wondering how much it’ll actually set you back in our pricey market, this guide’s got the real talk. Auckland averages run $25,000–$32,000 for a solid mid-range job (higher than the national $18,000–$26,000), with full overhauls hitting $40,000–$60,000, but smart planning can keep it affordable while adding heaps of value and comfort.
Quick 2026 Answer guide – Bathroom Renovation Costs in NZ (Auckland specific)
- Mid Range bathroom renovation $26,000 to $35,000 (to include, new tiles, bathroom fixtures, lighting, labour cost and project management) a 5 to 8% increase from 2025 due to labour and material inflation.
- Budget range bathroom renovation (paint, new fittings and minor tiling) $9000 to $16,000.
- Luxury Custom bathroom renovation (Wet room and high-end brands with longer warranty periods) from $45,000 onwards.
Official NZ Construction Cost Trends (Stats NZ & MBIE)
- Residential construction prices rose 0.6% in the March 2025 quarter (Stats NZ, Value of Building Work Put in Place: March 2025).
- Annual construction prices increased 1.9% in the 12 months to March 2025 (Stats NZ).
- Broader trends: Construction input prices rose significantly post-2020, but growth slowed by 2023–2025 due to easing supply issues (MBIE Building and Construction Sector Trends Annual Report 2023).
- Residential building construction output prices increased faster than CPI in recent years (Stats NZ Producer Price Index data). These indicate ongoing upward pressure on renovation costs in Auckland—factor in 5–10% contingency for 2026 projects.
What’s a Realistic Bathroom Reno Cost in Auckland Right Now?
For most folks, a mid-range refresh lands around $20,000–$35,000—think new tiles, vanity, shower, and fixtures without moving walls. Low-end cosmetic tweaks? $8,000–$15,000, or even $3,000–$5,000 for a quick paint and update. Go luxe with custom everything and it’s $35,000–$65,000+. We’ve seen a contemporary Henderson Valley setup with matte black tiles and a wall bathtub come in under $30,000, or a moody Parnell masterpiece pushing $45,000–$55,000. Labour eats 40-50% ($90–$120/hour here), materials 20-25%, and don’t forget 15-20% contingency for surprises like old plumbing in Mt Eden bungalows.
What Knocks the Price Up (or Down) for Your Auckland Bathroom?
Size matters less than complexity in small 5-7m² spots—fixed trades mean costs similar to bigger ones. Premium porcelain or stone tiles ($50–$150/m²) vs. basic ceramic ($30–$50) add thousands, same with relocating plumbing ($1,000–$5,000). Coastal humidity in St Heliers calls for top waterproofing ($300–$2,000) and ventilation to avoid mould regrets. Suburbs like Titirangi or Remuera might need consents ($500–$2,000) for structural stuff—check Auckland Council. Cheaper wins: Reuse layout, DIY demo or painting (save $500–$2,000), shop Mitre 10 or Tile Depot deals, and bundle trades.
How Do You Get the Most Bang for Your Buck Without Common Stuff-Ups?
Focus on what your whānau needs—non-slip floors and bathtubs for kids in Westmere ($1,500–$3,000 extra), or wet rooms for luxe flow in Mellons Bay ($10,000–$15,000). Trends like matte black Methven taps and large-format tiles are hot, lasting well in our damp winters. Avoid skimping on licensed pros for plumbing/electrical, or ignoring ventilation—mould fixes cost more later. A project manager keeps timelines to 3-4 weeks and budgets tight.
Fancy a bathroom that feels brand new and suits your Kiwi life? Chuck us a message at Superior Renovations for a free quote—what’s your reno budget looking like?
Bathroom Renovation Costs in NZ
Your Complete 2026 Guide
This article has been updated with additional content and project portfolios to reflect the bathroom renovation cost trends in 2026 – this is our most comprehensive guide yet!
A Bathroom renovation might seem simple and straight forward. This however is far from the truth. The fact is that a bathroom renovation is the most complex of all renovations due to the number of trades involved in a relatively small space.
Planning a bathroom renovation in NZ and wondering about the cost? In 2026, the average bathroom renovation cost in New Zealand ranges from $12,000 for a small upgrade to $50,000 for a full remodel. Whether you’re tackling a small bathroom or a luxury ensuite, this guide breaks down everything you need to know—labor, materials, and NZ-specific factors—to budget smarter and get the most value from your project.
Average bathroom renovation cost in New Zealand 2026 can only be determined when all the various factors are considered. Trades involved in a bathroom renovation include a designer, demolisher, plumber, electrician, tiler, water proofer, installer, painter, grouter, and plasterer. Imagine managing the above trades within a small space. You can easily understand why organisation and planning is key to a bathroom renovation. Bathroom renovations typically should take about 3-4 weeks to complete if you have a project manager on site managing the trades for you – assuming that there isn’t any structure changes or consent related works (which would take longer).
Curious about how much your
bathroom renovation would cost?
Try our bathroom renovation cost calculator tool
Need ideas? Check out our Kitchen Design Gallery or dive into our Bathroom Design Gallery for inspiration!
Managing the trades on your own comes at a risk of either blowing your budget as you are dealing with so many different companies or extending the timeline of your project. Our first advice would be to get a company that provides project manager as part of their service.
But more on project management later, lets talk about the costs related to bathroom renovations.
Before you renovate your bathroom ask yourself the reason for your renovation and plan from there. Once you have determined the reason for your renovation then we can work out a plan and costs related to them.
If you’re looking for “specific” cost estimates, try our Renovation Cost Calculator Tools
- Bathroom Renovation Cost Calculator
- Kitchen Renovation Cost Calculator
- Reroofing Cost Calculator
- Double Glazing Cost Calculator
- House Extension Cost Calculator
- Custom Kitchen Cabinetry Cost Calculator
1.How Much Does It Cost to Renovate a Bathroom in New Zealand in 2026?
Whether you’ve lived in your Auckland home for years or just bought an older property in suburbs like Grey Lynn or Henderson, renovating that tired bathroom might be on your radar. In New Zealand—and especially in Auckland—bathroom renovations rank among the priciest home upgrades. So, it’s no surprise that the top question homeowners ask is: What’s the average bathroom renovation cost in Auckland?
The answer depends on your project’s scope. In Auckland, a mid-range bathroom renovation—think new tiles, fixtures, paint, and some plumbing or electrical tweaks—averages $25,000–$32,000 in 2026. That’s higher than the national range of $18,000–$26,000, driven by Auckland’s elevated labor and material costs. Post-COVID, many hoped for price relief, but rising supply chain expenses and tradie shortages have kept costs climbing, particularly in this busy city.
See further examples of Mid-Range bathrooms
Bathroom and Toilet renovation in Papatoetoe
Rental renovation in Hillsborough
Classic Kitchen and bathroom renovation in West harbour
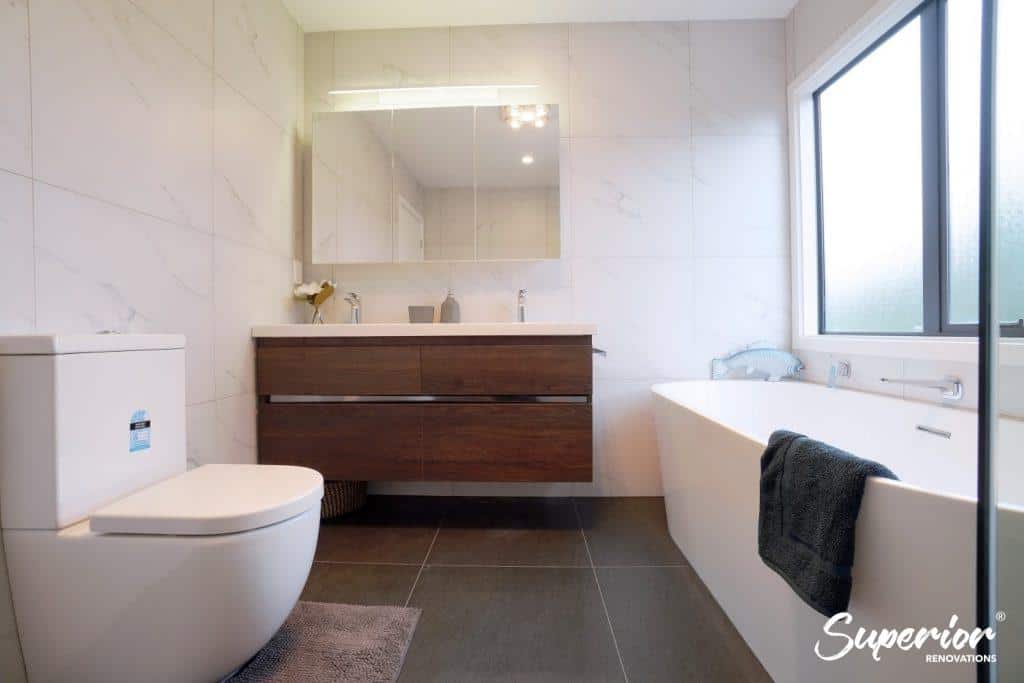
For a full overhaul in Auckland—new layout, premium appliances, and custom finishes—expect $40,000–$60,000. Outside Auckland, in places like Wellington or Christchurch, the same job might cost $30,000–$45,000. On a budget? A simple refresh (paint, minor updates) could run as low as $3,000–$5,000 in Auckland, though even these smaller jobs carry a premium here compared to rural NZ ($2,000–$4,000).
Understanding Your Bathroom Renovation Costs in Auckland
When budgeting for a bathroom renovation in Auckland, breaking down the costs into key components helps you see where your money goes—and how to control it. In 2025, Auckland’s higher labor rates ($90–$120/hour) and urban material costs push renovation prices above the national average, whether you’re opting for a low-cost refresh or a high-end overhaul. Labor typically claims the biggest chunk (40-50%), followed by materials like tiles, fixtures such as showers or vanities, and plumbing/electrical work. The table below outlines cost ranges for low, mid, and high-end renovations, reflecting Auckland’s market and offering a clear guide to plan your rental upgrade or dream bathroom.
Table 1: Average Total Bathroom Renovation Costs in Auckland (2026)
| Renovation Type | Total Cost Range ($) | Definition and Scope |
| Low-End (Minor Alterations) | 8,000 – 15,000 | Like-for-like replacements (e.g., new toilet, taps, tiles) without layout changes. Ideal for rentals or quick refreshes; minimal demolition, keeps existing plumbing and gib. |
| Mid-End (Full Renovation) | 20,000 – 35,000 | Complete overhaul: removes everything (incl. gib, fixtures, tiles), redoes plumbing/electrical, installs mid-range fixtures. Standard for family homes needing a fresh, functional space. |
| High-End (Luxury Upgrade) | 35,000 – 65,000+ | Premium fixtures (e.g., bronze taps, stone tiles), custom layouts, and structural changes (e.g., wall removal, wet rooms). For luxury homes prioritizing style and comfort. |
Notes:
- Low-End: Focuses on cost-effective swaps (e.g., $600 toilet, $30/m² tiles), often DIY-friendly.
- Mid-End: Full reno with professional trades, mid-range materials (e.g., $1,500 vanity), no major structural shifts.
- High-End: Includes bespoke items (e.g., $3,000 sink), structural work, and consents ($500–$2,000, aucklandcouncil.govt.nz).
- Auckland Factor: Costs exceed NZ averages ($6,000–$12,000 low, $15,000–$30,000 mid, $30,000–$50,000 high) due to urban premiums.
Detailed Cost Breakdown for Bathroom Renovations in Auckland (2025)
| Component | Low-End ($) | Mid-End ($) | High-End ($) | % Budget |
|---|---|---|---|---|
| Labor | 3,000–5,000 | 8,000–12,000 | 15,000–25,000 | 40–50% |
| Materials (tiles, gib, etc.) | 1,500–3,000 | 4,000–8,000 | 8,000–15,000 | 20–25% |
| Fixtures (shower, toilet, etc.) | 1,000–2,500 | 3,000–6,000 | 6,000–12,000 | 15–20% |
| Plumbing | 1,000–1,500 | 2,000–3,000 | 3,000–6,000 | 8–12% |
| Electrical | 500–1,000 | 1,000–2,000 | 2,000–4,000 | 5–8% |
| Painting/Plastering | 500–1,000 | 1,500–2,500 | 2,500–4,000 | 5–10% |
| Waterproofing | 300–500 | 500–1,000 | 1,000–2,000 | 3–5% |
| Structural Changes | 0 | 0–1,000 | 2,000–5,000+ | 0–10% |
| Total | 8,000–15,500 | 20,000–35,500 | 35,000–65,000+ | – |
Notes:
- Low-End: Minimal trades (e.g., plumber only, $90–$120/hour), basic materials (ceramic tiles, $30–$50/m²), no structural work.
- Mid-End: Full trade team, mid-range fixtures (e.g., $1,500 shower), gib replacement, minor plumbing tweaks.
- High-End: Luxury materials (e.g., stone tiles, $100–$150/m²), custom fixtures ($3,000 vanity), structural shifts (e.g., $2,000+ consents).
- Auckland Premium: Labor and permits (Building Code Clause E2) inflate costs vs. NZ norms.
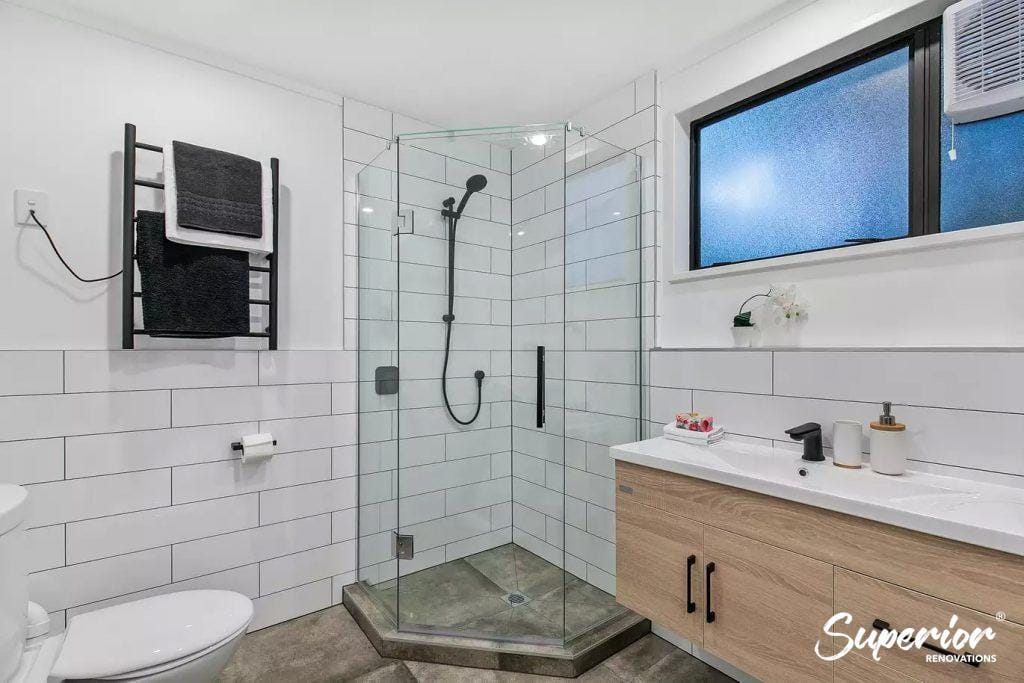
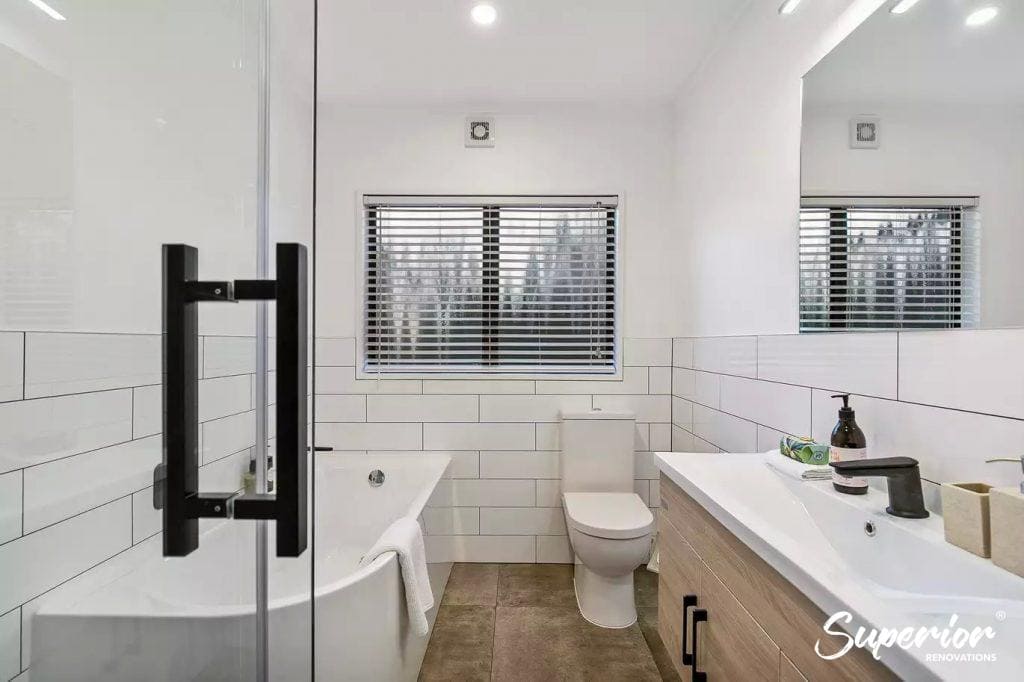
See full project specifications for the bathroom renovation below + Pictures
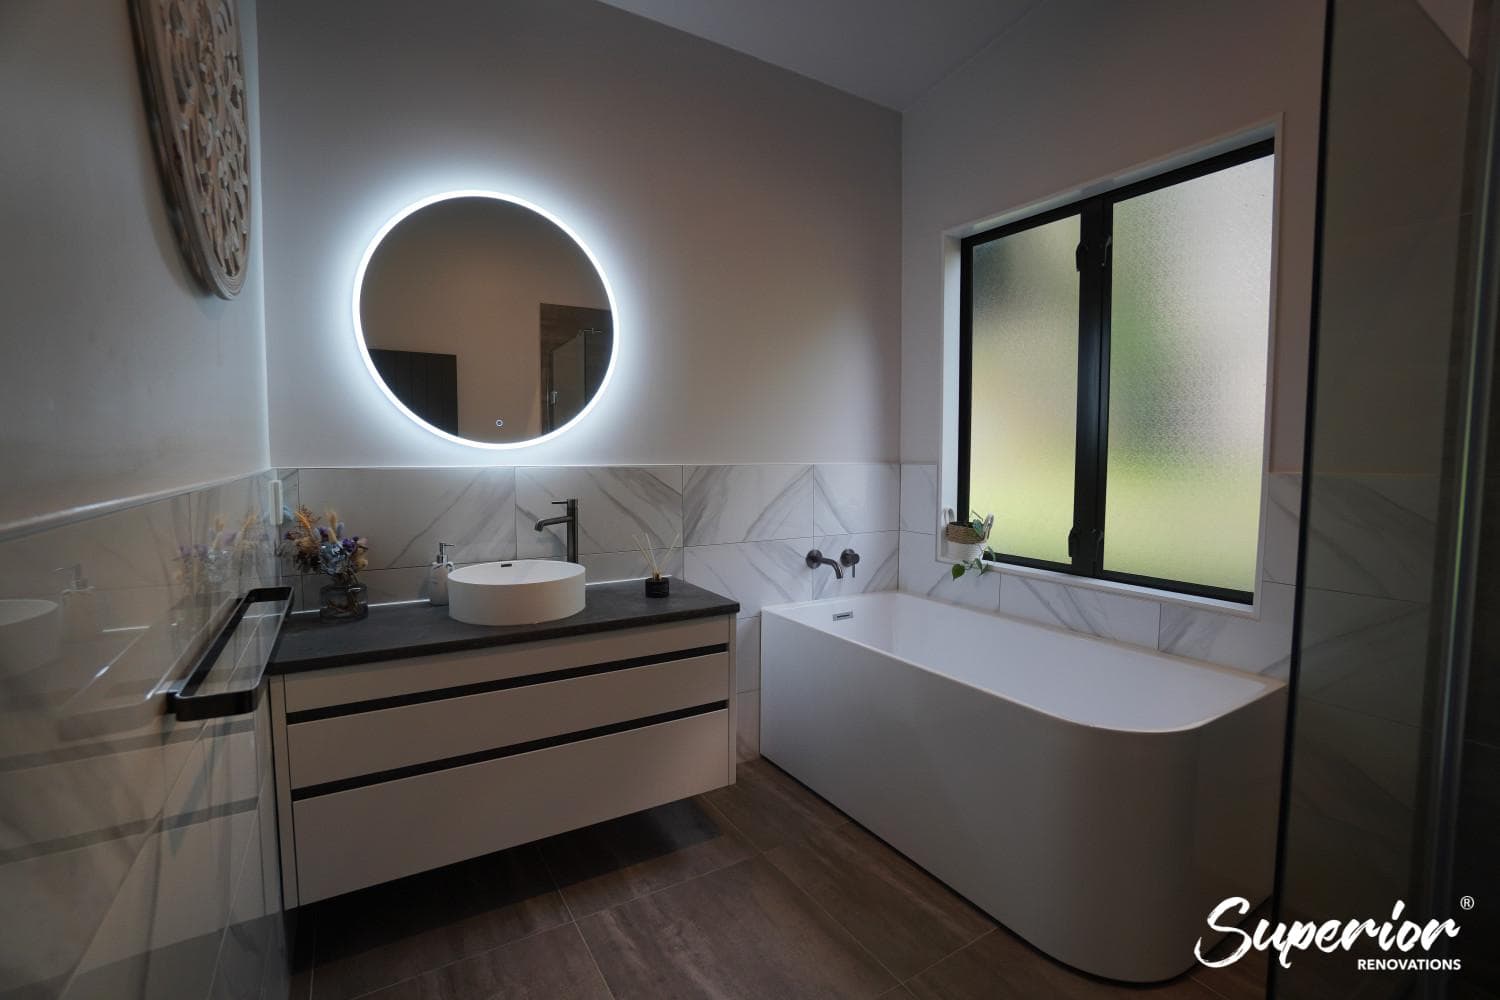
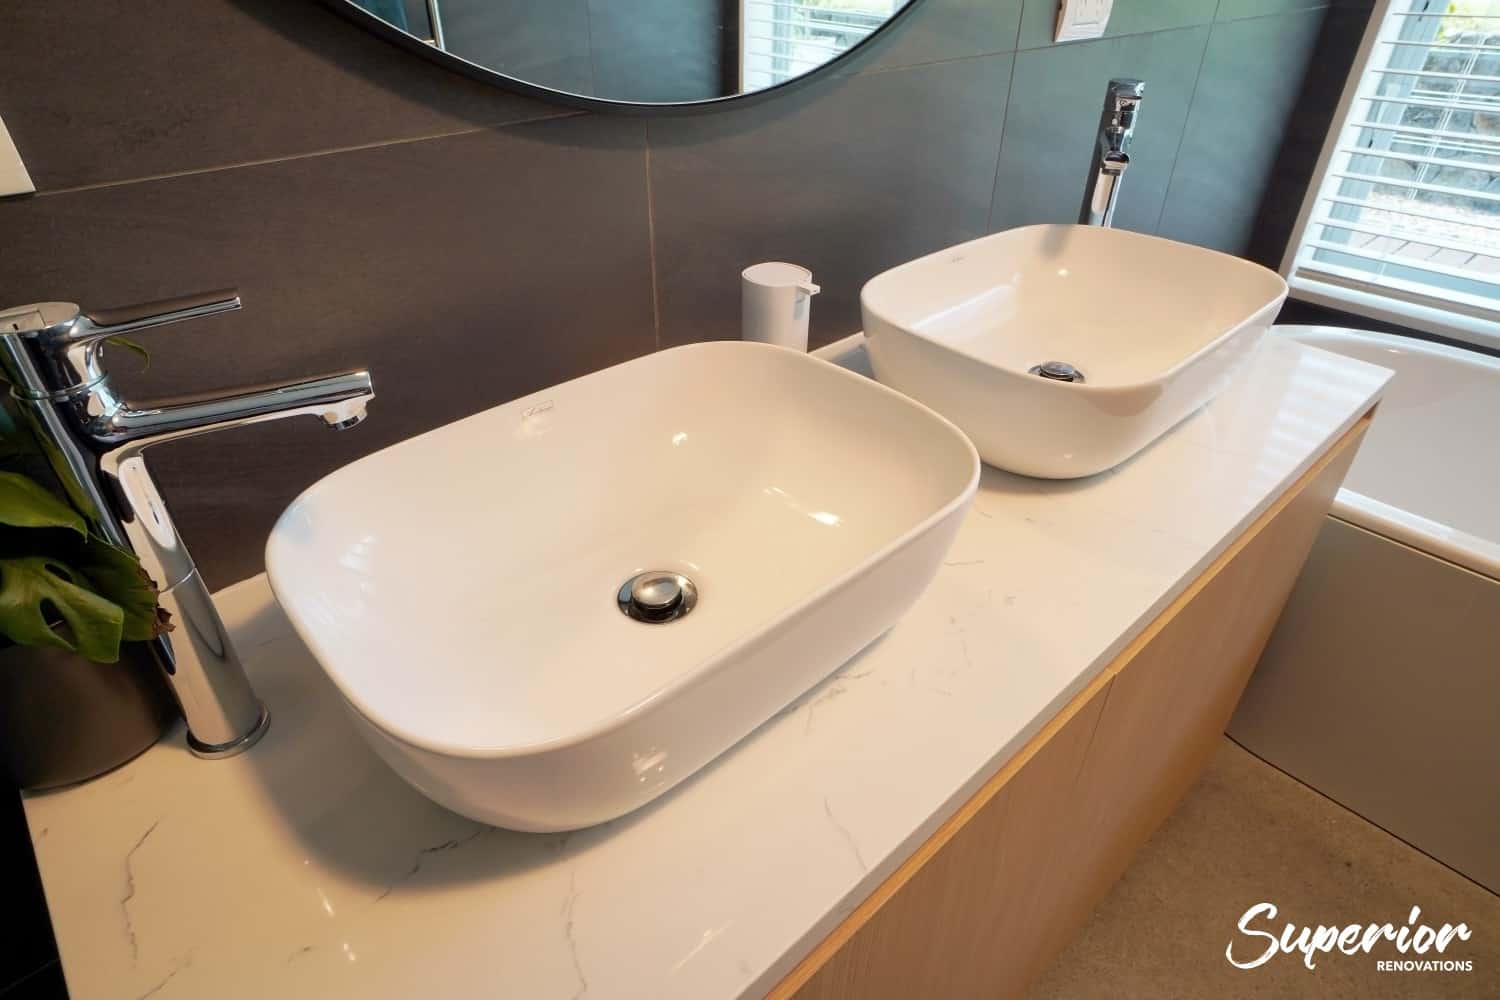
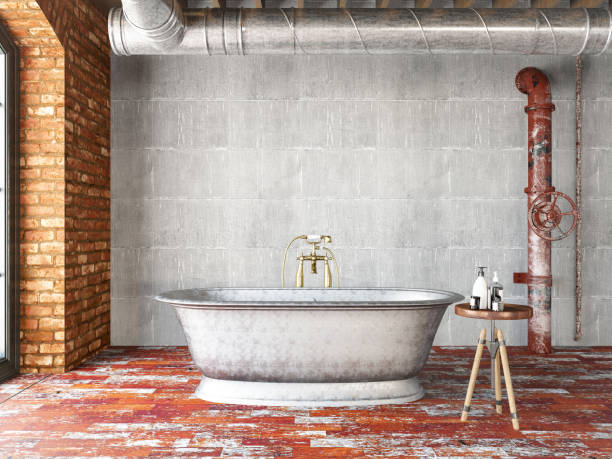
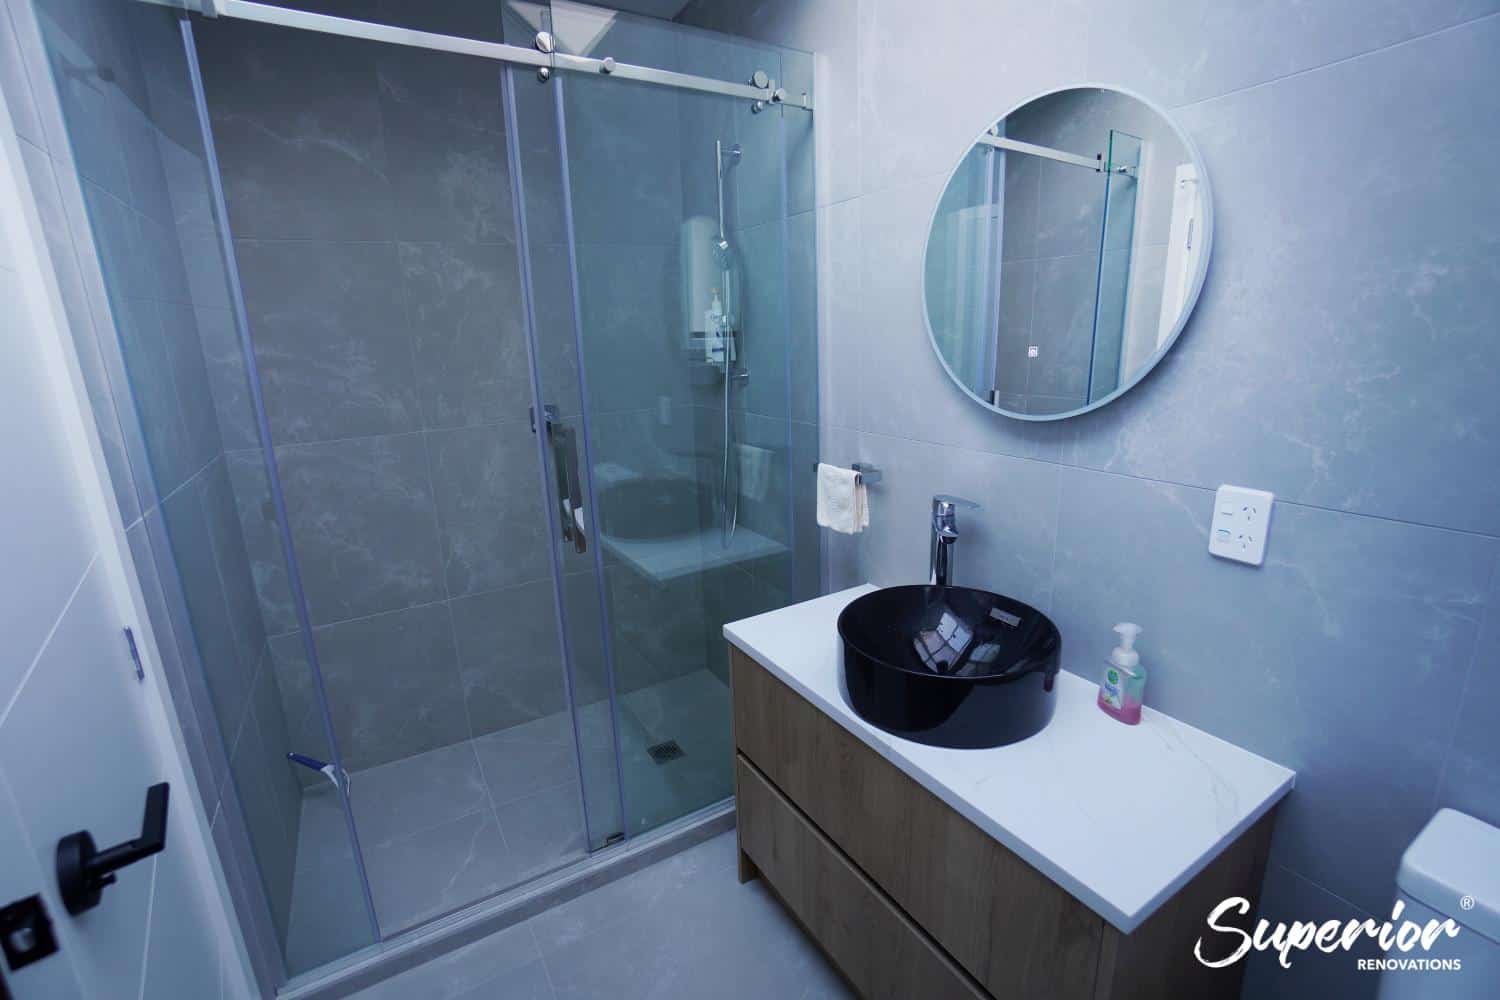
This contemporary bathroom renovation in Henderson Valley features matte black tiles, wall bathtub, custom vanity, top sink, Tiled shower and brushed brass fittings.
Official Guidance: When Bathroom Renovations Need Consent (Auckland Council & Building.govt.nz)
- Exempt: Repair/replacement of existing sanitary fixtures (e.g., sink/toilet) if by authorized person—no consent needed (Auckland Council: Kitchen and Bathroom Home Renovations page).
- Required: Adding new sanitary fixtures (e.g., extra bath/toilet), tiled wet areas, plumbing affecting structure (e.g., floor joists), or drainage changes (Schedule 1 exemptions do not apply).
- Minor plumbing under $5,000 may qualify for simplified processes, but structural/waterproofing impacts trigger full consent (building.govt.nz & Auckland Council guidelines). Always check with Auckland Council—fines up to $200,000 possible for unconsented work (Building Act penalties via building.govt.nz).
2. How Much Does It Cost to Renovate a Bathroom in Auckland in 2026?
Since most of our visitors are from Auckland, we decided to dedicate a section just about Auckland. Whether you’ve been in your Auckland home for years or recently bought an older property in suburbs like Ponsonby or Papatoetoe, you might be facing the need to renovate that dated bathroom. In Auckland, bathroom renovations are among the priciest home upgrades—often more expensive than in other parts of New Zealand due to higher labor rates, material costs, and demand for skilled tradespeople. Naturally, the first question on your mind is: What’s the average bathroom renovation cost in Auckland?
The answer isn’t straightforward because renovation scope varies widely. In Auckland, a mid-range bathroom renovation—think retiling, new fixtures, and some plumbing or electrical tweaks—typically costs between $25,000 and $32,000. That’s about 20-30% higher than the national average of $21,000–$26,000, reflecting Auckland’s premium market. Post-COVID, you’d hope for a price drop, but rising material costs (e.g., imported tiles) and labor shortages have kept prices elevated, especially in this bustling city.
By contrast, outside Auckland—say, in Christchurch or Hamilton—a similar mid-range project might cost $18,000–$24,000, thanks to lower labor rates and less pressure on supply chains. If you’re in Auckland and planning a full overhaul (e.g., layout changes, custom vanities, high-end fittings), expect costs to climb to $40,000–$60,000. For a budget refresh—like a new coat of paint and minor updates—costs could dip as low as $3,000–$5,000, though even these smaller jobs tend to be pricier here than elsewhere in NZ.
How to Estimate Your Bathroom Renovation Cost in Auckland
Pinpointing the average cost of a bathroom renovation in Auckland can feel tricky due to its variability, but at Superior Renovations, we’ve got practical tips to help you budget accurately—especially in this high-cost region.
Step 1: Define Your Goal
Start by clarifying why you’re renovating. Are you aiming to modernize a tired bathroom in an Auckland villa to match its chic décor, or do you need more space in a cramped Mt. Eden flat? In Auckland, modernizing often means sleek finishes and premium fixtures (adding to costs), while space upgrades might involve costly structural work due to the city’s older housing stock and strict council permits.
Step 2: List Your Renovation Needs
Make a detailed list of what’s required:
- Fixtures: Sinks, toilets, showers, or bathtubs (Aucklanders often opt for high-end brands, pushing costs up).
- Tiles: Floor and wall tiles (imported options popular in Auckland can cost $50–$150/m² vs. $30–$80/m² elsewhere).
- Lighting and Paint: Modern LEDs and durable paints for Auckland’s humid climate.
- Cabinetry and Extras: Custom vanities, mirrors, and towel racks—small details that add up fast in this design-savvy city.
Step 3: Research Auckland Prices
Check local suppliers like Bunnings, Mitre 10, or Auckland-based Tile Space for material costs. In Auckland, expect to pay more—e.g., a mid-range shower unit might cost $1,500 here versus $1,200 in Wellington. Look for seasonal sales, but factor in delivery fees, which can be higher due to urban logistics.
Step 4: Account for Auckland Labor Costs
Hiring tradespeople in Auckland is a big chunk of your budget—often 50% or more. Plumbers, electricians, and tilers charge premium rates ($80–$120/hour) compared to $60–$90/hour outside the city.
Step 5: Plan for Extra Costs
Auckland renovations often uncover surprises like rotten floorboards or outdated wiring—common in older homes. Add a 15-20% contingency ($4,000–$10,000 for a mid-range job) to cover permits (stricter in Auckland), disposal fees, and repairs. Outside Auckland, these extras might be 10-15% lower due to simpler regulations and cheaper waste management.
Step 6: DIY to Save
Consider tackling simpler tasks yourself, like painting or demolition, to offset Auckland’s high labor costs. However, leave plumbing and electrical work to pros—DIY mistakes here can be costly to fix under Auckland Council’s watchful eye.
Spread the Cost: Start with big-ticket items (e.g., tiling, fixtures) and add smaller upgrades later to manage your budget in this pricey market.
3. 7 Factors that contribute to the Cost of a bathroom Renovation in NZ
-
Size of the bathroom
- The size of the bathroom is a key factor that affects the cost of a renovation. Larger bathrooms require more materials and labour, which can drive up the cost. A standard-sized bathroom in NZ is usually around 8-12 square metres. If your bathroom is larger than this, you can expect to pay more for the renovation. However, if your bathroom is smaller, it may be more affordable to renovate.
-
Quality of materials
- The quality of materials used for the renovation can also have a significant impact on the overall cost. Higher-quality materials such as natural stone, premium tiles, and fixtures made of premium materials like brass and stainless steel will be more expensive. Lower-quality materials like vinyl, laminate, or ceramic tiles will be more affordable. However, it’s important to note that using lower-quality materials may not last as long and may require more maintenance and repair over time.
-
Complexity of the design
- The complexity of the design of the bathroom is another factor that can affect the cost of the renovation. If you have a unique design in mind or want to incorporate custom features, this will likely require more labour and materials, which can increase the cost of the project. For example, adding a new shower or bath, changing the layout of the bathroom, or installing custom cabinetry can all increase the complexity of the design and add to the cost.
-
Plumbing and electrical work
- If your bathroom renovation involves changing the plumbing or electrical systems, this can add to the cost of the project. This is because licensed professionals will need to be hired to ensure that the work is done safely and up to code. Plumbing work may include installing new pipes or moving existing ones, while electrical work may include installing new lighting or adding outlets.
-
Labour costs
- Labour costs are a significant component of the cost of a bathroom renovation. The cost of labour can vary depending on the level of experience and expertise of the contractors or tradespeople involved in the project. It’s important to choose a reputable and experienced renovation company to ensure that the work is done to a high standard and within budget.
-
Permits and fees
- Depending on the scope of the renovation, permits and fees may be required from the local council. These costs should be factored into the overall renovation budget. The cost of permits and fees can vary depending on the location of the property and the scope of the renovation.
-
Location
- The location of the property can also impact the cost of the renovation. Renovations in Auckland may be more expensive than other parts of New Zealand due to higher labour and material costs. Additionally, if the bathroom is in an apartment or multi-level building, there may be additional costs associated with access to the site, such as elevator or stair fees.
The cost to renovate a bathroom in NZ can vary based on several factors, including the size of the bathroom, quality of materials used, complexity of the design, plumbing and electrical work involved, labour costs, permits and fees, and location. By considering these factors and working with a reputable and experienced renovation company, you can ensure that your bathroom renovation is completed to a high standard and within budget.
4. Why Renovate Your Bathroom in Auckland? 4 Key Reasons and Costs in 2026
Renovating your bathroom in Auckland isn’t just about fixing what’s broken—it’s about aligning the space with your family’s needs and boosting your home’s value or comfort. Having a clear plan ensures your budget targets the right priorities, whether you’re in a bustling Auckland suburb like Ponsonby or elsewhere in NZ. Different households have unique reasons to renovate, and these drive choices like bathtubs, showers, or luxury fittings. Here’s why Aucklanders renovate bathrooms in 2025, with cost insights to guide you.
1. Young Families: Safety and Functionality
Young families—think new parents or those with toddlers—often renovate to make bathrooms safe and practical. In Auckland, where space can be tight in older homes, adding a bathtub or child-friendly features tops the list.
Key Features for Young Families:
- Bathtubs: Essential for bathing kids. A mid-range freestanding tub in Auckland costs $1,500–$3,000 (vs. $1,200–$2,500 elsewhere in NZ).
- Non-Slip Flooring: Textured tiles ($50–$100/m²) or mats reduce slips—crucial for wet, busy bathrooms.
- Storage: Built-in shelves or cabinets ($500–$1,500) keep toys and toiletries tidy.
- Child-Safe Fixtures: Soft-close toilet seats ($100–$200) and handheld showers ($150–$300) add convenience and safety.
- Grab Bars: $50–$150 each, offering support for kids learning to bathe solo.
Auckland Example:
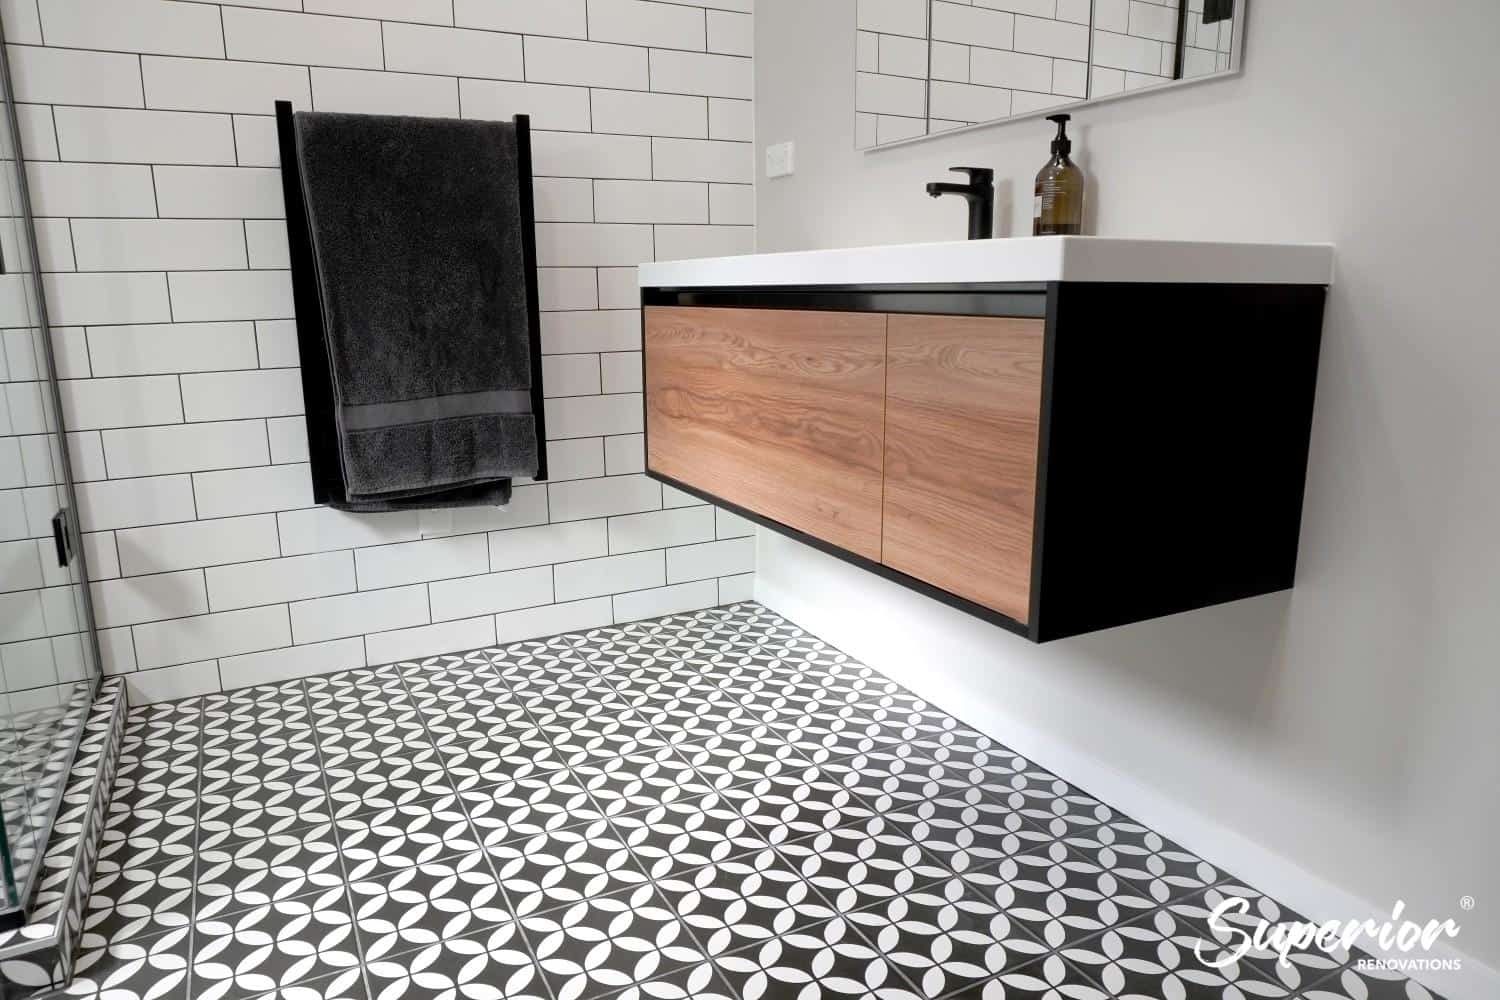
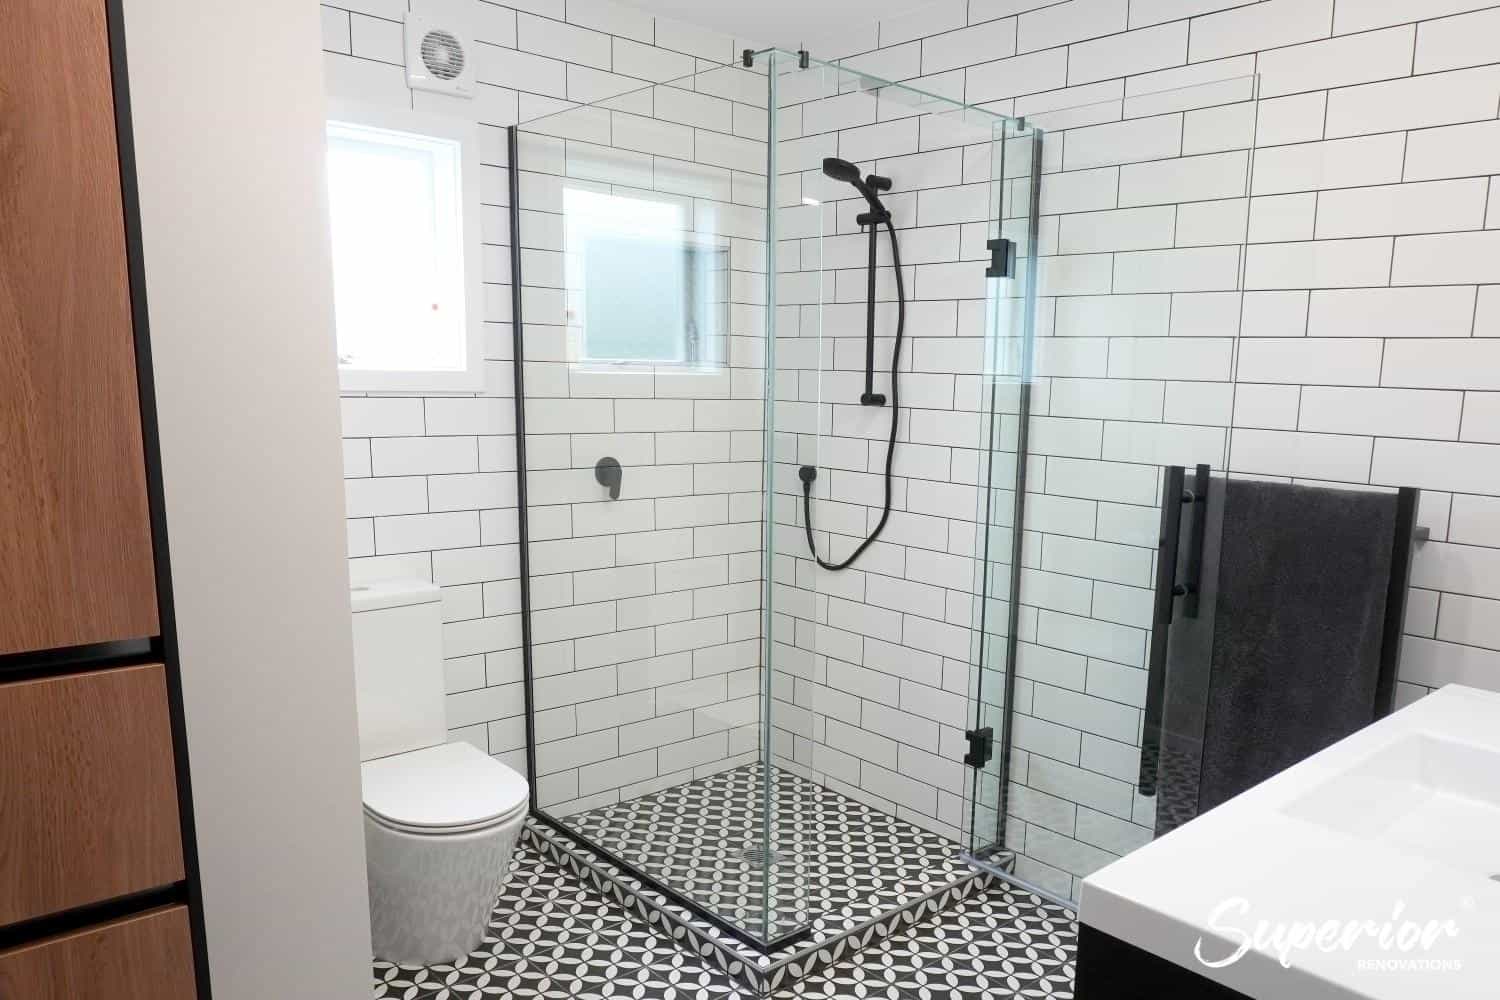
- Westmere Renovation: This rustic design features a large wet area (perfect for bathing kids), matte anti-slip tiles, and a double-sink vanity for shared use. The premium Artisan Moss Green tiles (6.5×20 cm, $80/m² from Tile Depot) and custom MDF cabinetry pushed costs to $30,000–$35,000—higher due to labor-intensive tiling and Auckland’s tradie rates ($90–$120/hour).
Cost Range: $25,000–$35,000 in Auckland (vs. $20,000–$28,000 elsewhere), reflecting premium materials and labor.
Spotlight: See full project specifications + Pictures of the bathroom renovation shown below.
The cost to renovate the bathroom below would be on a slightly higher side because of the choice of fittings. The tiles used in the feature wall of the wet area from Tile Depot are of the size 6.5 x 20 which is a fairly small size. This means that it is a lot more labour intensive to install as opposed to tiles in a larger format as there is less grouting to do. These Artisan Moss green tiles come in various shades of green with a glossy texture are also from Tile Depot’s more premium range in tiles.
The custom built vanity and benchtop also contributes to higher cost of the bathroom.

This bathroom is a good example of a bathroom design for families with young children. The ample space in the wet area is a perfect space for adults to bathe their children.
Bathroom Renovation in West Harbour
This bathroom renovation features a large bathtub which is again a good addition when you have young children. The free standing bathtub makes it easier to clean around the tub which allows for a healthy and hygienic environment.
Spotlight: See full project specifications + Before and After pictures.
As this bathroom is quite large, with full wall and floor tiles, a free standing bathtub, a vanity, toilet and custom tiled shower, the cost to renovate this bathroom would be between $35,000 to $38,000. The fixtures chosen for this bathroom design were from mid-range brands which means that the cost were on the lower side compared to if the fixtures were more premium.
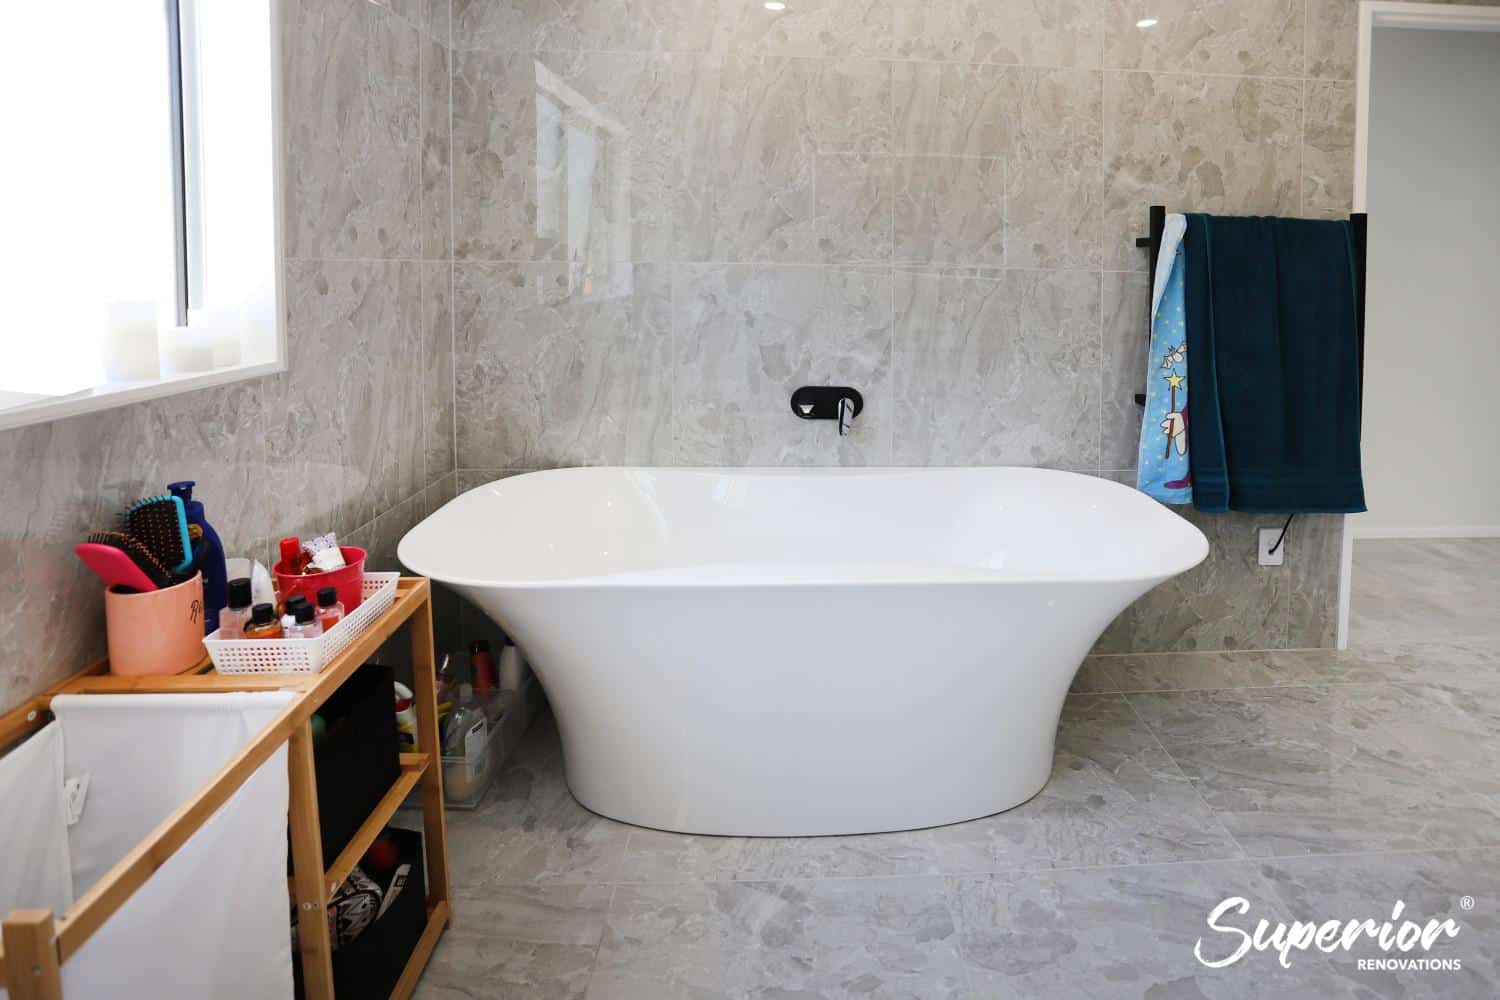
This bathroom renovation design shows a free standing bathtub.
2. Growing Families: Space and Convenience
As families grow—think teens or multi-generational households—bathrooms need to adapt. In Auckland, where homes often house extended families, this might mean adding a separate toilet, splitting an ensuite, or building a new bathroom.
Design Ideas:
- Dual-Use Features: Combine a shower and bathtub for all ages. A combo setup costs $2,000–$4,000 in Auckland.
- Extra Facilities: Converting a bedroom into a bathroom (e.g., $35,000–$45,000) or adding a toilet ($10,000–$15,000) boosts convenience.
- Storage Upgrades: Floating vanities ($800–$2,000) maximize floor space.
Auckland Example:
- Albany Renovation: This modern bathroom blends a shower and bathtub, using oversized dark tiles ($60/m²) and a wooden floating vanity for a cozy, versatile feel. Cost: $28,000–$32,000.
- Avondale Project: A bedroom transformed into two bathrooms for a three-generational family, costing $40,000–$50,000 due to plumbing and Auckland permit fees ($1,000–$2,000).
Cost Range: $28,000–$50,000 in Auckland (vs. $22,000–$40,000 elsewhere), driven by space adjustments and urban labor costs.

Our clients have shown a strong preference for modern bathroom designs due to their versatility and ability to complement a wide range of home styles. To achieve an attractive contrast, we opted for oversized dark tiles on the floor that coordinated well with the neutral color palettes of the walls and bathtub. Additionally, we aimed to create a cozy atmosphere in the room by installing floating vanities made of wood.
Read more…
This home was renovated for a large family. Bathrooms were created in a space that previously was a bedroom for two young girls. See full project specifications below:
Bathroom renovation in Avondale for a growing 3 generational family
3. Adding Value for Resale or Rental
Renovating to sell or rent in Auckland’s competitive market? Buyers and renters favor move-in-ready homes, so focus on cost-effective updates over luxury splurges. Per industry data (e.g., Houzz), bathroom renovations typically return $1.50 per $1 spent—higher in Auckland’s hot property scene.
Smart Choices:
- Mid-Range Fixtures: A $500 vanity or $800 shower beats a $3,000 designer sink for ROI.
- Neutral Design: Half-height tiles ($30–$50/m²) and simple layouts keep costs down while appealing broadly.
- Repairs First: Fix leaks or mold ($1,000–$3,000) before aesthetics.
Auckland Example:
- St Heliers Renovation: This compact design uses a narrow bathtub, wall-hung vanity, and dark tiles halfway up the walls—costing $20,000–$25,000. It’s budget-friendly yet modern, perfect for resale.
Cost Range: $20,000–$28,000 in Auckland (vs. $15,000–$22,000 elsewhere). Avoid overcapitalizing—stick to updates that match market expectations.

This bathroom design features a narrow bathtub to accommodate the small layout of the bathroom, wall hung vanity, dark hued tiles and a tiled glass shower. The walls were lain only halfway across the ceiling to keep the bathroom renovation costs down.
Read more…
Bathroom Design NZ Guide – For Guest Bathrooms and Master Ensuite Bathroom
A guide on Small Bathroom Designs – Layout, Cost of Bathroom and Design
4. Enhancing Comfort with a Luxury Bathroom
Renovating for personal enjoyment in Auckland? Go big with a spa-like retreat. Luxury upgrades—popular in affluent areas like Parnell or Titirangi—elevate quality of life, even if they don’t fully recoup costs.
Luxury Features:
- Wet Rooms: Ideal for small spaces, costing $10,000–$15,000 with seamless tiling.
- Premium Fixtures: A $3,000 sink or Methven matte black taps ($300–$600) add sophistication.
- Custom Details: Art deco tiles ($100–$150/m²) or sliding shower doors ($1,500–$2,500) scream high-end.
Auckland Examples:
- Titirangi Renovation: This contemporary space features intricate art deco floor tiles (labor-intensive at $120/m²) and premium St Michel fixtures, costing $35,000–$40,000.
- Mellons Bay Project: Seamless matte tiles, a custom vanity with MDF panels, and a sliding-door shower hit $40,000–$45,000—pricey but luxurious.
- Parnell Luxury: A dark, moody bathroom with high-end finishes, costing $45,000–$55,000 (source: Superior Renovations portfolio).
Cost Range: $35,000–$60,000 in Auckland (vs. $30,000–$50,000 elsewhere), reflecting premium tastes and labor.
Bathroom Design ideas for Classic, Vintage, Modern and Contemporary Bathrooms
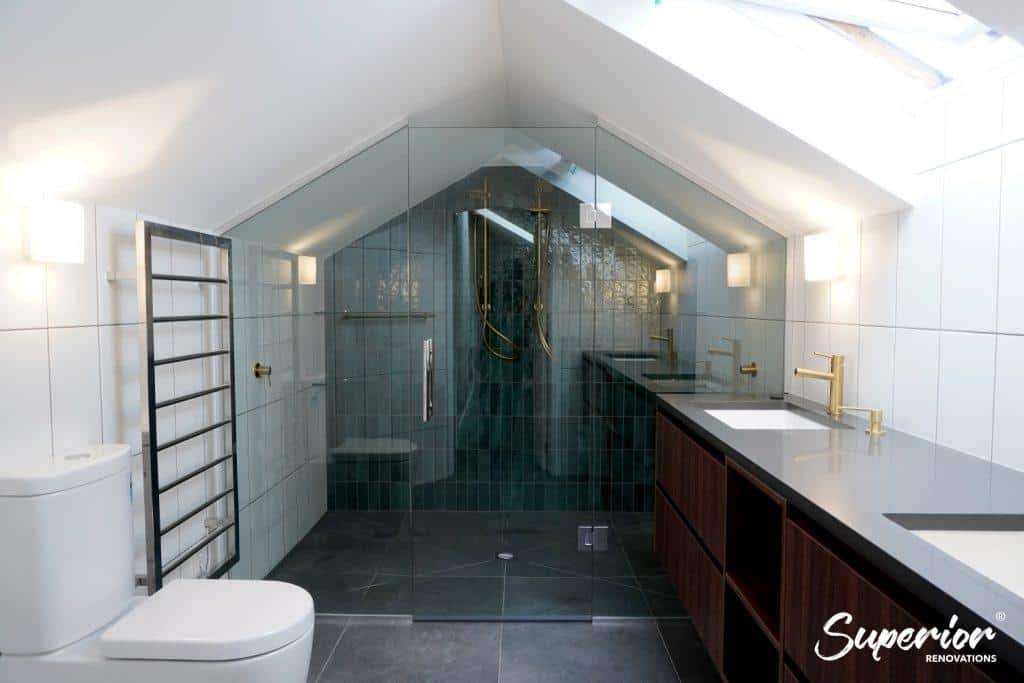
Spotlight: Contemporary bathroom renovation in Titirangi
While the bathroom below may look like a simple bathroom renovation, it in fact is a work of art when it comes to its tiling work. The art deco tiles used on the floors required a high skill level to tile and grout because all the tiles had to be perfectly laid to match the patterns of the other tiles to create the design.
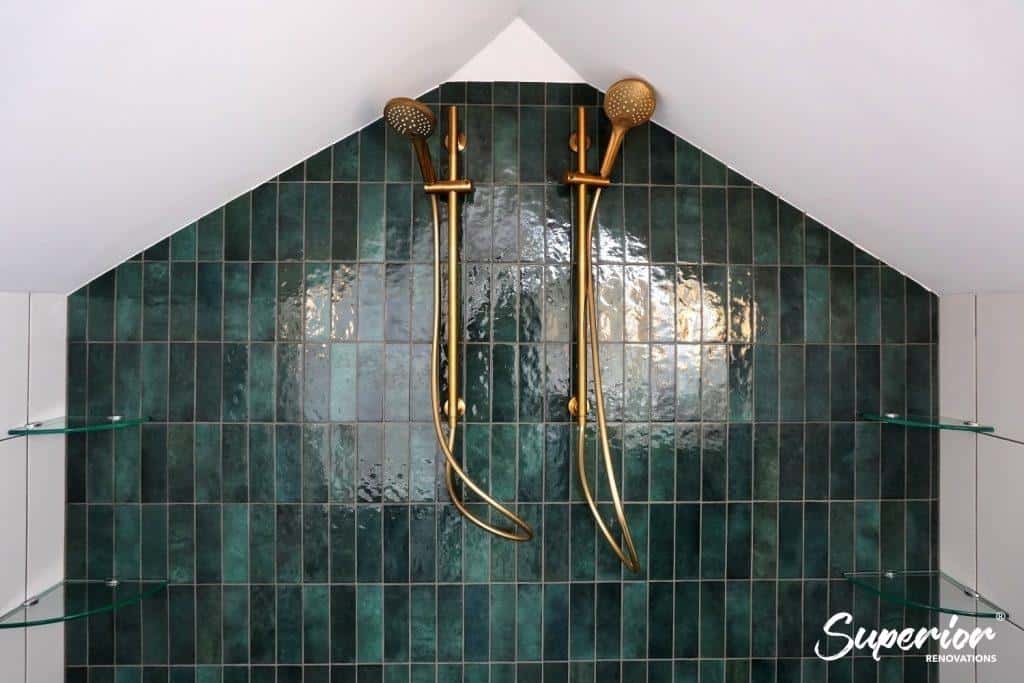
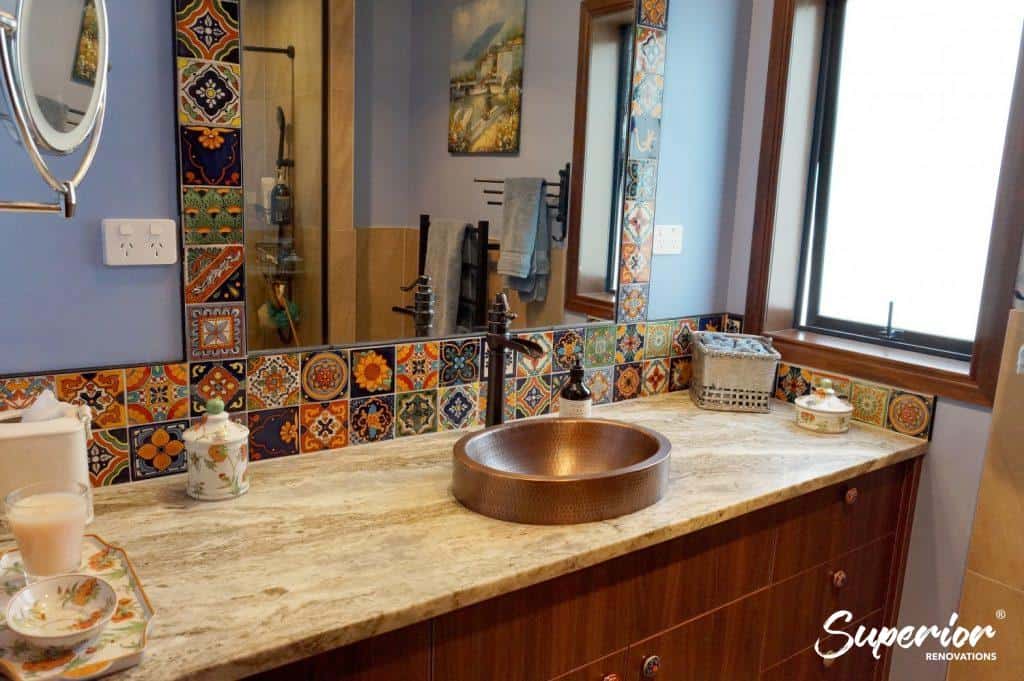
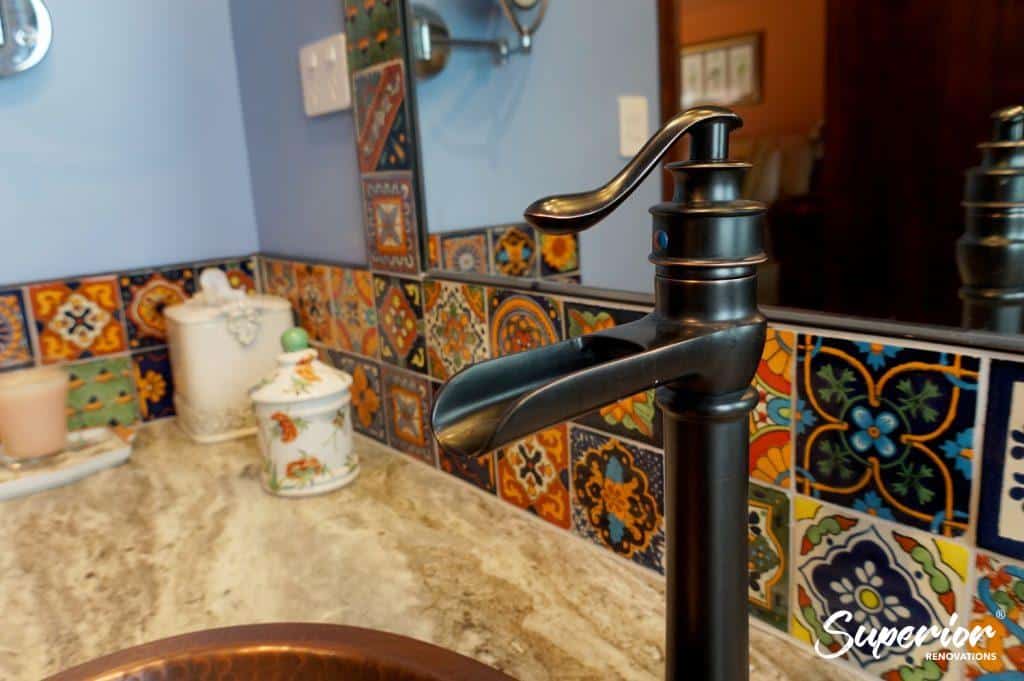
“Matte black fixtures remain the top trend in premium suburbs like Parnell and Remuera in 2026, but pair them with anti-corrosion coatings in coastal areas like St Heliers to last longer.” — says Cici, Senior Designer, Superior Renovations.
The fixtures used in this bathroom like the vanity, mirror cupboard and matte black tapware are from a more premium range of bathroom supplies using brands such as St Michels, and Methven.
See more Luxury bathroom renovations…
Dark and Moody bathroom in Redvale
Spotlight: This bathroom renovation in Mellons Bay, features a dramatic with design with matte tiles that look seamless and without grout lines.

The shower features a sliding door which is a feature that increases the overall cost of the bathroom renovation compared to glass doors that open like a door. The vanity is also custom built with a round black top mounted basin. The MDF wooden looking textured panels of the vanity exudes some warms in the overall bathroom design.
5. How to Lower Your Bathroom Renovation Cost in Auckland: 5 Smart Tips for 2026.
The average bathroom renovation cost in Auckland ranges from $20,000 to $60,000 in 2025, but that’s just a starting point—your choices can significantly trim the bill. Whether you’re refreshing a small ensuite in Parnell or overhauling a family bathroom in Papatoetoe, these five tips will help you save without sacrificing quality. Here’s how to reduce your Auckland bathroom renovation costs effectively.
1. Refresh Instead of Replace Cabinets and Fixtures
Swapping out bathroom cabinets or fixtures can inflate costs fast—new vanities alone run $800–$3,000 in Auckland. Instead:
- Repaint or Restain: A fresh coat of modern paint (e.g., white or matte grey, $50–$100) or stain ($30–$80) revives old cabinets.
- Refinish Sinks and Tubs: Resurfacing a bathtub or sink ($300–$600) beats replacing them ($1,500–$3,000). In Auckland’s humid climate, opt for durable, moisture-resistant finishes.
- Savings: Cuts $1,000–$2,500 off your budget vs. new installs.
2. Upgrade Faucets and Handles, Not Full Appliances
A full fixture overhaul (e.g., new toilet, sink, shower) can cost $3,000–$10,000 in Auckland. For a modern look on a budget:
- New Faucets: Mid-range taps from Methven or Mitre 10 ($150–$500) update sinks and showers.
- Handles: Swap cabinet or shower handles ($20–$100) for a sleek finish.
- Why It Works: In Auckland, where labor rates hit $90–$120/hour, minimizing installs saves big—expect $500–$1,500 total vs. $3,000+ for new units.
3. Use Light Colors to Boost Space Perception
Knocking down walls to enlarge a bathroom in Auckland costs $5,000–$15,000, plus permits ($500–$2,000). Skip the sledgehammer:
- Light Paint: Pale shades like beige, soft yellow, or white ($50–$100 for quality paint) make small spaces feel airy.
- Mirrors: A large mirror ($200–$600) amplifies light and depth.
- Auckland Tip: In compact urban homes (e.g., Mt. Eden flats), this trick avoids costly structural work, saving thousands.
4. Opt for Cost-Effective Shower Solutions
Replacing a shower in Auckland averages $1,500–$9,000, depending on materials and plumbing. To cut costs:
- Acrylic Shower Box: $900–$2,000 (installed) is low-maintenance and quick to fit—ideal for time-poor Aucklanders.
- Tiled Shower: $2,500–$4,000 offers luxury but requires more cleaning and labor ($100–$150/m² for tiles, $1,000+ for install).
- Glass Doors: Stick to standard hinged doors ($800–$1,500) over pricier sliding options ($1,200–$2,500).
- Plumbing Note: Adding new lines costs $1,000–$2,500 in Auckland—reuse existing pipes if possible.
Bathroom Renovation Cost Breakdown:
| Component | Cost Range | Notes |
| Acrylic Shower | $900–$2,000 | Easy-clean, budget-friendly |
| Custom Tiled Shower | $2,500–$4,000 | Premium but labor-intensive |
| Shower Glass Door | $800–$2,500 | Hinged cheaper than sliding |
| New Faucet | $150–$500 | Quick modern upgrade |
| Extra Plumbing | $1,000–$2,500 | Avoid if possible |
5. DIY Simple Tasks to Slash Labour Costs
Labour eats up 40-50% of your bathroom renovation cost in Auckland ($10,000–$20,000 for mid-range projects). Take on easy jobs yourself:
- Painting: $100–$200 for supplies, saving $500–$1,000 in tradie fees.
- Demolition: Removing old tiles or fixtures ($200–$500 in tools) cuts $1,000–$2,000.
- Accessories: Install towel racks or mirrors ($50–$150), avoiding $200–$400 in labor.
- Caution: Leave plumbing and electrical work to pros—DIY errors in Auckland’s strict code environment can cost $1,000+ to fix.
Get Started with Superior Renovations
Ready to renovate your Auckland bathroom—or just exploring ideas? Call us at 0800-199-888 (9 AM–5 PM) for expert advice tailored to your budget. Not set to start yet? Visit our Wairau Valley showroom, open 7 days (9 AM–5 PM), featuring 5 bathroom displays, 3 kitchen setups, and hundreds of materials.

6.Average Toilet Renovation Cost
Average Toilet Renovation Cost in Auckland: 2026 Guide
In Auckland, separate toilets are common but often overlooked—small, dated spaces with worn vinyl and tired fixtures. Renovating your toilet alongside your bathroom makes sense: it saves time, cuts labor duplication, and trims costs by 10-15%. In 2025, a full toilet renovation in Auckland averages $6,500–$9,000, compared to $5,500–$7,500 elsewhere in NZ. Here’s what’s involved.
Why Renovate Your Toilet?
- Efficiency: Pairing it with a bathroom reno uses the same tradies (plumbers, tilers), reducing callout fees ($200–$400).
- Value Boost: A modern toilet appeals to Auckland buyers and renters.
- Auckland Reality: Small, neglected toilets in older homes (e.g., North Shore villas) deserve a refresh.
Cost Breakdown
| Task | Cost Range | Auckland Notes |
Tiling Works | ||
| Wall Tiles (to ceiling) | $2,200–$3,500 | Higher for complex layouts |
| Floor Tiles | $900–$1,200 | Anti-slip options popular |
Plumbing Works | ||
| Toilet Bowl & Bidet Spray | $600–$1,000 | Mid-range models (e.g., Englefield) |
| Wash Basin & Tap | $300–$500 | Space-dependent |
| Stainless Steel Piping | $500–$900 | Hot/cold upgrades add cost |
| Haulage & Disposal | $400–$700 | Urban rates apply |
| New Accessories | $250–$400+ | Mirrors, racks, etc. |
| Total | $6,500–$9,000 | Includes Auckland labor premium |
Turnaround Time
- 5–10 Working Days: Faster if paired with a bathroom reno; solo jobs may stretch to 10 days due to scheduling.
Building Consent Note
Per Auckland Council (aucklandcouncil.govt.nz), consent may be needed if:
- Plumbing Moves: Relocating a toilet or basin requires approval ($500–$2,000).
- Structural Changes: Knocking walls or altering drainage triggers checks (Building Code Clause G13).
Confirm with council— consents ensure compliance but add time and cost.
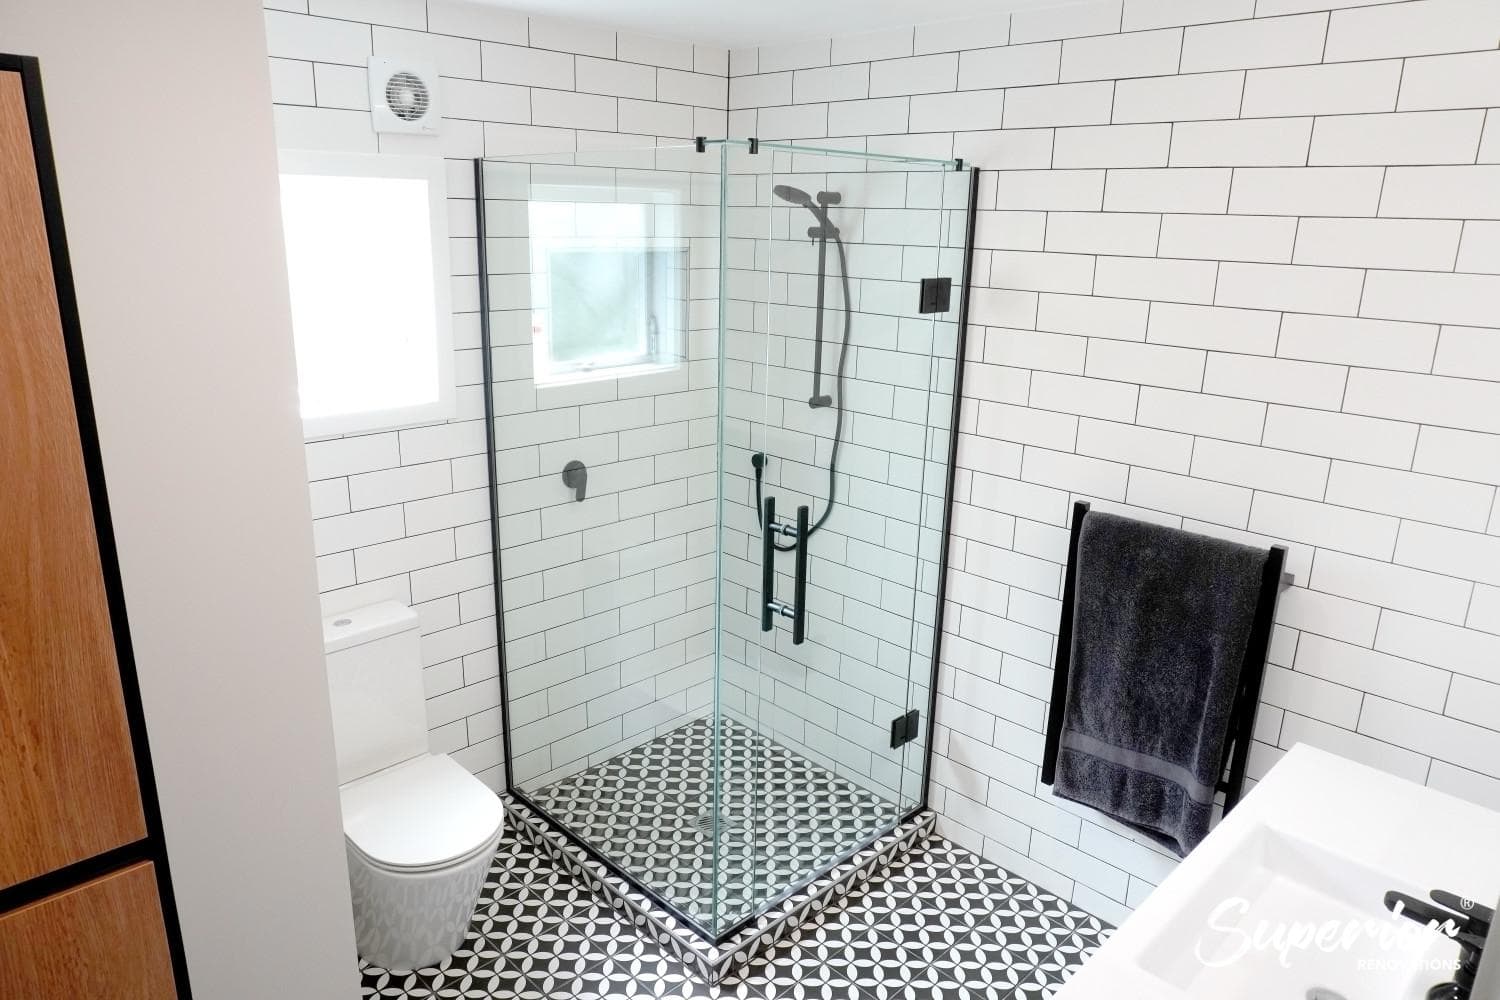
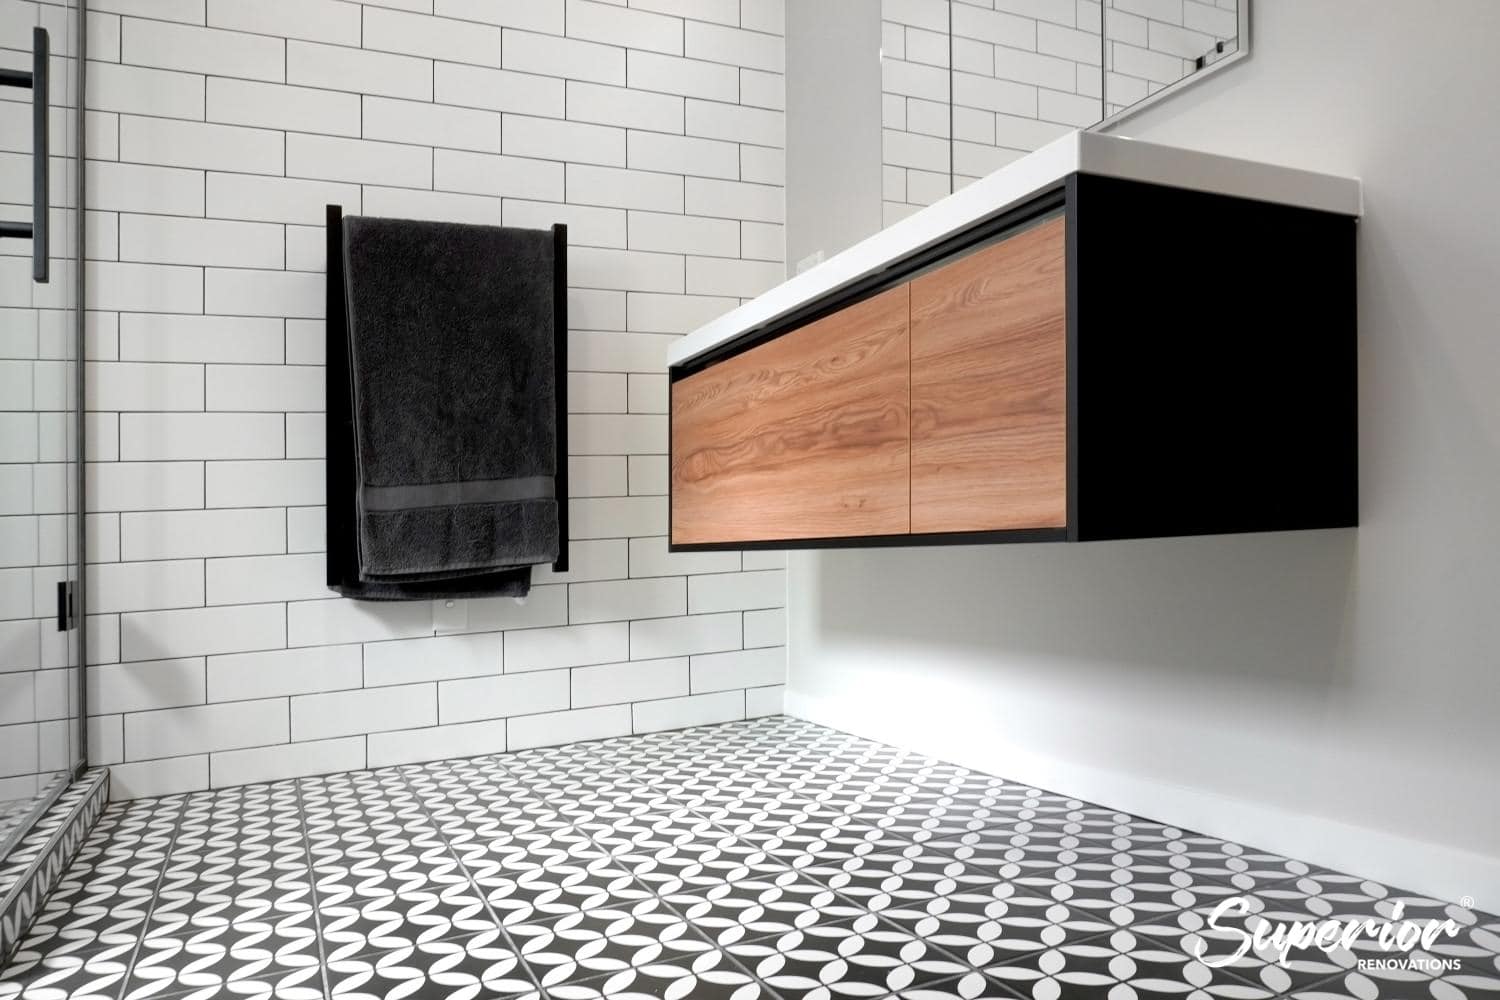
Spotlight: Bathroom Renovation in Redvale, Auckland
This bathroom was renovated in dark tones of grey and brown for tiles with a custom tiled shower and custom made vanity.
See full project specifications + Pictures for this bathroom renovation.

7. Cost to Install a Tile Shower in Auckland: 2026 Breakdown
A tiled shower brings style and durability to your Auckland bathroom, but it’s a premium choice reflected in the price. In 2025, installing a new tiled shower in Auckland costs $2,000–$9,500, higher than the national range of $1,550–$8,250 due to elevated labor and material rates. Retiling an existing shower (walls and floor) runs $1,800–$4,000, excluding waterproofing ($500–$1,500). Here’s why tiled showers shine—and what drives their cost.
Why Choose a Tiled Shower?
- Design Flexibility: Options like ceramic ($30–$50/m²), porcelain ($50–$100/m²), or natural stone ($80–$150/m²) offer endless colors, patterns, and textures.
- Auckland Appeal: In suburbs like Remuera or Titirangi, well-designed tiled walls elevate home value with a luxurious look.
- Durability: Properly installed, tiles outlast acrylic units, ideal for Auckland’s humid climate.
Tiled Shower Cost Breakdown
| Task | Cost Range | Auckland Notes |
| Remove Old Unit | $150–$250 | Higher if asbestos present |
| Haul Away Debris | $250–$500 | Urban disposal fees apply |
| Prepare Surface | $500–$1,200 | Includes leveling and waterproofing |
| New Tiled Shower | $1,000–$7,500 | Varies by tile type and size |
| Total | $2,000–$9,500 | Reflects Auckland labor ($90–$120/hr) |
Building Consent for Tiled Showers
Per Auckland Council (aucklandcouncil.govt.nz) and the NZ Building Code (building.govt.nz), a building consent is often required for new tiled showers in Auckland if:
- Plumbing Changes: Moving pipes or adding new lines triggers consent ($1,000–$2,000 in fees).
- Structural Work: Altering walls or floors (e.g., for a wet room) needs approval.
- Waterproofing Compliance: The Building Code (Clause E3) mandates proper waterproofing—faulty installs risk leaks, costing $2,000+ to fix.
Check with Auckland Council before starting; skipping consent can delay projects or incur fines.
NZ Building Code Clause E3: Internal Moisture – Key Requirements for Bathrooms From the official Building Performance site (building.govt.nz):
- Clause E3.3.1: “An adequate combination of thermal resistance, ventilation, and space temperature must be provided to all habitable spaces, bathrooms, laundries, and other spaces where moisture may be generated or may accumulate.”
- Clause E3.3.3: Floor surfaces in spaces with sanitary fixtures must be “impervious and easily cleaned.”
- Clause E3.3.4: Wall surfaces adjacent to sanitary fixtures must be “impervious and easily cleaned.”
- Clause E3.3.6: Surfaces likely to be splashed must prevent water from penetrating behind linings or into concealed spaces. Non-compliance risks fungal growth, damage, or health issues—Auckland’s humid climate makes proper waterproofing (e.g., membranes per E3/AS2) essential in renovations.
Cost-Saving Tips
- Larger Tiles: 30×60 cm tiles ($50–$80/m²) need less grout and labor than small mosaics ($80–$150/m²).
- Reuse Plumbing: Avoid $1,000–$2,500 in extra piping costs.
- Mid-Range Tiles: Ceramic at $30–$50/m² balances style and budget.
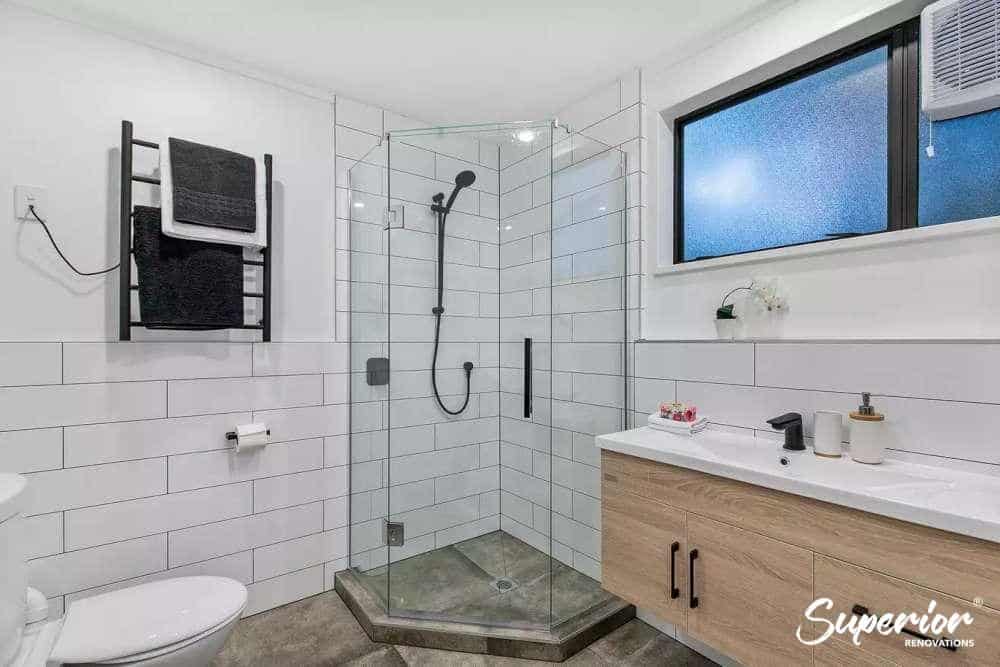
Spotlight: Vintage bathroom renovation in North Shore (pictured below)

This bathroom renovation highlights the use of bathroom fixtures that contribute to the overall bathroom design. Our client wanted a vintage bathroom design and hence we chose vintage fixtures from Englefield.
Watch Kalun from Tile Depot discussing emerging Tiling Trends
8. How Much Does a Bathroom Renovation Cost in Auckland and NZ? 2026 Summary
Planning your bathroom renovation starts with understanding your goals—whether it’s a quick refresh, a functional upgrade, or a luxury overhaul. In 2026, costs vary widely based on scope, especially in Auckland, where labor and materials carry a premium. Working with a renovation company like Superior Renovations typically covers demolition, product supply, fixtures, installation, waterproofing, flooring, painting, and project management. Here’s a breakdown of bathroom renovation costs in Auckland and NZ averages to guide your budget.
1. Standard Bathroom Minor Alterations (Low-Cost Option)
Want to keep your bathroom renovation cost in Auckland affordable? Stick to minor updates without rearranging the layout. Swap out old sinks, showers, toilets, or bathtubs for newer models while keeping plumbing in place.
- What’s Included: New fixtures, basic tiling, and paint—ideal for DIY or solo tradie jobs (e.g., plumber).
- Auckland Cost: $10,000–$15,000 (vs. NZ average $8,000–$13,000).
- Why Higher in Auckland?: Labor rates ($90–$120/hour) and urban material costs (e.g., $50/m² tiles) push prices up.
- Best For: Rental touch-ups or budget-conscious homeowners.
- Savings Tip: DIY painting or fixture swaps cut $1,000–$2,000 off professional fees.
2. Mid-Range Bathroom Renovation (Most Popular)
A mid-range renovation balances style and function, offering long-term benefits like improved lighting, extra sinks, or better showers. In Auckland, this is the go-to choice for families upgrading dated bathrooms in suburbs like Westmere or Albany.
- What’s Included: Mid-range fixtures (e.g., Englefield toilets, $600–$800), some premium touches (e.g., matte black taps, $200–$400), full tiling, and waterproofing—all managed by a renovation company.
- Auckland Cost: $28,000–$35,000 (vs. NZ average $26,000–$32,000).
- Why Higher in Auckland?: Tradies charge more, and permits ($500–$2,000) for plumbing tweaks add up.
- Benefits: Boosts home value (up to $1.50 per $1 spent, per Houzz) and daily comfort.
- Example: Adding a double vanity ($1,500–$2,500) or upgrading to a tiled shower ($2,500–$4,000).
3. Custom Bathroom Renovation (High-End Luxury)
Got a bigger budget? A custom bathroom renovation in Auckland transforms your space into a spa-like retreat, perfect for luxury homes in Parnell or Titirangi.
- What’s Included: High-end materials (e.g., quartz countertops, $2,000–$4,000), premium fixtures (e.g., bronze faucets, $500–$1,000), custom cabinetry (solid wood, $3,000–$5,000), and intricate tiling—all with full project management.
- Auckland Cost: $40,000–$60,000+ (vs. NZ average $34,000–$40,000+).
- Why Higher in Auckland?: Demand for bespoke designs and higher material costs (e.g., stone tiles at $100–$150/m²) drive the premium.
- Best For: Homeowners prioritizing comfort over resale ROI.
- Luxury Add-Ons: Wet rooms ($10,000–$15,000) or underfloor heating ($2,000–$4,000).
Cost Comparison Table
| Renovation Type | Auckland Cost | NZ Average Cost | Key Features |
| Standard (Minor) | $10,000–$15,000 | $8,000–$13,000 | Fixture swaps, basic tiling |
| Mid-Range | $28,000–$35,000 | $26,000–$32,000 | Full reno, mid-to-premium fixtures |
| Custom (High-End) | $40,000–$60,000+ | $34,000–$40,000+ | Luxury materials, custom design |
Why Costs Vary: Auckland vs. NZ
- Labor: Auckland tradies charge $90–$120/hour, 20-30% more than NZ’s $70–$100/hour (source: Builderscrack).
- Materials: Tiles ($50–$150/m²) and fixtures cost more due to urban demand and shipping.
- Permits: Auckland Council fees ($500–$2,000) for structural or plumbing changes exceed rural rates (aucklandcouncil.govt.nz).
- Example: A mid-range bathroom in Christchurch might hit $26,000, while Auckland’s climbs to $35,000 for the same specs.
Spotlight: Mid-Range Renovation in Greenlane
This 2025 project featured a double vanity, matte anti-slip tiles ($60/m²), and a tiled shower—costing $30,000 with Superior Renovations. The mix of mid-range and premium fixtures made it a standout for Auckland homeowners.
9. Example’s of completed bathroom renovations by Superior Renovations


Featured Projects (Mid Range to Luxury)
Sarah’s Luxury Bathroom renovation in Redvale, Auckland
We renovated two of these bathrooms to give a luxury feel but was actually a mid range bathroom. The bathroom was fully renovated before selling the property. One of the highlights of this project was the custom built vanities to maximise the space in the bathroom. See full project specifications + photos
 |  |
Todd Chandler’s Mid-Range Bathroom renovation in St Heliers
We renovated Todd’s 3 leaky bathrooms in a contemporary style with wooden looking tiles and cabinets. The wooden looking tiles against the white fixtures made the bathroom look spacious and modern. See project specifications
 |  |
Luxury Contemporary bathroom renovation in Titirangi, Auckland
Our client wanted to renovate her bathroom to match the aesthetics of the rest of her home. The highlight of this renovation was the clever use of patterns for their tiles to give it a contemporary artisan look. See full project specifications + Photos.
 |  |
Mary Stuart’s Spanish style bathroom with Mosaic tiles
Mary’s kitchen and bathroom in Stanmore Bay was renovated by keeping the design of Spanish Villa’s in mind. The bathroom was painted Blue with Mosaic tiles as feature on the walls. A brass sink and tap-ware added to the feel of a Spanish rustic villa see project specifications.
 |  |
 |  |
Designer Bathroom in Westmere
 |  |
 |  |
10. Small Bathroom Renovation Cost in Auckland and NZ: 2026 Insights
Renovating a small bathroom in Auckland or across New Zealand is a big project, blending multiple trades and unique challenges—especially where space is tight. Many assume a smaller bathroom means a lower renovation cost, but size isn’t the main driver. In 2025, factors like trades, fixtures, and complexity shape the price more than square footage. Here’s what influences small bathroom renovation costs in Auckland, why size matters less than you think, and how to budget smartly.
Why Size Doesn’t Dictate Cost
A common myth is that small bathrooms (e.g., 5-7 m²) are cheaper to renovate than larger ones (8-12 m²). While bigger spaces need more tiles or waterproofing, the core process—demolition, plumbing, electrical work, tiling, painting, and installation—stays the same. In Auckland, where labor rates hit $90–$120/hour (vs. NZ’s $70–$100/hour), these fixed trade costs dominate the budget, not the bathroom’s footprint. A compact powder room in Ponsonby requires the same skilled tradies as a spacious ensuite in Parnell, keeping base expenses consistent.
Key Cost Factors for Small Bathrooms
- Trades Involved: Plumbers, electricians, tilers, and painters are non-negotiable, costing $10,000–$15,000 in Auckland for a full reno, regardless of size.
- Fixtures and Fittings: Space constraints favor compact options—wall-hung vanities ($500–$1,500) or corner showers ($1,000–$2,500)—which can save money compared to larger units ($2,000–$4,000).
- Complexity: Reconfiguring a cramped layout (e.g., moving plumbing) or adding features like a wet room ($10,000–$15,000) spikes costs.
- Materials: Tiles ($30–$150/m²) and waterproofing ($500–$1,500) scale with size, but smaller areas still need quality finishes to meet Auckland’s humid conditions and building codes.
Cost Breakdown for Small Bathrooms
| Renovation Type | Auckland Cost | NZ Average Cost | What’s Included |
| Minor Upgrade | $5,000–$10,000 | $4,000–$8,000 | Fixture swaps, paint, partial tiling |
| Full Renovation | $20,000–$30,000 | $15,000–$25,000 | Demo, trades, new fixtures, retiling |
| Custom Small Reno | $30,000–$45,000 | $25,000–$35,000 | Premium fixtures, layout changes |
- Auckland Premium: Higher labor, permit fees ($500–$2,000), and urban material costs (e.g., $60/m² tiles) push prices 20-30% above NZ averages.
- Example: A 6 m² bathroom in Westmere with a tiled shower, new toilet, and vanity costs $25,000 in Auckland vs. $20,000 in Christchurch.
Full Renovation vs. Minor Upgrades
- Minor Upgrades: Swapping a toilet ($600–$1,000) or retiling a floor ($900–$1,200) keeps costs low ($5,000–$10,000 in Auckland). Best for quick fixes or rentals.
- Full Renovation: Overhauling plumbing, electrical, and layout (e.g., for a wet room or niche storage) runs $20,000–$30,000. It’s transformative—perfect for long-term value in Auckland’s competitive market (ROI up to $1.50 per $1 spent, per Houzz).
- Auckland Note: Older homes (e.g., Mt. Eden bungalows) often need structural fixes (rotten floors, $1,000–$3,000), nudging full renos higher.
Space-Saving Choices Impacting Cost
Small bathrooms limit fixture size, but smart picks can trim expenses:
- Compact Showers: Acrylic units ($900–$2,000) or corner tiled showers ($2,500–$4,000) fit tight spaces vs. larger walk-ins ($4,000–$7,000).
- Wall-Hung Vanities: $500–$1,500 vs. freestanding ($1,500–$3,000), freeing floor space.
- Mirrors: Large mirrors ($200–$600) enhance light, avoiding costly expansions ($5,000–$15,000).
- Trade-Off: Premium compact fixtures (e.g., Methven taps, $300–$600) can raise costs if luxury trumps savings.
Auckland Spotlight: Small Bathroom Renovation in Henderson Valley
This 5 m² reno featured matte black tiles ($80/m²), a custom vanity, and a tiled shower—costing $28,000 with Superior Renovations. The confined space required precise tiling and plumbing adjustments, but the result maximized style and function.
Henderson Valley’s small reno proves size doesn’t limit impact.
Planning Tips for Auckland
- Check Permits: Auckland Council (aucklandcouncil.govt.nz) requires consent for plumbing moves or structural changes ($500–$2,000), per Building Code Clause E2.
- Prioritize Function: Opt for non-slip tiles ($50–$100/m²) and storage niches ($500–$1,000) over big-ticket items.
- Get Quotes: Auckland’s tradie rates vary—shop around to save $1,000–$2,000.
Small Doesn’t Mean Cheap
The cost to renovate a small bathroom in Auckland ($20,000–$30,000 for a full job) isn’t dictated by size alone. Trades, complexity, and fixture choices outweigh material savings from a smaller footprint. Across NZ, costs dip to $15,000–$25,000, but Auckland’s urban premiums persist. Plan carefully with a trusted renovation company to balance cost, style, and functionality—turning your small space into a standout feature.
11. How Much Does It Cost to Tile a Bathroom in Auckland and NZ in 2026?
Tiling can transform your bathroom, adding style and value—whether it’s a sleek ensuite in Auckland or a cozy space elsewhere in NZ. But what’s the cost to tile a bathroom in 2026? Prices vary based on tile size, scope, and waterproofing, with Auckland’s higher labor and material rates pushing the bill above national averages. Let’s break down the costs, factors, and estimates to help you budget your bathroom renovation in Auckland or beyond.
Cost to Tile a Bathroom: Per Square Metre Breakdown
Tile prices depend on size, material, and installation complexity. In Auckland, labor rates ($90–$120/hour) exceed NZ’s $70–$100/hour, impacting totals. Here’s a 2026 guide:
| Tile Size | Auckland Cost/m² | NZ Average Cost/m² | Comments |
| Small (10×10 cm) | $70–$120 | $60–$100 | More grout, labor-intensive |
| Medium (30×30 cm) | $60–$100 | $50–$90 | Popular, cost-effective balance |
| Large (60×60 cm) | $80–$150 | $70–$120 | Less grout, but heavier to install |
- Auckland Premium: Add 15-20% over NZ averages due to urban demand and tradie rates.
- Material Options: Ceramic ($30–$50/m²), porcelain ($50–$100/m²), or natural stone ($80–$150/m²) from suppliers like Tile Depot.
Factors Affecting Tiling Costs
- Tile Size: Smaller tiles (e.g., mosaics) need more cutting and grouting, hiking labor costs by $10–$20/m². Larger tiles (60×60 cm) reduce grout lines but may require precise leveling ($200–$500 extra).
- Tiling Scope: Full wall-to-ceiling and floor tiling costs more than a shower splashback. A 10 m² Auckland bathroom fully tiled averages $600–$1,500 vs. $300–$700 for a 2 m² shower area.
- Pattern Complexity: Intricate designs (e.g., herringbone, $100–$150/m²) or feature walls take longer—add $200–$500 in Auckland labor.
- Surface Prep: Removing old tiles ($150–$300) or leveling floors ($300–$800) adds up, especially in Auckland’s older homes.
- Location: Auckland’s urban logistics (e.g., delivery fees, $50–$100) and tradie rates exceed rural NZ.
Waterproofing Costs: A Must-Do
Waterproofing is non-negotiable for tiled bathrooms, especially showers, to prevent leaks, mold, and costly repairs ($2,000+). Per NZ Building Code Clause E3 (building.govt.nz), it’s mandatory in wet areas. Costs vary by scope:
| Area | Auckland Cost | NZ Average Cost | Comments |
| Shower Area (2-3 m²) | $400–$600 | $300–$500 | Essential for compliance |
| Full Bathroom (10 m²) | $800–$1,500 | $600–$1,200 | Maximum protection, Auckland premium |
- Auckland Note: Higher rates reflect labor and quality membranes (e.g., Mapei, $20–$30/m²).
- Consent Check: Auckland Council (aucklandcouncil.govt.nz) may require consent for shower tiling if plumbing moves ($500–$2,000 in fees)—confirm before starting.
Total Cost Estimate: Auckland Example
For a 10 m² small bathroom in Auckland (e.g., Henderson):
- Tiling: 10 m² x $80 (mid-range 30×30 cm tiles) = $800
- Labor: $600–$1,000 (6-10 hours at $90–$120/hour)
- Waterproofing: $1,000 (full bathroom)
- Prep/Disposal: $300–$500
- Total: $2,700–$3,300
NZ Average: $2,200–$2,800 for the same job in cities like Wellington, due to lower labor ($70–$100/hour) and material costs.
Cost-Saving Tips for Auckland
- Larger Tiles: 60×60 cm ($80–$150/m²) cut labor time, saving $100–$300.
- DIY Prep: Remove old tiles yourself ($150–$300 in tools) to trim $200–$500.
- Mid-Range Tiles: Porcelain ($50–$100/m²) balances style and budget vs. stone ($80–$150/m²).
- Shower Only: Tile just the wet area (2-3 m², $120–$300) instead of full walls.
Spotlight: Tiled Bathroom in Redvale, Auckland
This 8 m² reno used dark grey 60×60 cm tiles ($90/m²) for floors and a custom shower, costing $2,800 total ($1,200 materials, $1,200 labor, $400 waterproofing). The large tiles minimized grout, keeping labor down despite Auckland rates.
Redvale’s sleek tiling proves cost-effective style in a small space.
Why Costs Vary
- Auckland Factors: Higher tradie rates, urban fees, and premium tile demand (e.g., Tile Depot’s artisan range) inflate costs.
- NZ Trends: Rural areas see lower totals ($1,800–$2,500 for 10 m²) due to cheaper labor and logistics.
- Quotes Matter: Get 2-3 Auckland tiler quotes—prices can swing $500–$1,000 based on experience and availability.
Tiling a bathroom in Auckland costs $60–$150/m², with totals for a 10 m² space hitting $2,700–$3,300 including waterproofing—20-30% above NZ’s $2,200–$2,800. Size, complexity, and location drive the price more than tile choice alone. Plan with a pro to nail your budget and avoid surprises.
12. Can You Renovate a Bathroom Cheaply for a Rental Property in Auckland?
Renovating a bathroom for a rental property in Auckland doesn’t have to break the bank—especially if you’re aiming to attract tenants without overcapitalizing. In 2025, landlords can keep costs low by blending DIY efforts, smart sourcing, and minimal professional help, all while meeting Auckland’s rental standards (e.g., Healthy Homes compliance). Here’s how to refresh your rental bathroom affordably, ensuring it’s tenant-ready without luxury splurges.
5 Budget Strategies for Rental Bathrooms
- Plan for Tenants, Not Trends: Start with a lean budget targeting essentials—think durable tiles, a clean vanity, and functional fixtures. Skip high-end finishes; tenants prioritize reliability over style. Use Consumer NZ’s budgeting tools (consumer.org.nz) to cap costs at $5,000–$10,000, far below Auckland’s $20,000+ full reno average.
- Stick to Existing Plumbing: Moving pipes in Auckland costs $1,000–$2,500 plus permits ($500–$2,000, aucklandcouncil.govt.nz). Keep the sink, toilet, and shower where they are to avoid plumbing fees and consent hassles—crucial for a cheap rental reno.
- Paint Over Replace: A fresh coat of moisture-resistant paint (e.g., Resene’s bathroom range, $50–$100) transforms walls or old tiles. DIY this for $100–$200 vs. $500–$1,000 hiring a pro in Auckland’s pricey labor market ($90–$120/hour).
- Swap Fixtures, Not Systems: Update taps ($50–$150), showerheads ($80–$200), and handles ($20–$50) from Mitre 10 sales—easy DIY upgrades that modernize without rewiring or replumbing ($1,000+ savings).
- Re-Grout for a Quick Win: Re-grouting tiles ($100–$200 in materials) and sealing ($50–$100) refreshes the look without new tiling ($600–$1,500 in Auckland). It’s labor-intensive but landlord-friendly.
Sourcing Cheap Materials for Rentals
Keep your rental bathroom practical and cost-effective with these Auckland-friendly sources:
- Trade Me & Facebook Marketplace: Score second-hand vanities ($100–$300), toilets ($50–$150), or surplus tiles ($20–$40/m²)—half the price of new.
- DIY Stores: Bunnings and Mitre 10 clearance bins offer budget tiles ($20–$40/m²) and fixtures (e.g., $100 showerheads) perfect for rentals.
- Salvage Yards: Auckland’s architectural salvage spots (listed on Builderscrack) sell used sinks or taps ($50–$200), adding character on the cheap.
- Tip: Stick to durable, low-maintenance picks—laminate vanities ($200–$500) over wood ($800+)—since tenants won’t pamper premium materials.
Hiring Trades on a Budget
For rental renos, skip full-service companies ($2,000–$5,000 in management fees) and hire individual tradies:
- Find Affordable Help: Use Builderscrack or NoCowboys to source Auckland plumbers ($90–$120/hour) or tilers ($50–$80/hour). Get 3 quotes—prices can drop $200–$500.
- Manage the Job: Coordinate trades yourself (e.g., plumber then tiler) to avoid contractor overheads, saving $500–$1,000.
- Prep Yourself: Demo old tiles ($150–$300 in tools) or strip paint ($50–$100) to cut labor costs by $500–$1,000—key in Auckland’s high-rate market.
Cost-Saving Tips for Landlords
- Reuse What Works: Refinish an existing vanity ($100–$300) or bathtub ($300–$600) instead of replacing ($1,000–$3,000).
- Cheap Alternatives: Laminate countertops ($200–$500) mimic stone ($1,000+)—tenants won’t notice the difference.
- Minimal Updates: A new mirror ($50–$150) or towel rack ($20–$50) from Kmart refreshes without structural costs.
- Healthy Homes Focus: Ensure ventilation (e.g., $200 extractor fan) and waterproofing ($400–$600) meet standards (healthyhomes.org.nz) without extras.
Auckland Rental Example: Papatoetoe Refresh
For a 6 m² rental bathroom in Papatoetoe:
- Plan: Keep plumbing, update fixtures, and re-tile the shower. Budget: $6,000.
- Materials: Second-hand vanity ($200, Trade Me), 30×30 cm tiles ($30/m², Mitre 10 sale, $180 for 6 m²), new taps ($100).
- DIY: Paint walls with Resene moisture-resistant ($80), re-grout tiles ($150).
- Tiler: Hired via Builderscrack ($600 for shower area).
- Total: $1,308—under $1,500, tenant-ready, and Healthy Homes-compliant.
Why It Works for Rentals
In Auckland’s rental market, tenants want clean, functional bathrooms—not luxury. This approach keeps your bathroom renovation cost in Auckland low ($1,500–$6,000) vs. a full reno ($20,000+), maximizing ROI (up to $1.50 per $1 spent, per Houzz) without overinvesting. Compare quotes, source wisely, and DIY where possible to stay under budget.
13. How Long Does a Bathroom Renovation Take in Auckland?
When budgeting for a bathroom renovation in Auckland, cost isn’t the only factor—time matters too. Knowing the timeline helps you plan around tenant schedules, family needs, or resale deadlines. In 2026, renovation duration varies by scope, with Auckland’s high demand for tradies ($90–$120/hour) and permit processes (aucklandcouncil.govt.nz) often stretching timelines compared to NZ averages. Here’s what to expect for your bathroom renovation timeline in Auckland, plus tips to speed it up.
Timeline Breakdown
| Renovation Type | Duration (Auckland) | NZ Average Duration | Key Factors |
| Low-End (Minor Alterations) | 3–7 days | 2–5 days | Fixture swaps, no permits |
| Mid-End (Full Renovation) | 3–4 weeks | 2–3 weeks | Full demo, plumbing, tiling |
| High-End (Luxury Upgrade) | 4–8 weeks+ | 5–6 weeks | Structural changes, custom fixtures |
Why Auckland Takes Longer
- Labor Shortages: High demand for plumbers and tilers delays start dates by 1–2 weeks.
- Building Consents: Auckland Council approvals for plumbing or structural changes (Building Code Clause E2) add 1–3 weeks vs. rural NZ’s faster processing.
- Weather: Auckland’s humidity slows drying times for paint ($50–$100) or grout ($100–$200), adding days.
Speed-Up Tips
- Pre-Order Materials: Stock tiles ($30–$150/m²) and fixtures early—delays from suppliers like Tile Depot can add a week.
- Hire a Coordinator: A project manager ($1,000–$2,000) aligns tradies, shaving 3–5 days off mid-to-high-end jobs.
- DIY Prep: Demo yourself ($150–$300 in tools) to start tilers sooner, saving 2–4 days.
Auckland Example: Greenlane Mid-Range Reno
A 10 m² bathroom took 3 weeks: 1 week for demo and plumbing ($2,000–$3,000), 1 week for tiling ($800), and 1 week for fixtures ($3,000) and finishing. A 1-week permit delay pushed it to 4 weeks total—typical for Auckland’s busy market.
A bathroom renovation timeline in Auckland ranges from 3 days for minor fixes to 8+ weeks for luxury upgrades, longer than NZ’s 2 days to 6 weeks due to urban factors. Plan ahead to keep your rental income flowing or your family comfortable.
14. Do You Need a Building Consent for a Bathroom Renovation in Auckland?
Renovating a bathroom in Auckland isn’t just about costs—building consents can affect your budget and timeline. In 2026, Auckland Council (aucklandcouncil.govt.nz) and the NZ Building Code (building.govt.nz) enforce strict rules, especially for plumbing or structural changes, adding to your bathroom renovation cost in Auckland. Knowing when a building consent is required helps you avoid delays, fines, or rework, whether you’re upgrading a rental or crafting a luxury space. Here’s the rundown on bathroom renovation building consents in Auckland.
When Do You Need a Building Consent?
| Renovation Type | Building Consent Required? | Cost of Consent ($) | Timeline Impact |
| Low-End (Minor Alterations) | Usually No | 0 | None |
| Mid-End (Full Renovation) | Sometimes | 1,000–2,500 | 2–3 weeks |
| High-End (Luxury Upgrade) | Yes | 2,000–3,500+ | 3–4 weeks |
- Low-End: Like-for-like swaps (e.g., new toilet, $600) or retiling ($600–$1,500) skip consents if plumbing stays unchanged—great for quick rental fixes.
- Mid-End: Adding a tiled shower ($2,000–$3,000) or adding an additional vanity ($1,500) may need a consent (Building Code Clause G13). Check with council.
- High-End: Structural changes (e.g., wall removal, $2,000–$5,000) or wet rooms require consents for safety and waterproofing (Clause E3).
Auckland-Specific Building Consent Rules
- Plumbing Changes: Relocating pipes or adding lines needs consent—$500–$1,500, plus inspections.
- Waterproofing: Mandatory for showers ($400–$600); non-compliance risks $2,000+ in leak repairs. Auckland Council enforces this rigorously.
- Structural Work: Altering walls or layouts (e.g., for a rental ensuite) demands consents ($1,000–$2,500), often with engineer reports ($500–$1,000).
- Heritage Homes: Common in Auckland (e.g., Ponsonby), these require extra approvals—add $500–$1,000 and 2–4 weeks.
Cost and Timeline Impact
- Fees: $500–$2,500, higher than rural NZ ($300–$1,500) due to Auckland’s oversight.
- Delays: Processing takes 1–4 weeks, stalling tradies ($90–$120/hour) and adding $500–$1,000 in idle costs.
- Fines: Skipping consents risks $1,000+ penalties or forced redo (aucklandcouncil.govt.nz).
How to Handle Building Consents
- Check Early: Visit aucklandcouncil.govt.nz or call 09 301 0101 to confirm—free and quick.
- Hire a Pro: An architect ($1,000–$2,000 fee) can manage consents, saving time.
Auckland Example: Papatoetoe Rental Renovation
A landlord retiling a shower ($600) and swapping fixtures ($1,000) spent $6,000 total—no consent needed, done in 5 days. Later adding a toilet ($2,000) required a $1,500 consent and 3-week delay, pushing costs to $9,500—showing how consents hike your bathroom renovation cost in Auckland.
A building consent isn’t always needed for a bathroom renovation in Auckland, but mid-to-high-end projects ($20,000–$65,000) often require them, adding $500–$2,500 and weeks to your timeline. Low-end rental fixes ($8,000–$15,000) typically avoid this, keeping costs and delays low. Confirm with Auckland Council to stay compliant and on budget.
Official Auckland Council Building Consent Fees for Plumbing & Minor Bathroom Work (2026) According to Auckland Council’s Building Consent Fees and Charges (aucklandcouncil.govt.nz):
- Minor plumbing work (value less than $5,000, with producer statement): Fixed fee of $343 (non-refundable, no additional charges).
- Minor plumbing work (value less than $5,000, not by approved installer): Fixed fee of $343 + one inspection deposit of $195.
- Work involving rainwater tanks connected to internal plumbing (above ground): Base fee $624 + inspection deposit $390.
- General plumbing/drainage changes in renovations: Often require consent if adding fixtures (e.g., new bath/toilet) or affecting structure/waterproofing—fees based on hourly rates (Technical Level 1 Residential: $195/hour). Source: Auckland Council Building Consent Fees (updated as of 2026). Many repairs/replacements of existing fixtures (e.g., sink/toilet) are exempt under Schedule 1 of the Building Act 2004, but adding new sanitary fixtures or tiled wet areas typically needs consent to ensure compliance.
15. Choosing the Best Materials for Your Bathroom Renovation in Auckland
The materials you pick for your bathroom renovation in Auckland can make or break your budget and the final look—especially in 2026, where costs and durability matter more than ever. From tiles to fixtures, your choices impact your bathroom renovation cost in Auckland, tenant appeal for rentals, or long-term value for your home. Auckland’s humid climate and premium market (e.g., $90–$120/hour labor) demand smart selections. Here’s a guide to the best materials for bathroom renovations in Auckland, balancing cost, style, and practicality.
Key Materials and Costs
| Material | Cost Range ($/m² or Unit) | Pros | Cons | Best For |
| Ceramic Tiles | 30–50 | Affordable, easy to clean | Limited luxury appeal | Rentals, low-end |
| Porcelain Tiles | 50–100 | Durable, water-resistant | Higher cost, heavier | Mid-range homes |
| Natural Stone Tiles | 80–150 | Premium look, long-lasting | Expensive, needs sealing | High-end upgrades |
| Laminate Vanity | 200–500 (unit) | Cheap, mimics wood/stone | Less durable, prone to wear | Rentals, budget renos |
| Solid Wood Vanity | 1,000–3,000 (unit) | Elegant, durable | Costly, needs maintenance | Luxury homes |
| Acrylic Shower | 900–2,000 (unit) | Low-maintenance, quick install | Basic look | Rentals, mid-range |
| Tiled Shower | 2,500–4,000 (unit) | Customizable, stylish | Labor-intensive, pricier | Mid-to-high-end |
- Auckland Costs: Prices reflect urban premiums—e.g., porcelain tiles at $50–$100/m² in Auckland vs. $40–$80/m² in rural NZ (Tile Depot pricing).
- Durability Note: Auckland’s humidity (70-80% annually) favors waterproof options like porcelain or acrylic over cheaper vinyl ($20–$40/m²), which warps faster.
Factors to Consider
- Budget: Low-end rentals stick to ceramic tiles ($30–$50/m²) and laminate ($200–$500) for a $5,000–$10,000 reno. High-end homes splurge on stone ($80–$150/m²) and wood ($1,000–$3,000), hitting $35,000+.
- Tenant Needs: For rentals, prioritize easy-clean materials (acrylic showers, $900–$2,000) over tiled showers ($2,500–$4,000) that need grout upkeep.
- Climate: Auckland’s dampness requires moisture-resistant paint (Resene, $50–$100) and sealed tiles to avoid mold ($1,000+ repairs).
- Installation: Larger tiles (60×60 cm, $80–$150/m²) cut labor time ($600–$1,000 savings) but need skilled tilers—common in Auckland’s premium market.
Where to Source Materials in Auckland
- Tile Depot: Wide range (ceramic to stone, $30–$150/m²)—check sales for 20-30% off.
- Mitre 10/Bunnings: Budget fixtures (e.g., $100 taps) and clearance tiles ($20–$40/m²).
- Trade Me: Second-hand vanities ($100–$300) or surplus tiles ($20–$50/m²) for rentals.
- Tip: Pre-order to avoid Auckland’s supply delays (1–2 weeks).
Auckland Example: Westmere Rental Renovation
A 6 m² rental bathroom used ceramic tiles ($40/m², $240 total), a laminate vanity ($300), and an acrylic shower ($1,200). Total material cost: $1,740, keeping the reno under $6,000 with labor—perfect for tenant appeal without luxury costs.
Bathroom renovation materials in Auckland range from budget-friendly ceramic ($30–$50/m²) to luxury stone ($80–$150/m²), driving costs from $5,000 to $65,000 depending on your goal. For rentals, stick to low-maintenance picks like laminate and acrylic; for homes, porcelain or stone adds value. Match materials to Auckland’s climate and budget for a win-win reno.
16. Top 5 Bathroom Renovation Mistakes to Avoid in Auckland
Renovating a bathroom in Auckland can boost value or tenant appeal, but mistakes can inflate your bathroom renovation cost in Auckland and derail your project. In 2026, with Auckland’s high labor rates ($90–$120/hour) and strict building codes (aucklandcouncil.govt.nz), errors hit harder than in other NZ regions. From skipping consents to poor planning, here are the top five common bathroom renovation mistakes in Auckland—and how to dodge them for a smoother, cheaper reno.
1. Skipping Building Consents
- Mistake: Assuming minor changes (e.g., moving a shower, $2,000–$3,000) don’t need a building consent.
- Cost: Fines ($1,000+) or forced rework ($5,000–$10,000) if Auckland Council catches non-compliance (Building Code Clause G13).
- Fix: Check aucklandcouncil.govt.nz early—consents cost $500–$2,500 but save headaches. Low-end renos ($8,000–$15,000) often skip this, but mid-to-high-end ($20,000–$65,000) rarely do.
2. Underestimating Costs
- Mistake: Budgeting $10,000 for a full reno when Auckland mid-range averages $20,000–$35,000.
- Cost: Mid-project cuts (e.g., cheaper tiles, $30/m² vs. $60/m²) or delays as funds run dry—adding $1,000–$3,000 in rushed fixes.
- Fix: Add a 15-20% contingency ($2,000–$5,000)—Auckland’s older homes (e.g., Ponsonby villas) often hide rot ($1,000–$3,000) or wiring issues ($1,000+).
3. Choosing Cheap Materials
- Mistake: Picking vinyl flooring ($20–$40/m²) or low-end fixtures ($50 taps) that fail fast in Auckland’s humidity.
- Cost: Replacements within 2–3 years ($1,000–$2,000) vs. durable porcelain ($50–$100/m²) or mid-range taps ($150–$300) lasting 10+.
- Fix: Invest in moisture-resistant options (e.g., Resene paint, $50–$100) for rentals ($5,000–$10,000) or porcelain for homes ($20,000+).
4. Ignoring Ventilation
- Mistake: Skipping an extractor fan ($200–$400) to save cash, risking mold in Auckland’s damp climate (70-80% humidity).
- Cost: Mold remediation ($1,000–$3,000) and Healthy Homes non-compliance fines ($500+) for rentals.
- Fix: Install a fan—mandatory for rentals (healthyhomes.org.nz) and cheap insurance for any reno ($8,000–$65,000).
5. Poor Planning and Scheduling
- Mistake: Not coordinating tradies or ordering tiles ($30–$150/m²) late, stalling a $20,000–$35,000 mid-range job.
- Cost: Delays add $500–$1,000 in idle labor or rushed work compromises quality (e.g., uneven tiling, $600 redo).
- Fix: Plan 4–6 weeks ahead—pre-order from Tile Depot and hire a coordinator ($1,000–$2,000) for high-end renos ($35,000+).
Auckland Example: Mt. Eden Mid-Range Mishap
A homeowner budgeted $15,000 for a 10 m² reno but skipped a $1,500 consent for plumbing shifts. Council halted work, adding 3 weeks and $3,000 in fixes—total cost hit $22,000. Proper planning and consent could’ve kept it at $18,000.
Bathroom renovation mistakes in Auckland—like skipping consents or choosing cheap low quality materials—can turn an $8,000 rental fix into a $15,000 headache or a $35,000 luxury reno into $50,000+. Avoid these pitfalls with upfront checks, realistic budgets, and quality choices to keep your project on track and within cost.
17. Top Bathroom Renovation Trends in Auckland for 2026
Staying ahead of bathroom renovation trends in Auckland can elevate your space—whether it’s a rental attracting tenants or a home gaining value. In 2026, Auckland’s design scene blends practicality with style, driven by its humid climate and premium market (labor at $90–$120/hour). These trends impact your bathroom renovation cost in Auckland, so here’s a look at the latest bathroom design trends in NZ, their costs, and how to adapt them smartly.
1. Matte Black Finishes
- Trend: Matte black taps ($150–$400), showerheads ($200–$500), and handles ($20–$50) add sleek contrast.
- Cost in Auckland: $500–$1,500 for a full set (vs. chrome at $300–$800)—labor stays $600–$1,000.
- Why Popular: Low-maintenance and modern; suits Auckland’s urban aesthetic (e.g., Ponsonby rentals).
- Budget Tip: Use in rentals ($8,000–$15,000) for a high-end feel without structural costs.
2. Large-Format Tiles
- Trend: 60×60 cm or bigger tiles ($80–$150/m²) in neutral tones (grey, white) create a seamless look.
- Cost in Auckland: $800–$1,500 for 10 m² (Tile Depot), plus $600–$1,000 labor—total $1,400–$2,500.
- Why Popular: Less grout cuts cleaning time—key for rentals—and Auckland’s humidity favors durable porcelain.
- Adapt: Mid-range renos ($20,000–$35,000) can use $50–$100/m² porcelain for savings.
3. Wet Rooms
- Trend: Open-plan showers with floor-to-ceiling tiles ($60–$150/m²) and no glass doors.
- Cost in Auckland: $10,000–$15,000 (tiling, waterproofing at $800–$1,500, plumbing at $2,000–$3,000). Needs building consent ($1,000–$2,500, aucklandcouncil.govt.nz).
- Why Popular: Space-saving and luxurious—big in Auckland’s compact apartments (e.g., CBD).
- Budget Tip: Skip for rentals; reserve for high-end homes ($35,000+).
4. Floating Vanities
- Trend: Wall-hung vanities ($500–$3,000) in wood or laminate free up floor space.
- Cost in Auckland: $500–$1,500 mid-range, $2,000–$3,000 luxury—install adds $300–$600.
- Why Popular: Modern and practical; Auckland’s small bathrooms (5-7 m²) benefit from the airy feel.
- Adapt: Rentals use laminate ($200–$500) to keep costs low ($5,000–$10,000).
5. Smart Lighting
- Trend: LED strips ($100–$300) or motion-sensor lights ($200–$500) for ambiance and efficiency.
- Cost in Auckland: $300–$800 total, plus $500–$1,000 electrical labor.
- Why Popular: Energy-saving (Healthy Homes bonus for rentals) and stylish—suits Auckland’s tech-savvy market.
- Budget Tip: Add to mid-range renos ($20,000–$35,000) for minimal cost, big impact.
Bathroom renovation trends in Auckland for 2025—like matte black finishes or wet rooms—range from $500 add-ons to $15,000 features, shaping costs from $8,000 (low-end rentals) to $65,000 (high-end homes). Pick trends that match your goal: rentals favor cheap, durable options, while homes can splurge for value. Source smartly (e.g., Mitre 10 sales) to keep your Auckland reno on budget and on-trend.
18. How to Choose the Right Bathroom Renovation Contractor in Auckland
Picking the right bathroom renovation contractor in Auckland can make or break your project—impacting your bathroom renovation cost in Auckland, timeline, and quality. In 2026, with Auckland’s tradie rates at $90–$120/hour and a busy market, finding a reliable company is key to avoiding delays or budget blowouts. Whether you’re refreshing a rental ($8,000–$15,000) or splurging on luxury ($35,000–$65,000), here’s how to choose a bathroom renovation company in NZ, tailored to Auckland’s unique challenges.
Key Factors to Consider
Experience and Specialization
- Look For: Contractors with 5+ years in bathroom renos—experts handle Auckland’s older homes (e.g., rotten floors, $1,000–$3,000 fixes) better.
- Why It Matters: Specialists streamline mid-range jobs ($20,000–$35,000), avoiding rookie errors like poor waterproofing ($2,000+ repairs).
- Check: Portfolios on their site or Superior Renovations’ Wairau Valley showroom.
Licensing and Insurance
- Look For: Licensed Building Practitioners (LBP, building.govt.nz) and liability insurance.
- Why It Matters: Auckland Council (aucklandcouncil.govt.nz) requires consents ($500–$2,500) for plumbing or structural work—unlicensed contractors risk fines ($1,000+).
- Ask: Proof of LBP status and insurance coverage.
Quotes and Transparency
- Look For: Detailed quotes breaking down labor ($8,000–$15,000), materials ($5,000–$10,000), and fixtures ($3,000–$6,000).
- Why It Matters: Vague quotes lead to $2,000–$5,000 overruns—common in Auckland’s premium market.
- Tip: Get 3 quotes via Builderscrack; compare to spot outliers.
Reviews and References
- Look For: 4+ star ratings on Google or NoCowboys, plus past client feedback.
- Why It Matters: Auckland’s busy tradies can overbook—reviews flag reliability for tight timelines (2–4 weeks mid-range).
- Check: Ask for 2–3 references from similar projects (e.g., $20,000 renos).
Project Management
- Look For: Companies offering coordination ($1,000–$2,000 fee) for plumbers, tilers, and electricians.
- Why It Matters: Self-managing saves cash but risks delays ($500–$1,000) in Auckland’s tradie shortage.
- Bonus: Speeds high-end renos ($35,000+) by 1–2 weeks.
Where to Find Contractors in Auckland
- Builderscrack: Lists local tilers ($50–$80/hour) and plumbers ($90–$120/hour) with reviews.
- NoCowboys: Filters Auckland companies by rating—aim for 90%+.
- Superior Renovations: Showroom visits (Wairau Valley) let you see work firsthand—call 0800-199-888.
- Tip: Start early—Auckland’s peak season (summer) books out 4–6 weeks ahead.
Choosing bathroom renovation contractors in Auckland means vetting for experience, licensing, and transparency—crucial in a city where costs range from $8,000 (rentals) to $65,000 (luxury). A solid company keeps your project on budget and on schedule, dodging common pitfalls like delays or shoddy work. Compare quotes, check credentials, and visit showrooms to nail your 2025 bathroom renovation.
19. How to Finance Your Bathroom Renovation in Auckland
A bathroom renovation in Auckland can stretch your wallet—from $8,000 for a basic rental spruce-up to $65,000 for a luxury overhaul in 2026—so finding the right financing is key to managing your bathroom renovation cost in Auckland. Whether you’re a landlord aiming for quick tenant appeal or a homeowner dreaming of a spa-like retreat, Auckland’s high labor rates ($90–$120/hour) and material costs make funding options worth exploring. Here’s how to finance a bathroom renovation in NZ, tailored to Auckland’s market, drawing on practical solutions to keep your project affordable.
Personal savings are a straightforward choice, ideal for low-end renos ($8,000–$15,000) like swapping tiles ($600–$1,500) or fixtures ($1,000–$2,500). It’s interest-free and keeps you in control, though Auckland’s older homes often reveal surprises like rot ($1,000–$3,000), so stashing an extra 15-20% ($1,000–$3,000) is smart. For bigger projects, a home loan can tap into your property’s equity, offering competitive rates (often 4-6%) and flexibility. As outlined on our blog (https://superiorrenovations.co.nz/guide-to-financing-your-home-renovation-in-nz-by-superior-renovations/), Superior Renovations partners with Linda Eagleton from Loan Market to assess your affordability and secure funds against your home—perfect for mid-to-high-end renos ($20,000–$65,000), especially if you’ve got an existing loan or equity to leverage.
Another option is our long-term finance through Q Mastercard, detailed at https://superiorrenovations.co.nz/finance-options/. This offers up to 18 months interest-free, letting you spread costs (e.g., $2,000/month for a $36,000 reno) without upfront pressure—great for any scope ($8,000–$65,000). Standard lending criteria apply, but it’s a stress-free way to enjoy your new bathroom now and pay later. Personal loans (8-14% interest) work for mid-range jobs ($20,000–$35,000), offering $5,000–$30,000 with quick approval, while credit cards suit small add-ons ($150–$400 taps) if paid off fast to dodge 15-20% rates.
Take an Auckland example: a Henderson homeowner financed a $25,000 reno (10 m², tiled shower at $2,500, vanity at $1,500) with $10,000 savings and a $15,000 personal loan (10% interest, $600/month). It balanced cost and convenience, wrapping up in 3 weeks. For rentals, stick to savings or Q Mastercard to preserve cash flow; for value-boosting homes, home loans offer long-term gains (up to $1.50 per $1 spent, per Houzz). Financing a bathroom renovation in Auckland means matching your budget—$8,000 or $65,000—to options like these, ensuring your 2025 project fits your finances and goals.
To sum up…
Renovating a bathroom in Auckland is a smart way to enhance your home’s value, attract tenants, or simply enjoy a refreshed space—and in 2025, understanding your bathroom renovation cost in Auckland is the first step to success. Costs can range from $8,000 for a budget-friendly rental fix to $65,000+ for a luxury upgrade with the latest trends like matte black finishes or wet rooms. Auckland’s higher labor rates ($90–$120/hour), material prices, and building consent requirements (aucklandcouncil.govt.nz) push expenses above NZ averages, but smart choices—like sticking to existing plumbing or opting for durable porcelain tiles ($50–$100/m²)—can keep your budget in check. Whether you’re financing through savings, a home loan, or Q Mastercard, planning ahead with a trusted contractor ensures your project stays on track. From timelines (3 days to 8 weeks) to avoiding common mistakes (e.g., skipping consents), this guide equips you to tackle your reno with confidence.
In 2025, bathroom renovation costs in Auckland range from $8,000–$15,000 for minor alterations (like-for-like swaps), $20,000–$35,000 for a full mid-range reno (everything removed, mid-range fixtures), and $35,000–$65,000+ for high-end luxury upgrades (premium fixtures, structural changes). Auckland’s costs exceed NZ averages ($6,000–$50,000) due to higher labor ($90–$120/hour) and materials. Tiling a 10 m² bathroom in Auckland costs $2,700–$3,300, including tiles ($60–$150/m²), labor ($600–$1,000), and waterproofing ($800–$1,500). Smaller tiles (10x10 cm) cost more to install than larger ones (60x60 cm), and Auckland’s rates top NZ’s $2,200–$2,800 due to urban premiums. Yes, a rental bathroom reno in Auckland can cost $1,500–$6,000 by keeping plumbing unchanged, using second-hand materials (e.g., $200 vanity from Trade Me), painting ($80–$200), and hiring individual tradies ($600) via Builderscrack. DIY prep and budget fixtures keep it tenant-ready without luxury. A bathroom renovation timeline in Auckland spans 3–7 days for minor alterations, 3–4 weeks for a full mid-range reno, and 5–8 weeks+ for luxury upgrades. Auckland’s delays (tradie shortages, consents taking 2–4 weeks) stretch it beyond NZ’s 2 days–6 weeks. Pre-ordering materials saves time. No consent is needed for minor swaps ($8,000–$15,000), but mid-range renos ($20,000–$35,000) with plumbing shifts or high-end jobs ($35,000+) with structural changes require a building consent ($500–$2,500) from Auckland Council (aucklandcouncil.govt.nz). Skipping it risks $1,000+ fines. For rentals, use ceramic tiles ($30–$50/m²) and laminate vanities ($200–$500); mid-range homes favor porcelain tiles ($50–$100/m²) and acrylic showers ($900–$2,000); luxury upgrades opt for stone tiles ($80–$150/m²) and wood vanities ($1,000–$3,000). Auckland’s humidity demands moisture-resistant picks. Top mistakes include skipping consents (adds $5,000–$10,000 in rework), underbudgeting (misses $2,000–$5,000 surprises), using cheap materials (e.g., vinyl fails fast), ignoring ventilation ($1,000–$3,000 mold fixes), and poor planning (delays cost $500–$1,000). Plan and vet carefully. Trends include matte black finishes ($500–$1,500), large-format tiles ($1,400–$2,500 for 10 m²), wet rooms ($10,000–$15,000), floating vanities ($500–$3,000), and smart lighting ($300–$800). Rentals lean budget-friendly; luxury homes splurge for style. Not always—a small bathroom (5-7 m²) costs $20,000–$30,000 for a full reno in Auckland, close to larger spaces ($25,000–$35,000). Trades ($10,000–$15,000) and complexity outweigh material savings ($600–$1,500 tiles), unlike NZ’s $15,000–$25,000 range. How much does a bathroom renovation cost in Auckland?
What’s the average cost to tile a bathroom in Auckland?
Can I renovate a bathroom cheaply for a rental property in Auckland?
How long does a bathroom renovation take in Auckland?
Do I need a building consent for a bathroom renovation in Auckland?
What are the best materials for a bathroom renovation in Auckland?
What are common bathroom renovation mistakes to avoid in Auckland?
What are the latest bathroom renovation trends in Auckland for 2025?
Does a small bathroom cost less to renovate in Auckland?
If you’re looking for “specific” cost estimates, try our Renovation Cost Calculator Tools
- Bathroom Renovation Cost Calculator
- Kitchen Renovation Cost Calculator
- Reroofing Cost Calculator
- Double Glazing Cost Calculator
- House Extension Cost Calculator
- Custom Kitchen Cabinetry Cost Calculator
Need ideas? Check out our Kitchen Design Gallery or dive into our Bathroom Design Gallery for inspiration!
Need more information?
Take advantage of our FREE Complete Home Renovation Guide (48 pages), whether you’re already renovating or in the process of deciding to renovate, it’s not an easy process, this guide which includes a free 100+ point check list – will help you avoid costly mistakes.
Download Free Renovation Guide (PDF)
Still have questions unanswered?
Book a no-obligation consultation with the team at Superior Renovations,
we’d love to meet you to discuss your renovation ideas!
Or call us on 0800 199 888
Come Visit us at our showroom (16B Link drive, Wairau Valley, Auckland)
or we can come across East Auckland, West Auckland, Northshore, South Auckland, Whangaparoa, Orewa, Silverdale an Stanmore Bay.
Have you been putting off getting renovations done?
We have partnered with Q Mastercard ® to provide you an 18 Month Interest-Free Payment Option, you can enjoy your new home now and stress less.
Learn More about Interest-Free Payment Options*
*Lending criteria, fees, terms and conditions apply. Mastercard is a registered trademark and the circles design is a trademark of Mastercard International Incorporated.


 58")


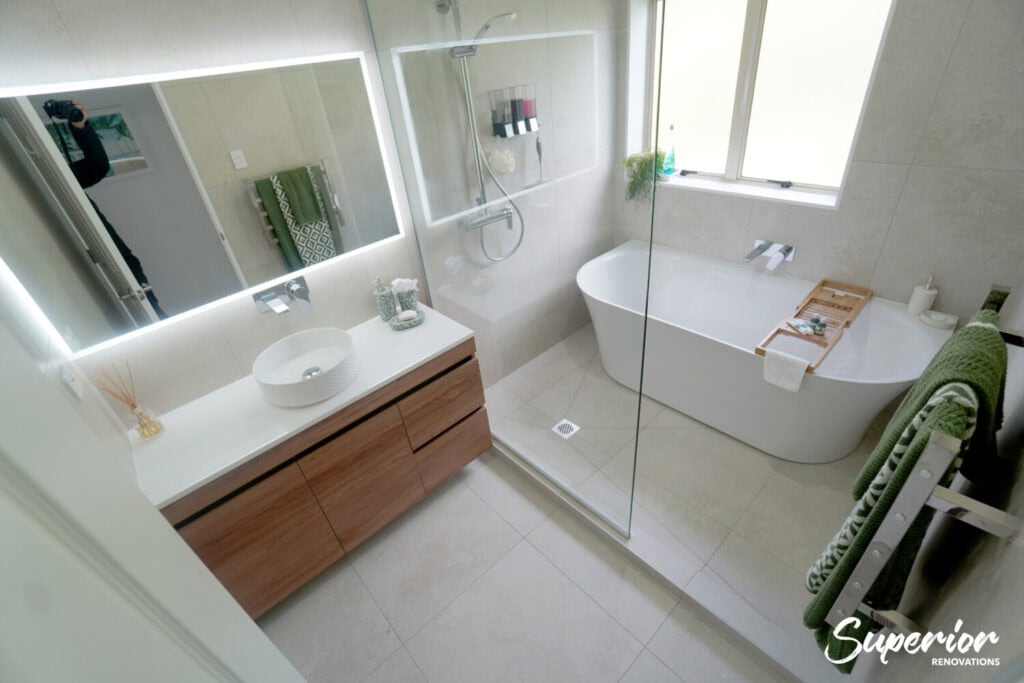


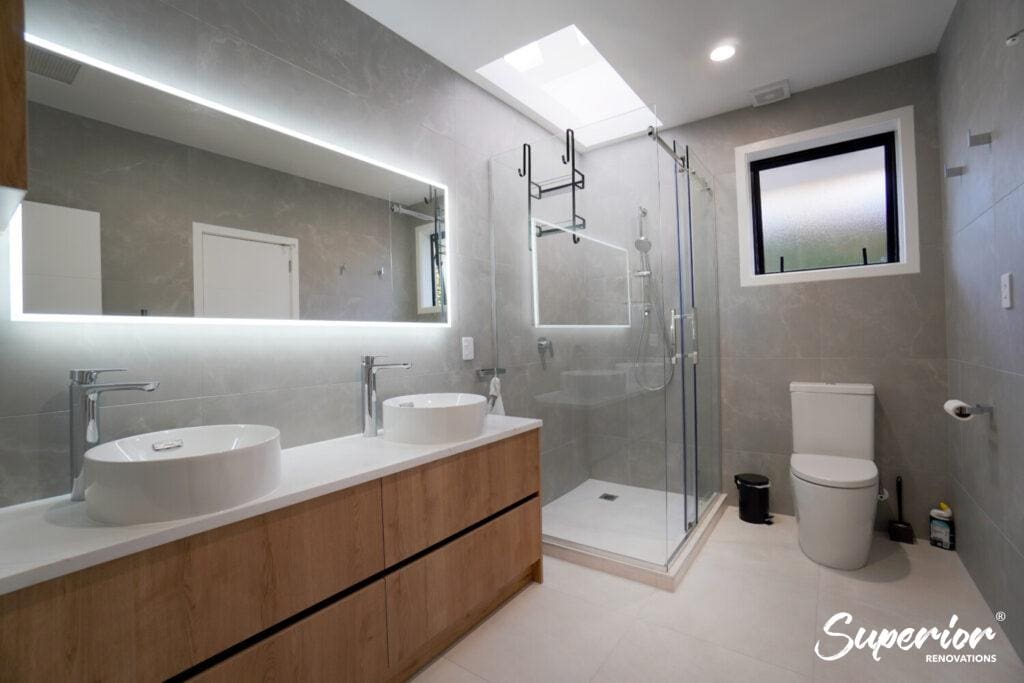
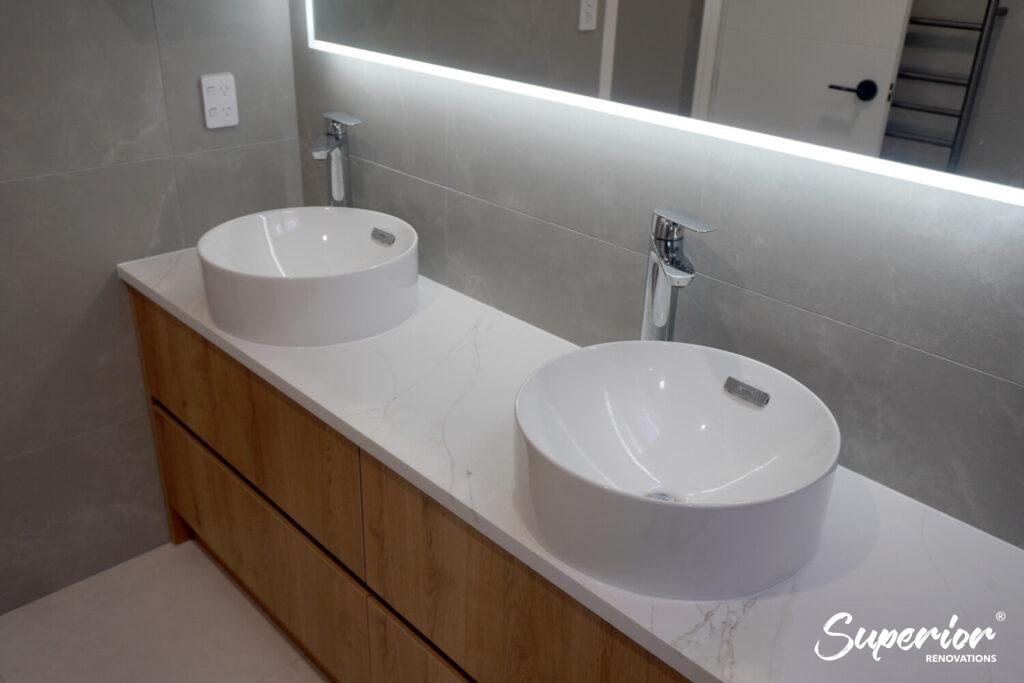
 - Superior Renovations 87")